I have 93' Sprite (carb HIF 38) that has part electronic ignition but nothing like a megajolt system. Im guessing it will fit my car easily enough, read the thread in FAQ, is it easy to bolt
on pulley with engine insitu? Is the trigger wheels one good?
The wiring looms they sell are they complete made up with connectors or does one still need to sort out wires etc into connectors?
I have on way a used edis4 and coil pack so really plan to buy it bit by bit as £325 all in is to much in one go!
Last of all is it worth it? mainly im looking for more reliability, and is it really easy to tune or change much via a laptop?

Megajolt
Started by
bunch1980
, Jan 07 2011 12:43 PM
14 replies to this topic
#1

bunch1980
-
- Members
-

- 1,192 posts
One Carb Or Two?
- Local Club: nein
Posted 07 January 2011 - 12:43 PM
#2
secondopsman
-

- Members
-
- 661 posts
Super Mini Mad
Posted 07 January 2011 - 01:41 PM
I got mine for my 16v conversion from trigger wheels,My only gripe was although they describe it as a wiring loom its just loads of various wires cut all the same length and coiled up(with loads to spare)all the connectors were seperate and i needed to buy a special crimping tool to do it,I thoght it was a little mis leading really.
Cant comment on reliabilty as mine isnt out on the road yet.
Pete
Cant comment on reliabilty as mine isnt out on the road yet.
Pete
#3
bunch1980
-
- Members
-
- 1,192 posts
One Carb Or Two?
- Local Club: nein
Posted 07 January 2011 - 03:37 PM
Thanks Pete I thought as much as that what loom was then they have deluxe version to so maybe thats done but I guess also it cant be cut to length with connectors on as might need
to be adjusted etc and the ecu is best off in side car to so connector put on after just need to know which each wire does to!
Crimp things on end of wire then push into block type connector i guess?
to be adjusted etc and the ecu is best off in side car to so connector put on after just need to know which each wire does to!
Crimp things on end of wire then push into block type connector i guess?
#4
Ethel
-

- TMF Team
-
- 26,027 posts
..is NOT a girl!
- Local Club: none
Posted 07 January 2011 - 03:54 PM
If you can find a scrapyard donor, pinch your wiring off that. You would still need to wire up the MJ itself - plenty of info on Autosportlabs site & you can download the software to have a look, even without an MJ.
Not sure how worthwhile MJ is if it's just to gain electronic ignition, but it's certainly one of the easiest ways to optimise ignition timing on a tuned one.
Not sure how worthwhile MJ is if it's just to gain electronic ignition, but it's certainly one of the easiest ways to optimise ignition timing on a tuned one.
#5
bunch1980
-
- Members
-
- 1,192 posts
One Carb Or Two?
- Local Club: nein
Posted 07 January 2011 - 04:05 PM
If you can find a scrapyard donor, pinch your wiring off that. You would still need to wire up the MJ itself - plenty of info on Autosportlabs site & you can download the software to have a look, even without an MJ.
Not sure how worthwhile MJ is if it's just to gain electronic ignition, but it's certainly one of the easiest ways to optimise ignition timing on a tuned one.
I see im buying edis4 and coil pack off grease monkey, so would need to find a scrappy and another edis and wiring i guess doh lol, I have seen Autosport will look more closely.
First off Its just got to be more reliable in weather, not that I have had any trouble with mine yet!! will be neater set up to with out dizzy etc and in the far far future i would like to super charge to
so be handy for that to i would imagine!
#6
Ethel
-
- TMF Team
-
- 26,027 posts
..is NOT a girl!
- Local Club: none
Posted 07 January 2011 - 04:53 PM
MJ, and the other programmable systems, are as good as you'll get and versatile enough to fit any 4 cylinder engine (excluding diesels, before anyone says it). An improvement on any engine, but maybe not the most cost effective on a standard one that's all.
I'm sure you can buy the EDIS connectors online, there's also a later version of EDIS (with a vacuum connection) that's no good for MJ, but the connector can be made to fit.
I'm sure you can buy the EDIS connectors online, there's also a later version of EDIS (with a vacuum connection) that's no good for MJ, but the connector can be made to fit.
#7
MrSporty
-

- Noobies
-
- 75 posts
Stage One Kit Fitted
Posted 07 January 2011 - 05:02 PM
I keep banging on about my 998 install no end to my mates but thats because ive only been running it a month or so and i guess the novelty hasn't worn off yet 
Mine was a mix and match of parts from various sources.
EDIS, Coil pack and VR sensor were second hand from ebay, luckily they had enough spare cable connected for the job.
MJ unit was a self build with all parts sourced from Farnell.
The VR bracket was scrap steel and ally and a hex bolt, hung off the engine mount.
The only real problem i ran into was that the crank pulley on my 998 was the standard thin style one. My trigger wheel was one i sourced off ebay and was a a ring rather than a plate type. I picked up a spare pulley to machine down to add the trigger wheel on an interference fit but it was the type with the harmonic damper and after assembly it fouled the engine mount. I just had to have at it with the angle grinder to take a small sliver out and then it was fine.
I sourced a map off the net which is apparently for a 998 stage 1
http://www.autosport...7c2f8c32c60b969
The 1000 RPM is about right for the idle on my motor so armed with my mates timing strobe (an essential part if your setting up on your own), i hooked the laptop up for the first time run and found that i was only a couple of degrees out which can easily be accounted for with the trigger offset option.
Ive been running in this cold damp snowy weather for the last month since installing and cannot sing the MJ's praises enough. It starts first turn every time, no cranking for ever more. Ive had sleet and snow spraying through the grille on the motorways which would normally cause the odd stutter but not any more. The best bit, it goes like a stabbed rat ! Nice even pull through each gear and it sounds and feels so much nicer than the old mechanical dizzy. The old coil and dizzy were as clean and well maintained as they could be but are not a patch on the MJ setup.
Go for it is all i can say. Even more so if you can do most of the building yourself because its a very cheap but very effective upgrade.
Ohh, and in answer to your question , i can't see a problem with sourcing your parts from trigger wheels. You'll probably pay a bit over the odds but at least you know its tested.
Mine was a mix and match of parts from various sources.
EDIS, Coil pack and VR sensor were second hand from ebay, luckily they had enough spare cable connected for the job.
MJ unit was a self build with all parts sourced from Farnell.
The VR bracket was scrap steel and ally and a hex bolt, hung off the engine mount.
The only real problem i ran into was that the crank pulley on my 998 was the standard thin style one. My trigger wheel was one i sourced off ebay and was a a ring rather than a plate type. I picked up a spare pulley to machine down to add the trigger wheel on an interference fit but it was the type with the harmonic damper and after assembly it fouled the engine mount. I just had to have at it with the angle grinder to take a small sliver out and then it was fine.
I sourced a map off the net which is apparently for a 998 stage 1
http://www.autosport...7c2f8c32c60b969
The 1000 RPM is about right for the idle on my motor so armed with my mates timing strobe (an essential part if your setting up on your own), i hooked the laptop up for the first time run and found that i was only a couple of degrees out which can easily be accounted for with the trigger offset option.
Ive been running in this cold damp snowy weather for the last month since installing and cannot sing the MJ's praises enough. It starts first turn every time, no cranking for ever more. Ive had sleet and snow spraying through the grille on the motorways which would normally cause the odd stutter but not any more. The best bit, it goes like a stabbed rat ! Nice even pull through each gear and it sounds and feels so much nicer than the old mechanical dizzy. The old coil and dizzy were as clean and well maintained as they could be but are not a patch on the MJ setup.
Go for it is all i can say. Even more so if you can do most of the building yourself because its a very cheap but very effective upgrade.
Ohh, and in answer to your question
, i can't see a problem with sourcing your parts from trigger wheels. You'll probably pay a bit over the odds but at least you know its tested.
Edited by MrSporty, 07 January 2011 - 05:09 PM.
#8
bunch1980
-
- Members
-
- 1,192 posts
One Carb Or Two?
- Local Club: nein
Posted 07 January 2011 - 06:22 PM
I keep banging on about my 998 install no end to my mates but thats because ive only been running it a month or so and i guess the novelty hasn't worn off yet
Mine was a mix and match of parts from various sources.
EDIS, Coil pack and VR sensor were second hand from ebay, luckily they had enough spare cable connected for the job.
MJ unit was a self build with all parts sourced from Farnell.
The VR bracket was scrap steel and ally and a hex bolt, hung off the engine mount.
The only real problem i ran into was that the crank pulley on my 998 was the standard thin style one. My trigger wheel was one i sourced off ebay and was a a ring rather than a plate type. I picked up a spare pulley to machine down to add the trigger wheel on an interference fit but it was the type with the harmonic damper and after assembly it fouled the engine mount. I just had to have at it with the angle grinder to take a small sliver out and then it was fine.
I sourced a map off the net which is apparently for a 998 stage 1
http://www.autosport...7c2f8c32c60b969
The 1000 RPM is about right for the idle on my motor so armed with my mates timing strobe (an essential part if your setting up on your own), i hooked the laptop up for the first time run and found that i was only a couple of degrees out which can easily be accounted for with the trigger offset option.
Ive been running in this cold damp snowy weather for the last month since installing and cannot sing the MJ's praises enough. It starts first turn every time, no cranking for ever more. Ive had sleet and snow spraying through the grille on the motorways which would normally cause the odd stutter but not any more. The best bit, it goes like a stabbed rat ! Nice even pull through each gear and it sounds and feels so much nicer than the old mechanical dizzy. The old coil and dizzy were as clean and well maintained as they could be but are not a patch on the MJ setup.
Go for it is all i can say. Even more so if you can do most of the building yourself because its a very cheap but very effective upgrade.
Ohh, and in answer to your question
Sounds like you done it diy style, wish I had knowledge to do that!
How did you assemble the mj yourself? did you have a circuit diagram to follow or something? as thats the most expensive bit at £130.
Sounds good, im un sure as to what pulley my 1275 sprite will have? hope its a simple bolt on job though!!
I will just be buying bits as i go really, yeah true!
#9
bunch1980
-
- Members
-
- 1,192 posts
One Carb Or Two?
- Local Club: nein
Posted 07 January 2011 - 06:24 PM
MJ, and the other programmable systems, are as good as you'll get and versatile enough to fit any 4 cylinder engine (excluding diesels, before anyone says it). An improvement on any engine, but maybe not the most cost effective on a standard one that's all.
I'm sure you can buy the EDIS connectors online, there's also a later version of EDIS (with a vacuum connection) that's no good for MJ, but the connector can be made to fit.
Cool, so best keep all old bits so can take off and put on another mini etc! what other cheaper options are there?
I see im not sure what i need or what connectors etc are called at all at mo need to do more reading!! though pretty sure i want use the MAP sensor from my vacum off carb that i hope i have to lol!!!
#10
MrSporty
-
- Noobies
-
- 75 posts
Stage One Kit Fitted
Posted 07 January 2011 - 07:51 PM
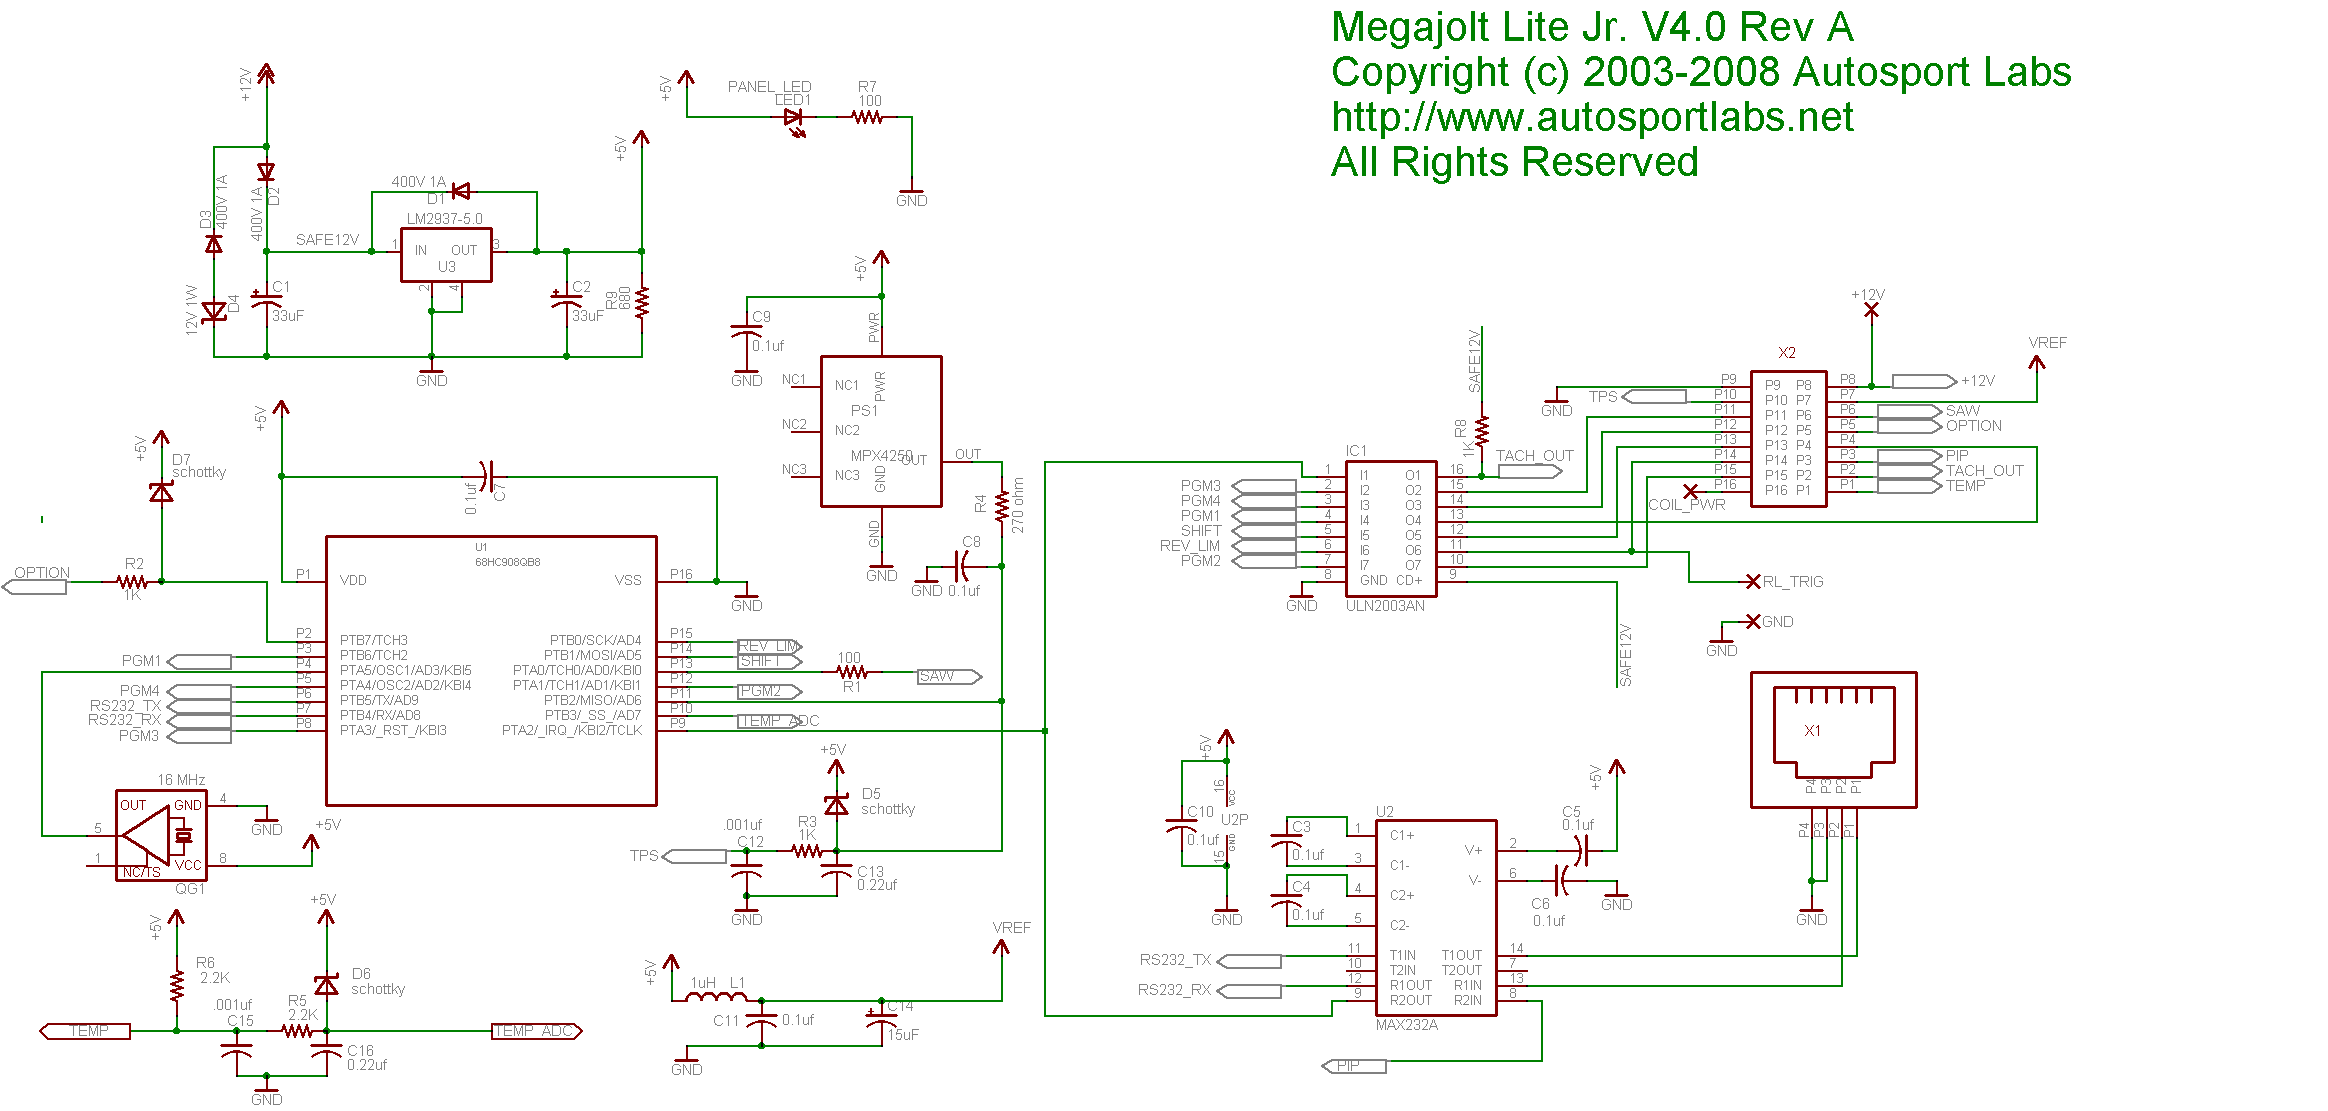
The schematic is here:
http://www.autosport...mjlj_v4_sch.png
I just used a bit of verostrip and messy but functional point to point wiring. If you want i can take a pic of the internals of my unit as long as you don't judge me on the build quality i wanted working not pretty. Because mine uses a MAP sensor i left off all the TPS components, i also skipped the shift light and tacho wiring because im not bothered about those either. I might wire in the mapping switch at a later date.
You can save yourself a packet though, even with the enclosure i don't think it cost more than about £30 in parts. Only hard part for most people is initially programming the microcontroller but i could do that if you ever decided to go the diy route.
One other thing i did do different is that my vacuum take off is tapped from a custom carb spacer rather than the existing take off on the carb. The reason i was told is that on the carb vac takeoff the throttle butterfly closes directly on the take off hole, so on closed throttle there is no vacuum and then a really sharp increase in pressure as you open it which then subsequently levels off.
Personally i think its a bit of a crock as the idle screw means the butterfly is never completely closed but hey ho..
http://www.autosport...mjlj_v4_sch.png
I just used a bit of verostrip and messy but functional point to point wiring. If you want i can take a pic of the internals of my unit as long as you don't judge me on the build quality
i wanted working not pretty. Because mine uses a MAP sensor i left off all the TPS components, i also skipped the shift light and tacho wiring because im not bothered about those either. I might wire in the mapping switch at a later date.You can save yourself a packet though, even with the enclosure i don't think it cost more than about £30 in parts. Only hard part for most people is initially programming the microcontroller but i could do that if you ever decided to go the diy route.
One other thing i did do different is that my vacuum take off is tapped from a custom carb spacer rather than the existing take off on the carb. The reason i was told is that on the carb vac takeoff the throttle butterfly closes directly on the take off hole, so on closed throttle there is no vacuum and then a really sharp increase in pressure as you open it which then subsequently levels off.
Personally i think its a bit of a crock as the idle screw means the butterfly is never completely closed but hey ho..
#11
bunch1980
-
- Members
-
- 1,192 posts
One Carb Or Two?
- Local Club: nein
Posted 08 January 2011 - 06:55 PM
The schematic is here:
http://www.autosport...mjlj_v4_sch.png
I just used a bit of verostrip and messy but functional point to point wiring. If you want i can take a pic of the internals of my unit as long as you don't judge me on the build quality
You can save yourself a packet though, even with the enclosure i don't think it cost more than about £30 in parts. Only hard part for most people is initially programming the microcontroller but i could do that if you ever decided to go the diy route.
One other thing i did do different is that my vacuum take off is tapped from a custom carb spacer rather than the existing take off on the carb. The reason i was told is that on the carb vac takeoff the throttle butterfly closes directly on the take off hole, so on closed throttle there is no vacuum and then a really sharp increase in pressure as you open it which then subsequently levels off.
Personally i think its a bit of a crock as the idle screw means the butterfly is never completely closed but hey ho..
Sounds good will pm you for more info.
#12
bunch1980
-
- Members
-
- 1,192 posts
One Carb Or Two?
- Local Club: nein
Posted 08 January 2011 - 06:56 PM
You shouldn't use the standard vac take off on the carb, because it gets blocked or on some carbs it's on the wrong side of by the throttle disc at idle.
Drill and tap your manifold it's the best way.
Similar to what Mrsporty said above i guess!!
#13
Turbo Phil
-

- TMF+ Member
-
- 2,426 posts
Up Into Fourth
- Location: Cumbria
- Local Club: Cumbria Classic Mini Club
Posted 08 January 2011 - 07:58 PM
If you're planning on supercharging in the future then it's well worth fitting. There's a few pics of how I fitted mine here: CLICKY
I managed to do mine for less than £100 by getting all the Ford bits from the scrappy, buying a second hand Megajolt & making my own trigger wheel and sensor bracket setup.
I managed to do mine for less than £100 by getting all the Ford bits from the scrappy, buying a second hand Megajolt & making my own trigger wheel and sensor bracket setup.
#14
bunch1980
-
- Members
-
- 1,192 posts
One Carb Or Two?
- Local Club: nein
Posted 08 January 2011 - 08:49 PM
If you're planning on supercharging in the future then it's well worth fitting. There's a few pics of how I fitted mine here: CLICKY
I managed to do mine for less than £100 by getting all the Ford bits from the scrappy, buying a second hand Megajolt & making my own trigger wheel and sensor bracket setup.
Thanks for info Phil will take a look at your page.
Thats what im hoping for to do it as cheap as possible really lol, no need for brand new bits so much on a 17yr old car either in some ways!
#15
MrSporty
-
- Noobies
-
- 75 posts
Stage One Kit Fitted
Posted 09 January 2011 - 04:13 PM
Heres the bracket i made, just a couple of bits of scrap plate. I measured and drilled the two holes to use the engine mount bolts but then found the sensor was out of line. Easily fixed by opening the top hole into a slot (not sure why i didn't do that to begin with)

Inline with the trigger wheel, you can see the little bit of steel i took out of the engine mount to ease getting the modified pulley on.

Carb spacer with barbed vac take off. Was donated by a good friend so im not too sure where you can get them from. It would be easy to fabricate though.

The case. I ordered the wrong one so its wide rather than tall, makes no difference though.

I used a standard 9 pin serial port instead of the crazy telephone jack that the autosports labs guys used. I can never understand why people use cables that have to be custom crimped when an industry standard serial cable works just fine.

Inside the case, i didn't have enough wide verostrip at the time so i just tacked two pieces together.

Backside, just the usual cuts and an extra jumper wire that i forgot.

This was how i got around the fact that the miniature connector pins dont line up with the verostrip .. just bend with needle nose pliars.

Another artsy shot of the worst point to point wiring in the world. You can see the MAP sensor a bit easier here, tie wrapped to stop it wobbling about.

I know that its not the prettiest of all builds but its just an example to show that it isn't too hard to knock together with a bit of patience. I do have the tools and abilities to etch and solder my own boards as well as surface mount work but for this quick knock up, the point to point was by far the quickest way to get this up and running.
Edited by MrSporty, 09 January 2011 - 04:16 PM.


1 user(s) are reading this topic
0 members, 1 guests, 0 anonymous users


