Jump to content


Photo
- - - - -

Wiring up digital dials?


  • Please log in to reply
34 replies to this topic

#1 minimanshane

minimanshane

    Mini Mad

  • Members
  • PipPipPipPip
  • 272 posts

Posted 26 December 2005 - 09:17 PM

Hey
Rite i decided to start a new thread on the clocks.
Im totally new to wiring up lol so need help with the whole processe
Need help wiring these bad boys in.
Posted Image
"Dont Panic" I hope you dont mind me copyiing your post.
Here goes
Copy below table and add what i need to do
Volt meter - ?
Oil Pressure - ?
Water Temp - ?
RPM - ?
Fuel -? (mini sender is about 10-270 ohms,While the gauges are 0-90mm)
Speedo -?? (requires a Pulse generator - I don't know anything about this suggestions?)

Ohh and heres what is in the box
Posted Image
Any more help needed just ask
:wub:

#2 minimanshane

minimanshane

    Mini Mad

  • Members
  • PipPipPipPip
  • 272 posts

Posted 27 December 2005 - 12:31 AM

hmm which one of these should be used as a pulse generator
http://cgi.ebay.com/...itemZ4583316070

or

http://cgi.ebay.com/...itemZ4583316080

#3 Turbo Nick

Turbo Nick

    Up Into Fourth

  • Members
  • PipPipPipPipPipPipPipPipPip
  • 2,913 posts
  • Local Club: Turbominis.co.uk

Posted 27 December 2005 - 02:34 AM

Volt meter - think it just needs a +ve and an earth

Oil Pressure - that big gold round thing in the box looks similar to my oil presssure sender, you'll need an adaptor/T piece to screw it into the block where the oil pressure switch is, then run a wire from the sender to the gauge.

Water Temp - ? should be a sender for it unless you can use the mini but i doubt it.

RPM - usually needs a feed from the -ve side of the coil

Fuel -? (mini sender is about 10-270 ohms,While the gauges are 0-90mm)
Speedo -?? (requires a Pulse generator - I don't know anything about this suggestions?)

All the gauges will need a fused 12V supply, an earth and a feed from the illumination circuit aswell.

#4 dklawson

dklawson

    Moved Into The Garage

  • TMF+ Member
  • PipPipPipPipPipPipPipPipPipPipPip
  • 10,923 posts
  • Name: Doug
  • Location: Durham, NC - USA
  • Local Club: none

Posted 27 December 2005 - 01:21 PM

Bud666 has given most the answers.

I'd add that the voltmeter should be a 'switched' +12V and ground. You don't want it on all the time.

Water temp will certainly need the sender supplied with the gauge, not the Mini one.

Fuel: Did you mean to say that the new gauge needs 0-90 Ohms? Obviously the diameter in mm doesn't have anything to do with it. If you meant 0-90 Ohms, you only have one obscure choice. Look for a pre-1964 Mini fuel tank WITH working sending unit. Those cars didn't use the voltage stabilizer for the gauges and had a resistance from 0-90 Ohms. Consider this an exercise in futility.

That second pulse generator posted by Minimanshane is the sort you'll need. However, you've got a bit of a problem. The Mini (and most other LBCs) have speedo cable attachments on the gearbox that are threaded M19x1. The second link above is for a GM unit which will be threaded 5/8-18. I've made adapters. In Europe you ought to have better luck finding the correct type. Look to old Jaguars with electronic dashes. Their senders should be OK for your use.

ALTERNATIVELY... you can buy an industrial, inductive proximity switch (with cable) and use it to sense something rotating in the drivetrain. I've done this before (not on Minis) with good results. If you don't find the sender you're looking for... email me and I'll discuss this in detail with you.

#5 minimanshane

minimanshane

    Mini Mad

  • Members
  • PipPipPipPip
  • 272 posts

Posted 27 December 2005 - 03:28 PM

So im gonna need a pre 64 fuel tank!!
also ive been tol don a diffrent forum demon tewaks supplies pulse generators.
Also do you have any of the adaptors??

#6 dklawson

dklawson

    Moved Into The Garage

  • TMF+ Member
  • PipPipPipPipPipPipPipPipPipPipPip
  • 10,923 posts
  • Name: Doug
  • Location: Durham, NC - USA
  • Local Club: none

Posted 27 December 2005 - 06:20 PM

I have a couple of the adapters for the 5/8" threads. I made these in my garage from bits of brass plumbing and square key stock. I'll be happy to post pictures and share information on how to make them. However, I won't be much use to you with the actual parts as we're an ocean apart. If Demon Tweeks has the parts I'd go that route.

Start with:
http://www.caigauge....Kdistribute.htm
This company (Caerbont) is what's left of Smiths & Sons (gauges... not clocks). They can help you find a sending unit. I've corresponded with their technical department before and they can be quite helpful. (Demon Tweeks has a link at the site I listed above).

I'm giving more thought to your fuel sending unit. Can you confirm what direction your new digital fuel gauge needs the resistance to move... 90 ohms empty... or 90 ohms full?

#7 minimanshane

minimanshane

    Mini Mad

  • Members
  • PipPipPipPip
  • 272 posts

Posted 27 December 2005 - 06:49 PM

Sorry as is say i am totaly new to this and dont have a clue what 90 ohm means never mine empty or full.
Have u msn perhaps we could chat there??

#8 dklawson

dklawson

    Moved Into The Garage

  • TMF+ Member
  • PipPipPipPipPipPipPipPipPipPipPip
  • 10,923 posts
  • Name: Doug
  • Location: Durham, NC - USA
  • Local Club: none

Posted 27 December 2005 - 06:59 PM

OK... I've given your fuel gauge issue more thought.

IF your gauge needs 90 ohms when empty ( 0 ohms when full), I may have a solution for you and it's easy enough to try.

Go to whoever your local source for electronic components is and buy enough resistors (1/2 Watt) that you can solder them in series to get 135 ohms. Get as close to that value as you reasonably can. Connect the 135 ohm load across the two terminals on the Mini sending unit (parallel to the resistance wires in the sender). (I'll bore you with math below explaining why). Test your new gauge by connecting it to the two terminals on the Mini sending unit and connecting it to a power supply (like that battery on the other side of the boot). Use a coat hanger through the tank's filler neck to lift and lower the float through its range. You should see the gauge display near empty when you push the float down and near full when you pull it all the way up. The Mini sending unit isn't exactly "linear" in response so you shouldn't expect linear readings from your new gauge when using the old sending unit.

OK, time for the math. When you hook resistors in series you add their values. Above I told you to solder resistors in series until you got 135 ohms. If there are such resistors... you could solder a 100 ohm and 35 ohm together in series and get 135... simple addition. When you wire resistors in parallel the math is much more complicated and you have to calculate the inverse reciprocal. Rtotal = (1/(1/R1 + 1/R2)). In the case of your NEED for 90 ohms, we need to say, 90 ohms = (1 / (1/270 + 1/R)) and solve for "R" (270 ohms is the EMPTY value of a stock Mini sending unit). When you do the math, the magic number is 135 ohms. If you plug in Rtotal = (1 / (1/270 + 1/135)) you get 90 ohms which is what you want for EMPTY. Now calculate the other extreme... let 270 ohms go towards ZERO (0) like when the tank is full (don't use zero as you can't divide by zero... use one (1) ohm. Rtotal = (1 / ( 1/1 + 1/135)) = about 1 ohm... which should let your gauge read very close to full.

This parallel resistor will ONLY work if your new gauge reads FULL when the sender resistance is close to zero ohms. This won't work if the new gauge needs 90 ohms to read full. If your new gauge needs 90 ohms to be full... find that pre-1964 fuel tank as it's your best solution.

#9 dklawson

dklawson

    Moved Into The Garage

  • TMF+ Member
  • PipPipPipPipPipPipPipPipPipPipPip
  • 10,923 posts
  • Name: Doug
  • Location: Durham, NC - USA
  • Local Club: none

Posted 27 December 2005 - 07:01 PM

Sorry... I was writing my last post while you were typing.

No Chat for me. You can email me at: dklawson-at-mindspring-dot-com
I can go into more detail offline and perhaps shoot some pictures for you that may clarify things.

#10 minimanshane

minimanshane

    Mini Mad

  • Members
  • PipPipPipPip
  • 272 posts

Posted 27 December 2005 - 07:13 PM

Right im sending my dials and other bits of to get a custom dash mad up soon.
So I have some time to get this sorted firstly i will sort the easier gauges.

Volt meter - think it just needs a +ve(were is this needed wired to lol) and an earth (were is thebest place to get earth)

Water Temp - ? were am i to wire the sender up at

RPM - usually needs a feed from the -ve side of the coil ( any pics) ive been told there willbe a bullet feed thingy behind my dials.

Oil pressure-need an adaptor/T piece to screw it into the block where the oil pressure switch is, then run a wire from the sender to the gauge. ( anyone care to explain anymore) also were to get adaptor/t piece

#11 dklawson

dklawson

    Moved Into The Garage

  • TMF+ Member
  • PipPipPipPipPipPipPipPipPipPipPip
  • 10,923 posts
  • Name: Doug
  • Location: Durham, NC - USA
  • Local Club: none

Posted 27 December 2005 - 08:40 PM

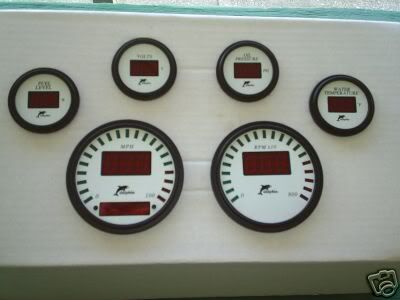
I put together something to help you with the fuel gauge. Please download this and contact me with your questions:
http://home.mindspri...Instruments.pdf

Regarding the 'T' piece, I believe Mini Spares sells them. Your new gauge is electric and will require a new wire be pulled through the firewall (assuming you aren't currently running an electric oil pressure gauge).

The tach connection on coil (-) will be the coil terminal with the wire going to the distributor. Later cars may well have had a wire already run behind the dash for a tach, early cars did not. Look for a white wire with a black tracer. This is the "normal" color code for a tach wire connection.

The volt-meter wire connection is up to you. Your web site implied that you have installed stereo equipment in your car. You should be able to use any of the switched power connection points you used for the stereo. You don't want the (typically yellow wire) connections used to maintain memory presets... you want a switched connection.

Earth connections will be any clean, bare metal point on the car chassis. As before, your stereo will have several black wires routed to chassis ground and you should be able to tap into any of those connections. All your new gauges will need earth and switched power connections.

Temp gauge. Where are you to wire it up? If you're not using the stock sending unit and its gauge, you should be able to use the wire that's already in the harness. Replace the stock sending unit with your new one, connect the stock wire to it. Behind the dash, find the other end of this wire and connect it to the input for your new digital gauge.

#12 Don't Panic

Don't Panic

    Super Mini Mad

  • Members
  • PipPipPipPipPipPip
  • 642 posts

Posted 27 December 2005 - 09:41 PM

Sounds like you've allot of work to do with those clocks, but 'Don't Panic' (excuse the pun) they will look quality when your done.

There is other things to consider, the new clocks don't have indicator/full-beam/ignition/oil pressure warning lights. Now before you panic this shouldn't be a problem, This is what i would do: (doesn't mean its right :wub: )

When you have your dash made, make some small holes where you can put in bulbs and cover over the top with coloured plastic (you might be able to use bits from your old clocks) then its a case of finding bulb holders to fit and soldering the correct wires from the original wiring harness so that when you switch your full beams on or indicate the appropriate bulb lights up. This will be nessesary for indicators and full beam, as for the warning lights i'm not so sure you will miss them but i would recommend wiring them up also.

Also when i emailed the guy you got these from he told me that the fuel sender was 0 - 90ohms but that a sender was included, you might be able to fit the sender in your fuel tank. Or certainly the idea with the resistors would work but i would recommend you find out the exact resistance that would be required and have an electriction make a box to do it (kinda like a transformer: goes in @ 10 - 270 ohms, comes out at 0 - 90ohms)

MiniSpares does sell the T-peice and its not expensive.

Keep us informed of how you get on

#13 minimanshane

minimanshane

    Mini Mad

  • Members
  • PipPipPipPip
  • 272 posts

Posted 27 December 2005 - 09:50 PM

What do you call the t piece?

#14 Don't Panic

Don't Panic

    Super Mini Mad

  • Members
  • PipPipPipPipPipPip
  • 642 posts

Posted 27 December 2005 - 09:56 PM

clickyI think this is what your looking for

Edit:

or maybe this Clicky

#15 minimanshane

minimanshane

    Mini Mad

  • Members
  • PipPipPipPip
  • 272 posts

Posted 27 December 2005 - 10:03 PM

:wub: which one lol


1 user(s) are reading this topic

0 members, 1 guests, 0 anonymous users