Jump to content


Photo

Doorstep Replacement.


  • Please log in to reply
3 replies to this topic

#1 mini-myles

mini-myles

    On The Road

  • TMF+ Member
  • PipPip
  • 35 posts

Posted 12 March 2011 - 08:30 PM

So I finally decided to crack on with the bodywork on the city. Starting off with the doorstep panel. The old one had already had a couple of repairs and they were not too good to say the least.Attached File  Photo437.jpg   2.24MB   
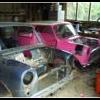
7 downloads After cutting the panel out the bodged repair is more evident. Attached File  Photo438.jpg   2.27MB   5 downloads
I could now use a bit of advice for re-fitting the panel. I have a full doorstep panel from mini-spares that follows through to the rear quarter with the intention of going right through and repairing the back corner rot all in one. However when removing the old step I found the curves to be pretty good with no rot at all.
Question is do i 1. Chop the panel up and use the straight section for the step and just use the rear part of the quarter or
2. Use the whole panel and go straight through?

Secondly is it best to drill and plug weld the step on like original spot welds or seam it up?

Thanks in advance. Mark.

Attached Files


#2 sonikk4

sonikk4

    Twisted Paint Polisher!!!

  • Admin
  • PipPipPipPipPipPipPipPipPipPipPip
  • 16,080 posts
  • Name: Neil
  • Location: Oxfordshire

Posted 12 March 2011 - 09:00 PM

Have you tried to offer the replacement step up yet as in my experience the ones i have had have been rubbish. I ended up making my own.
However if you are going the full length to the back of the rear quarter then change it as one piece, at least that way you will have got rid of any hidden rust.

For me plug welding would be best option. For the rear quarter panel section plug weld where it joins to the sill flange and then where it joins to the rear quarter butt weld the two edges. Tack weld it in place then pulse weld along the full length but no more than an inch at a time. It would pay you to have a damp rag to hand to cool the weld straight away to lessen any distortion as you will get some. Then once you have done that grind back flush, skim with filler job done.

Another option would be to joggle the quarter panel section if you do not want to butt weld but still use the same welding process.

Edited by sonikk4, 12 March 2011 - 09:02 PM.


#3 mini-myles

mini-myles

    On The Road

  • TMF+ Member
  • PipPip
  • 35 posts

Posted 12 March 2011 - 09:17 PM

Yeah offered it up lengths are good and the curves seem nice but the folds are not as sharp as i'd like. Saw the trouble you had on erm.
The curves on the car are very good condition but i'm worried that if i try to mix and match the old and new panels I won't get a decent fit.

#4 sonikk4

sonikk4

    Twisted Paint Polisher!!!

  • Admin
  • PipPipPipPipPipPipPipPipPipPipPip
  • 16,080 posts
  • Name: Neil
  • Location: Oxfordshire

Posted 12 March 2011 - 09:20 PM

Put the door on and then offer up the panel to see how the fit is around the curved section. If its ok then change the whole thing if not section out what you need.


1 user(s) are reading this topic

0 members, 1 guests, 0 anonymous users