A guide would be perfect or advice.
Cheers


On The Road

Posted 17 May 2011 - 02:11 PM
Original Spamster

Posted 17 May 2011 - 04:21 PM
Speeding Along Now
Posted 17 May 2011 - 04:24 PM
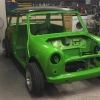
Hey guys its pretty much as the title says Ive got a 86 mayfair and I love the look of a deseamed mini I just woundered how hard it is to do or how much it costs, being a student means funds are quite tight at the moment.
A guide would be perfect or advice.
Cheers
Speeding Along Now

Posted 17 May 2011 - 04:46 PM
Mini Mad

Posted 17 May 2011 - 04:48 PM
Mine is purple, but I have been told that's normal

Posted 17 May 2011 - 04:52 PM
Super Mini Mad

Posted 17 May 2011 - 06:18 PM
Mini Mad
Posted 18 May 2011 - 09:50 PM
One Carb Or Two?

Posted 18 May 2011 - 09:55 PM

Edited by 1995 MK2 IOM, 18 May 2011 - 09:59 PM.
Up Into Fourth

Posted 18 May 2011 - 10:03 PM
One Carb Or Two?

Posted 19 May 2011 - 05:22 PM


0 members, 1 guests, 0 anonymous users


