Tidy work as ever. Comming along a treat. Are the holes and captive nuts for reversing and spot lights?? Are you going to waxoil in the closing plates at all??
Graham


Major Tlc For Verity The Sport 5
Started by
v21ash
, May 31 2011 09:56 PM
83 replies to this topic
#61

grahama
-

- Members
-

- 2,442 posts
Up Into Fourth
- Location: Warrington
- Local Club: None in my area !!
Posted 15 June 2011 - 06:28 PM
#62
mk1leg
-

- Members
-
- 9,343 posts
Crazy About Mini's
- Location: Jersey
- Local Club: Mini Club Jersey, MCR
Posted 15 June 2011 - 08:33 PM
What a great job well done and keep pics comming............... 
#63
v21ash
-
- Members
-
- 421 posts
Speeding Along Now
- Local Club: HumbersideMiniClub.co.uk
Posted 15 June 2011 - 10:30 PM
This is a quality restoration. It wouldn't matter how hard I tried I couldn't work to your standard. Thanks for the fantastic information.
Hugh
What a great job well done and keep pics comming...............
Thanks for the comments
Tidy work as ever. Comming along a treat. Are the holes and captive nuts for reversing and spot lights?? Are you going to waxoil in the closing plates at all??
Graham
Yes the nuts are for the fog light bracket, i didn't need to put them on the left side as they are for LHD cars but you never know if you'll ever need them. Yep i'll be blowing some more etch primer into the voids and once the car is painted i'll be waxoiling every nook and cranny, i've sealed all the way round where the closing panel meets the floor to try and stop moisture getting between them as the old boot floor had started to lift where rust had built up between them.
Not much to update on really, not had much spare time this week. I decided to drag my wheels out of the shed to give them a clean, after having a good look at them i found that the numpty who balanced them had put clip on weights on instead of putting on the proper stick on weights, so all four wheels have oxidized under the weights
 other than that the wheels only wanted a wash and polish so i’m not too happy and have now got to decide whether to respray just the back of the wheels or send them to be powder coated. Also i’ve found all for tyres have started to crack, two of them are worse than the other two and would almost definitely fail an MOT, and they have all got around 7mm of tread on them aswell! (i’ll get pictures up when i get round to cleaning the wheels up)
On a lighter note though i have managed to save my John Cooper wheel centres which were looking a bit rough, you can’t buy them anymore and i’ve seen a few sets go on eBay for stupid money.
Started out by removing the paint, a couple of them were missing quite a bit anyway, then repainted them and give them a polish when they were dry. They have come up better than i expected as i was half expecting them to be badly pitted but after they was polished there’s no pitting at all.

I’ve got a load more tedious jobs like this to do but don’t want to leave them till the shell has been painted as i will just want to be able to bolt everything straight on.


I think Josey was trying to tell me she didn’t like the smell of the paint.


And back to the bodywork, i got the subframe mount brackets plug welded and just need to dress the welds back, i’ve almost finished dressing the weld along the join in the floor too.
I would of liked to of fitted the rear subframe while i was fitting the new boot floor to check alignment but i cut the original one up after buying what looked to be a really good condition one off eBay, only to find when i got it home that the idiot who sold it to me had snapped the bolts on the radius arm bracket which in itself wouldn’t of been a problem until he decided to drill them out, he had completely missed the bolts and gone in at almost a 45º angle, then he tapped them out a put some old bolts in to hide the abortion he’d made of it!

As soon as i get a replacement i’ll fit it to check the alignment, although by fitting the full floor there’s not much room for any movement so can’t see there being any problems.


And i’ve got the rear valance spot welded, i just need to spot weld along the bumper lip and that’s all the welding done.


Welding the bumper lip has been delayed as i didn’t want to do it until i’d fitted the boot lid and bumper to check alignment, but when i went to fit the hinges i couldn’t find the studs or nuts for them, god knows where they are! So i had to have another trip to Mini Spares to get some more.
Before i weld it i just need to pull the top edge of the hinge panel in a bit as there was about a 5mm over hang from the bottom edge of the boot lid, after the boot floor was jigged (when someone drove into the back of me) i was never really happy with the middle of the hinge panel as it seemed to lean in a lot compared to the rest of it. Now that the bumper lip is back where it should be it appears the hinge panel was infact still bent.
I put a ratchet strap hook over so i wasn’t pulling on the weakest point then tied some rope to the seat back and give it a twist to pull it in, i run along it pulling it a bit at a time which seems to be doing the trick. It’s a bit hard to tell from the pictures but there’s only about a 1mm overhang now and the hinge panel looks a lot straighter, it would probably be ok as it is but i’m going to run down it a couple more times to see if i can get it flush.


#64
MigliaMayhem
-

- Noobies
-
- 132 posts
Mini Mad
- Local Club: North East Mini Club
Posted 15 June 2011 - 11:44 PM
I 100% respect the effort your putting into your car, fantastic job and by christ what an improvement over Longbridges effort, if they had a similar commitment then the Germans may not be running the show now.
Just echoes home how thin the factory paint was on the MPI's.
I would love to direct people to this thread when listing mine in the classifieds to show people what can be expected in alot of these late cars and basically highlight where to look when buying one as yours has seriously suffered the common MPI rot spots.
If you don't mind me asking, what kind of condition is your daily MPI in, have you had to do a similar job on that or has it weathered well.
Your car will stand testiment to your commitment when finished. Nice one.
#65
liam_italian
-

- Members
-
- 1,417 posts
One Carb Or Two?
- Local Club: TMF
Posted 16 June 2011 - 07:55 AM
I 100% respect the effort your putting into your car, fantastic job and by christ what an improvement over Longbridges effort, if they had a similar commitment then the Germans may not be running the show now.
Just echoes home how thin the factory paint was on the MPI's.
I would love to direct people to this thread when listing mine in the classifieds to show people what can be expected in alot of these late cars and basically highlight where to look when buying one as yours has seriously suffered the common MPI rot spots.
If you don't mind me asking, what kind of condition is your daily MPI in, have you had to do a similar job on that or has it weathered well.
Your car will stand testiment to your commitment when finished. Nice one.
The paint is wafer thin on MPI's, which I discovered this week when rubbing down my car for a respray. Also highlighted just how poor the build quality was when they were producing the MPI's. Sound deadening on the rear seat is way out of alignment has been folded back on itself, apeture for the sunroof was cut on a Friday afternoon with an axe by the looks of things aswell.
#66
leaky
-

- TMF+ Member
-
- 6,890 posts
Iv never hit a penguin in the face with a casserole
- Location: Costa Del Tadley
- Local Club: Basingstoke Mini Club
Posted 17 June 2011 - 04:19 PM
Wow I'v just been through the whole thread. Top marks for all work you've done. Really taking shape now. I'm looking forward to seeing this finished.
#67
jonathanplace
-

- Noobies
-
- 30 posts
Passed Test
- Local Club: West Cumbria Motorsport Club
Posted 18 June 2011 - 09:06 PM
As many others have said, really admire the work going into this project. Those centre caps have come up brilliant, look brand new. Will keep an eye on your updates.
#68
v21ash
-
- Members
-
- 421 posts
Speeding Along Now
- Local Club: HumbersideMiniClub.co.uk
Posted 18 June 2011 - 11:02 PM
I 100% respect the effort your putting into your car, fantastic job and by christ what an improvement over Longbridges effort, if they had a similar commitment then the Germans may not be running the show now.
Just echoes home how thin the factory paint was on the MPI's.
I would love to direct people to this thread when listing mine in the classifieds to show people what can be expected in alot of these late cars and basically highlight where to look when buying one as yours has seriously suffered the common MPI rot spots.
If you don't mind me asking, what kind of condition is your daily MPI in, have you had to do a similar job on that or has it weathered well.
Your car will stand testiment to your commitment when finished. Nice one.
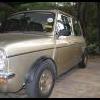
Unfortunately i p/x'd the green one in the first couple of pictures a few years ago, biggest mistake i ever made
although she has found her way back to our village and someone i went to school with has bought her (small world) and she is looking well, needs a bit of tidying up but nothing major. I've had a few more Mpi's since then and they have all had the usual Mpi rust spots (scuttle etc) but never dared dig to deep to find out how far they'd gone. I've got a Bini Cooper S at the minute for shows/runs etc but seriously considering getting rid for yet another Mpi (but a mint one) Wow I'v just been through the whole thread. Top marks for all work you've done. Really taking shape now. I'm looking forward to seeing this finished.
As many others have said, really admire the work going into this project. Those centre caps have come up brilliant, look brand new. Will keep an eye on your updates.
Thank you, i feel like i'm getting somewhere now and i really can't wait to see her with a new coat of paint
I'm really pleased with how the wheel centre's have turned out, was expecting to find a load of pitting but there's none at all
#69
mini.rich
-
- Members
-
- 619 posts
Super Mini Mad
- Location: Lincs
Posted 19 June 2011 - 03:43 PM
Nice to see(or not) another MPi with a lot of rust  lol. Mine was in quite a similar state
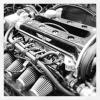
  Your work looks quality and the engine looks very tidy I'm going to kep an eye on this
lol. Mine was in quite a similar state Your work looks quality and the engine looks very tidy I'm going to kep an eye on this
#70
gronkjor
-

- Members
-
- 250 posts
Mini Mad
- Location: The Kingdom of Denmark
- Local Club: TMF
Posted 19 June 2011 - 04:09 PM
Fantastic job you have done. Sport 5´s and MPI in general are lovely! Just a shame they rust so much
I have an MPI Cooper from 1998. Which regarding the bodywork still is in good condition after nearly two years of daily drive. "only" have two small rust spots - one on the door and one on the scuttle.
I gave mine lots of waxoil when i bought it, and it seems like it was a great investment to do that since the sills, a panels and the general parts underneath the Mini is in perfect condition Shame why they didn't do that at Longbridge..
I have an MPI Cooper from 1998. Which regarding the bodywork still is in good condition after nearly two years of daily drive. "only" have two small rust spots - one on the door and one on the scuttle.
I gave mine lots of waxoil when i bought it, and it seems like it was a great investment to do that since the sills, a panels and the general parts underneath the Mini is in perfect condition
Shame why they didn't do that at Longbridge..
Edited by gronkjor, 19 June 2011 - 04:10 PM.
#71
shough
-
- Members
-
- 196 posts
Mini Mad
- Location: Surrey
- Local Club: N/A
Posted 07 September 2011 - 09:39 PM
Any update on this amazing Sport 5?
Just reread the topic again awesome work!
I really want to see the end product!!!
Just reread the topic again awesome work!
I really want to see the end product!!!
#72
MaxAndPaddy
-

- TMF+ Member
-
- 4,700 posts
Spamela Anderson
- Name: Elvis
- Location: North Yorkshire
- Local Club: TMF
Posted 07 September 2011 - 09:46 PM
Ive just read it too....amazing job, one of my favourate rover mini's (nearlyyy bought one instead of Max) cant wait to see her finnished!
#73
L. Brown
-

- Noobies
-
- 22 posts
Learner Driver
Posted 07 September 2011 - 09:52 PM
excellent build!!
what kind of spot welder are you using? thanks
what kind of spot welder are you using? thanks
#74
Black.Ghost
-

- TMF+ Member
-
- 2,567 posts
Formerly known as TneMini.
- Location: Bedfordshire
Posted 13 September 2011 - 12:52 PM
Last update 19 June?! You need to update this, its really good work and I really want to see it finished.
I wish I had been old enough and able to afford a brand new Mini back in the 90s. Would have been brilliant to be the only registered owner of one.
I wish I had been old enough and able to afford a brand new Mini back in the 90s. Would have been brilliant to be the only registered owner of one.
#75
v21ash
-
- Members
-
- 421 posts
Speeding Along Now
- Local Club: HumbersideMiniClub.co.uk
Posted 27 October 2011 - 10:36 PM
Last update 19 June?! You need to update this, its really good work and I really want to see it finished.
I wish I had been old enough and able to afford a brand new Mini back in the 90s. Would have been brilliant to be the only registered owner of one.
Sorry there's been no updates in quite a while but i've not done anything to her since the last update, i knew it had been a while but didn't realise it had been over 4 months!
I've been doing a load of overtime so i've got some money to throw at her but no time to do anything, and if i don't do the overtime i've got the time but no money
She's ready to start painting now so i'm hoping to get her in primer just after christmas and then i can send her to be sprayed
I'll update as soon as work on her starts again.excellent build!!
what kind of spot welder are you using? thanks
It's maybe a bit too late now but my spot welder's a Clark CSW13T (2+2) one of the best tools i've ever bought


0 user(s) are reading this topic
0 members, 0 guests, 0 anonymous users


