Jump to content


Photo
- - - - -

A Trailer For Bottom


  • Please log in to reply
17 replies to this topic

#1 blueturbomini

blueturbomini

    Mini Mad

  • Members
  • PipPipPipPip
  • 290 posts
  • Location: folkestone
  • Local Club: LSMOC

Posted 17 December 2011 - 08:04 PM

After reading the other trailer posts, it has prompted me to post mine. A couple of years ago i won this off e-bay.

Attached File  IMAG0001.JPG   460.04K   11 downloads


It was a total front end right off before anyone starts to moan, which was a great pity as the rear had hardly any tin worm. After getting it home, flipped it on it's top and started stripping the subframe, cleaning off the surface rust, trailing arms and brake pipes, before painting it up with grey hammerite primer

Attached File  IMAG0003.JPG   371.4K   7 downloads


Then did the same to the trailing arms and rear drums


Attached File  IMAG0006.JPG   331K   3 downloads

Found a tin of black gloss, then painted the whole bottom of the trailer and arms


Attached File  IMAG0010.JPG   504.29K   0 downloads


Attached File  IMAG0011.JPG   411.26K   2 downloads


To sort out the front, i found a local engineering firm and brought half a sheet of 2mm mild steel, i measured the width and height of the front of the trailer before hand and asked them to cut it to size. Also got them to bend up an angle section to attach the top.


When i test fitted the roof panel i found it was a touch to narrow for the body, so i attached 2 lengths of 50x25 box to each side of the tunnel, fitted a ratchet strap into the lock holes and eased the top of the trailer in enough for the roof to fit, then welded another length of 50x25 box across the top to keep it in place (no photo's of this sorry), then started to weld the front panel into place.

Attached File  IMAG0013.JPG   628.58K   13 downloads

When both sides were completely seam welded, i cut a couple of tapered strips of plate to fill in where the locks were and trimmed the top of the plate to match the shape of the body.


Attached File  IMAG0012.JPG   532.89K   17 downloads

Attached Files


#2 DAVEY_C

DAVEY_C

    Super Mini Mad

  • Members
  • PipPipPipPipPipPip
  • 555 posts
  • Location: kildare, ireland
  • Local Club: irish minis owner club

Posted 17 December 2011 - 08:24 PM

good job so far mate.... 1 question though, thats not the final wheel position within the wheel arch is it? just looks a bit forward

#3 blueturbomini

blueturbomini

    Mini Mad

  • Members
  • PipPipPipPip
  • 290 posts
  • Location: folkestone
  • Local Club: LSMOC

Posted 17 December 2011 - 08:47 PM

I decided i wanted to keep the rear seat and bins, as well as the rear parcel shelf, then dropped the roof into place, marked it up for length and set to it with the old angle grinder.

After it was cut down i positioned the angle(made earlier for me by sheet supplier) on the front of the trailer, then placed the roof up to it and marked the angle where the roof overlapped, then cut away the extra metal from the top leg of the angle to allow the roof to pass over the top. Then clamped it up and welded it together.

Attached File  IMAG0015.JPG   317.01K   20 downloads


I decided at the very start of this project that i wanted to use all classic mini parts on the build if possible, so the roof pane is fitted to the trailer with good old mini boot hinges, which work a treat.
I wanted to use gas struts to open the lid but found they twistedthe end panel of the roof, so gave up on that idea and made some brackets out of flat plate.

you can see the weld marks on the roof for the brackets
Attached File  IMAG0016.JPG   377.26K   12 downloads

As i wanted the trailer to match my mini, i then had to cut up and fit a zeemax body kit, welding extra plate to the front to infill the ends of the side skirts

Attached File  IMAG0017.JPG   346.69K   8 downloads

Attached File  IMAG0018.JPG   352.31K   12 downloads

Attached File  IMAG0019.JPG   303.67K   10 downloads

the 4 black dots on the rear bumper are rear parking sensors

Attached File  IMAG0021.JPG   377.54K   18 downloads

Where the roof panel was welded to the angle it was sitting far to low at the front, so sadly this was built back up to the correct shape with one hell of a lot of body filler. I filled the rest of the trailer where in was needed, sanded it all back nice and smooth and shipped it off to the body shop for painting, as my painting looks like windows in a rain storm.

#4 blueturbomini

blueturbomini

    Mini Mad

  • Members
  • PipPipPipPip
  • 290 posts
  • Location: folkestone
  • Local Club: LSMOC

Posted 17 December 2011 - 08:49 PM

good job so far mate.... 1 question though, thats not the final wheel position within the wheel arch is it? just looks a bit forward

It's the angle of the photo mate, thats why it looks strange

#5 DAVEY_C

DAVEY_C

    Super Mini Mad

  • Members
  • PipPipPipPipPipPip
  • 555 posts
  • Location: kildare, ireland
  • Local Club: irish minis owner club

Posted 17 December 2011 - 08:57 PM


good job so far mate.... 1 question though, thats not the final wheel position within the wheel arch is it? just looks a bit forward

It's the angle of the photo mate, thats why it looks strange


got ye :proud: ... nice tidy job done on the top :highfive:

#6 blueturbomini

blueturbomini

    Mini Mad

  • Members
  • PipPipPipPip
  • 290 posts
  • Location: folkestone
  • Local Club: LSMOC

Posted 17 December 2011 - 09:02 PM

The draw bar was made from 50x50 box. After i had worked out how long it needed to be and where it needed bending, i made 2 'v' cuts in opposite sides of the angle, so i could get a "swan neck" shape to it. The hardest part of the draw bar i found to be was getting the tow hitch the correct height in relation to the tow ball on the car, as when they are coupled up i wanted them to look level with each other.

Before welding the draw bar up, i drilled a hole in the side of the box near the hitch and another hole near the back, then threaded a length of welding wire through both holes. I bent the bar to shape, seam welded all the joints up, smoothed up with a grinder and welded gusset plates to the sides of both joints for extra strength.

When it had cooled down, i attached my trailer wire to my welding wire and pulled it through the draw bar and into the boot area for the lights and stuff, then put the plug on the other end, keeps it all nice and tidy.

#7 blueturbomini

blueturbomini

    Mini Mad

  • Members
  • PipPipPipPip
  • 290 posts
  • Location: folkestone
  • Local Club: LSMOC

Posted 17 December 2011 - 09:14 PM

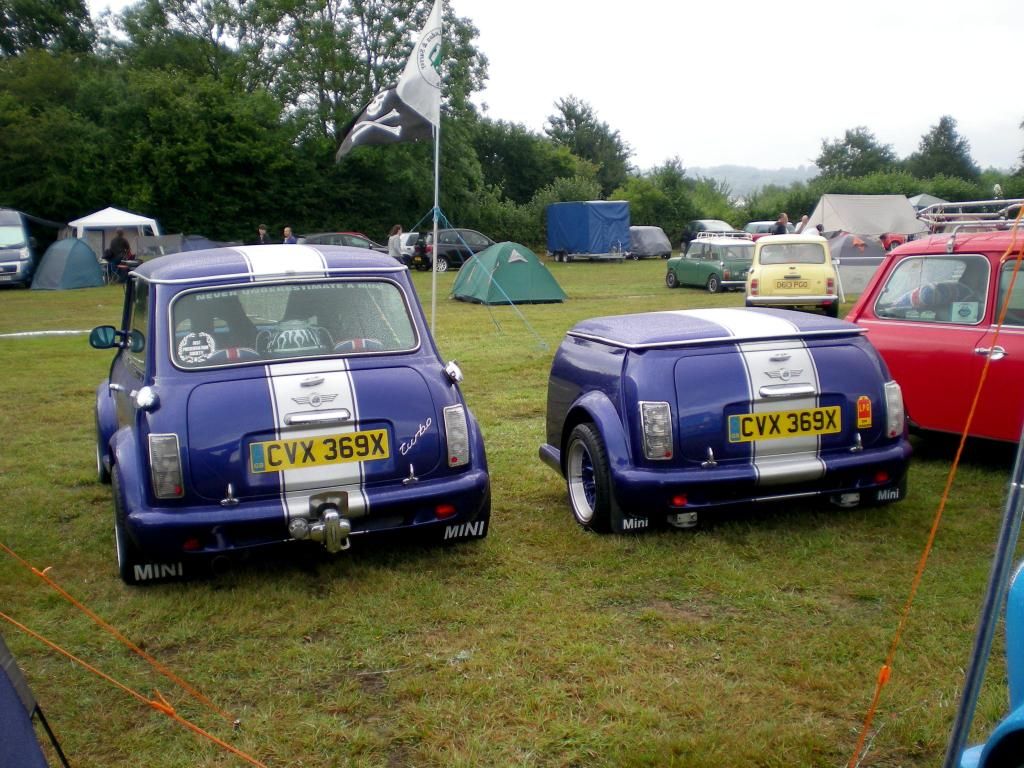
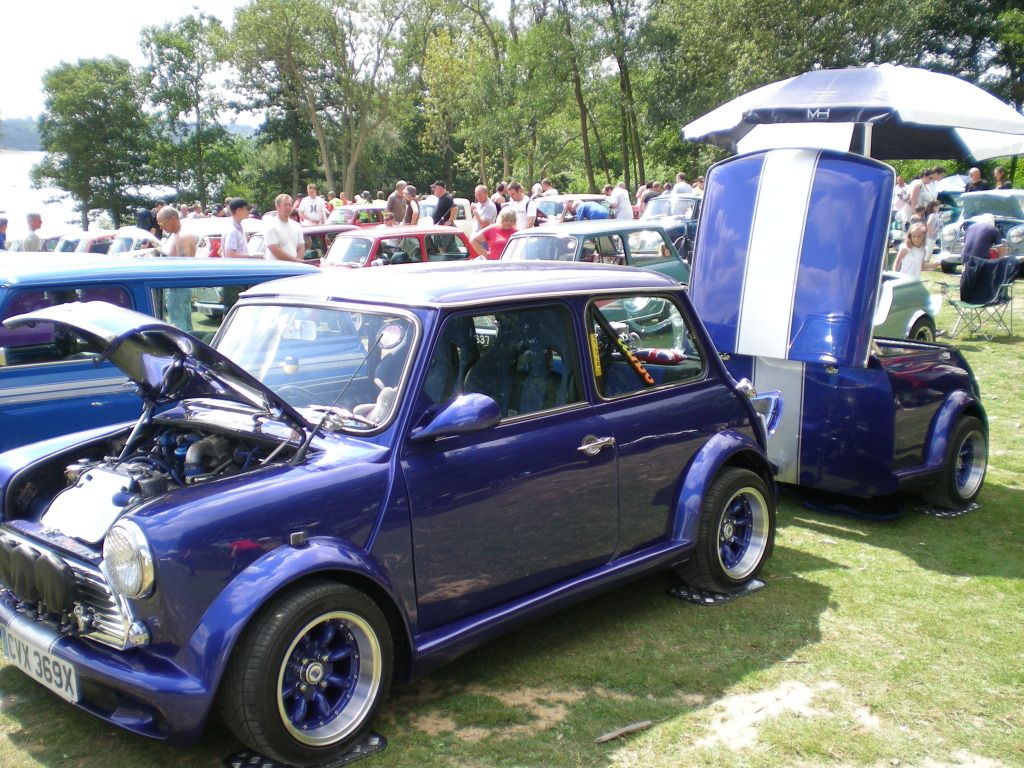
After i got it back from the body, i started fitting all the parts needed to match my mini. And i ended up with something like this

Attached File  IMAG0001.JPG   393.14K   36 downloads

Attached File  IMAG0002.JPG   624.63K   42 downloads


Sorry to say i cannot add any more picks as my quota is full.

#8 Lord Lucan

Lord Lucan

    Mini Mad

  • Noobies
  • PipPipPipPip
  • 117 posts
  • Location: Sunny Huddersfield

Posted 09 January 2012 - 02:55 PM

Mint job there mate... well done

#9 blueturbomini

blueturbomini

    Mini Mad

  • Members
  • PipPipPipPip
  • 290 posts
  • Location: folkestone
  • Local Club: LSMOC

Posted 09 January 2012 - 05:29 PM

Mint job there mate... well done

Thanks for that, i wanted to put on some more photo's but used my allowancw so to speak.

#10 luke666222

luke666222

    Mini Mad

  • Members
  • PipPipPipPip
  • 158 posts
  • Local Club: Crewes Missiles

Posted 10 January 2012 - 09:06 AM

Looks ace mate! Im thinking of building one at some point.

#11 blueturbomini

blueturbomini

    Mini Mad

  • Members
  • PipPipPipPip
  • 290 posts
  • Location: folkestone
  • Local Club: LSMOC

Posted 10 January 2012 - 05:07 PM

Posted ImageHope this works, if i can copy and paste should be pics of car and trailer

#12 Bungle

Bungle

    Original Spamster

  • Members
  • PipPipPipPipPipPipPipPipPipPipPip
  • 28,971 posts
  • Location: Cornwall
  • Local Club: cornish mini club

Posted 10 January 2012 - 05:09 PM

you would save a lot of weight by ditching the mini subframe and run trailer suspension

#13 blueturbomini

blueturbomini

    Mini Mad

  • Members
  • PipPipPipPip
  • 290 posts
  • Location: folkestone
  • Local Club: LSMOC

Posted 10 January 2012 - 05:10 PM

Posted Image

#14 blueturbomini

blueturbomini

    Mini Mad

  • Members
  • PipPipPipPip
  • 290 posts
  • Location: folkestone
  • Local Club: LSMOC

Posted 10 January 2012 - 05:11 PM

Posted Image

#15 blueturbomini

blueturbomini

    Mini Mad

  • Members
  • PipPipPipPip
  • 290 posts
  • Location: folkestone
  • Local Club: LSMOC

Posted 10 January 2012 - 05:14 PM

you would save a lot of weight by ditching the mini subframe and run trailer suspension

You are probably right in what you are saying but to be honest i do not ntice i have the trailer on the back. I forgot it was there on last years NDGT, looked at the speedo, saw 70, looked in the rear view mirror and thought%$£"%^^%$%%%^


1 user(s) are reading this topic

0 members, 1 guests, 0 anonymous users