Can anyone please explain step by step how to use cone compression tool? just purchased one today from minispeed.
have seen a thread on here but the compression tool looks different to my compression tool ....please help!!!!


Cone Compression Tool
Started by
mininick
, Jan 19 2012 02:03 PM
16 replies to this topic
#1

mininick
-
- Noobies
-

- 98 posts
Stage One Kit Fitted
- Location: Portsmouth
Posted 19 January 2012 - 02:03 PM
#2
jackmason
-

- Members
-
- 522 posts
Super Mini Mad
- Location: Essex
Posted 19 January 2012 - 02:23 PM
Normally, you take the tower bolts out the front and then put the long threaded shaft into the hole and then tighten it.
Obviously im answering blind here as i havent seen the one you have or the type you have seen. Im just going on the one ive used in the past.
Obviously im answering blind here as i havent seen the one you have or the type you have seen. Im just going on the one ive used in the past.
#3
mininick
-
- Noobies
-
- 98 posts
Stage One Kit Fitted
- Location: Portsmouth
Posted 19 January 2012 - 02:48 PM

#4
R1minimagic
-

- Traders
-
- 4,660 posts
Up Into Fourth
- Location: Manchester
Posted 19 January 2012 - 02:49 PM
It's not as simple as that,
1. Take the tower bolt out
2. Place the sleeved tube over the long threaded bar (make sure the locknut is tight 1st!)
3. Insert into tower bolt hole and screw in about 6 or 7 turns
4. Now tighten the top handle on the threaded bar about 5 turns to strat with
5. Check to see if this is enough to allow top arm pin to come out freely, if not turn another full turn and repeat
Dont over compress the donuts, as they will likely destroy the threads and go BANG!!
#5
mininick
-
- Noobies
-
- 98 posts
Stage One Kit Fitted
- Location: Portsmouth
Posted 19 January 2012 - 03:05 PM
Hmmmmm ok.......still cant see how it works....will give it a bash when i get home later....could be fun
Is there a video anywhere showing this procedure.....would be easier to follow probably.....?
Is there a video anywhere showing this procedure.....would be easier to follow probably.....?
#6
jackmason
-
- Members
-
- 522 posts
Super Mini Mad
- Location: Essex
Posted 19 January 2012 - 03:06 PM
After reading my post back in my head ive realised that it wasnt the most informative post, sorry 
The one i used had a ratchet handle built into it but was missing the spacer shaft so i had to make something up for it.
R1minimagic's post is spot on.
The one i used had a ratchet handle built into it but was missing the spacer shaft so i had to make something up for it.
R1minimagic's post is spot on.
#7
lrostoke
-

- Members
-
- 6,923 posts
Crazy About Mini's
- Location: Maybank, Staffordshire
- Local Club: none
Posted 19 January 2012 - 03:18 PM

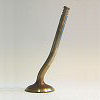
Compressor assembled, remove large turret bolt.
Then the threaded section shown on left of picture drops into turret hole and screws into a thread in the center of the suspension donut.
Then screw 2nd nut from right down so that it starts to pull the donut upwards (squeezing it), yours looks to only have one larger nut but still screw it down
Edited by lrostoke, 19 January 2012 - 03:20 PM.
#8
mininick
-
- Noobies
-
- 98 posts
Stage One Kit Fitted
- Location: Portsmouth
Posted 19 January 2012 - 03:27 PM
Oky Doky...think I got it now...thanks guys.......
Will have a bash later....I have a feeling i'm gonna break something lol....watch thhis ;space
Thanks again
Will have a bash later....I have a feeling i'm gonna break something lol....watch thhis ;space
Thanks again
#9
SolarB
-
- Members
-
- 1,385 posts
One Carb Or Two?
- Location: Surrey
Posted 19 January 2012 - 03:33 PM
A quick warning. While doing this job don't put you hands anywhere where they can be trapped if the tool or the tread in the spring fails. If this happenes there is a LOT of stored energy just waiting to remove fingers.
#10
thebullet
-

- Members
-
- 1,337 posts
One Carb Or Two?
Posted 19 January 2012 - 03:39 PM
A quick warning. While doing this job don't put you hands anywhere where they can be trapped if the tool or the tread in the spring fails. If this happenes there is a LOT of stored energy just waiting to remove fingers.
This is what happened to me on the fronts, didn't end up putting hi lows on the front because the tools just kept snapping back and it all came smashing togethor making a puff of dusty stuff, gosh it makes a bang!
#11
mininick
-
- Noobies
-
- 98 posts
Stage One Kit Fitted
- Location: Portsmouth
Posted 19 January 2012 - 04:05 PM
Your not really selling this job to me guys........ 
#12
SolarB
-
- Members
-
- 1,385 posts
One Carb Or Two?
- Location: Surrey
Posted 19 January 2012 - 04:20 PM
Your not really selling this job to me guys........
BANG!

#13
SolarB
-
- Members
-
- 1,385 posts
One Carb Or Two?
- Location: Surrey
Posted 19 January 2012 - 04:21 PM
Couldn't resist that (sorry).
It's not difficult or particularly dangerous as long as you do it with a little care.
It's not difficult or particularly dangerous as long as you do it with a little care.
#14
Pete649
-

- TMF+ Member
-
- 375 posts
Speeding Along Now
- Location: Isle of Man
Posted 19 January 2012 - 04:26 PM
Didn't the earlier cones have an imperial thread? The tool I bought came with interchangeable threaded ends for metric or imperial cone threads. I can't remember which way round it is but it is possible to fit the wrong tool end in the cone thread as the threads seem to fit, but it is a mismatch and the threads can slip letting go under pressure, so make sure you are using the right threaded end on the tool for the cone.
#15
mininick
-
- Noobies
-
- 98 posts
Stage One Kit Fitted
- Location: Portsmouth
Posted 19 January 2012 - 05:06 PM
Is there anyone in the Portsmouth / Fareham area that wants to come round and do it for me lol
I make a good cup o tea
Well theres only one way to learn..................
I make a good cup o tea
Well theres only one way to learn..................


1 user(s) are reading this topic
0 members, 1 guests, 0 anonymous users


