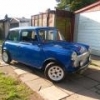
thats what the previous guy has done with her. my list for attack was gona be the engine/gearbox and the wheels first whilst im learning some basics for the welding and then start to attack the body. could be interesting.


Austin Special 1100 Rebuild
Started by
welshraider
, Jan 22 2012 11:46 AM
52 replies to this topic
#17

welshraider
-
- Noobies
-

- 61 posts
Stage One Kit Fitted
Posted 06 February 2012 - 06:41 PM
right then. been having a dig through the parts i can find and better than i thought. the dash is the standard one (although it has been fiddled with and had leds wired into it), have found the standard steering, and all the badges are there for bonnet and boot. have managed to fix the roof so all good. just gota replace the front end and rebuild the engine as the major jobs now. 


got all the timber to get my work bench built now so not long and she can be in the garage and i can start properly getting to it then.
my main dilemma is wether to change the head out so i can run her on unleaded or leave it as standard and run on additives. any ideas. (p.s. if it helps the engine is needing to be striped down and rebuilt so no extra work for the change thank god). will i need to change the pistons as well or just the head?
#18
oltonlad
-
- Banned from Buying/Selling
-
- 2,401 posts
Up Into Fourth
- Location: west midlands
Posted 06 February 2012 - 08:20 PM
you dont need to change the pistons to run unleaded, juat have the head done, i've also noticed that the door cards are the wrong ones as well.....and you cant get them anymore either, i had a hellish job finding replacements for mine.
#19
welshraider
-
- Noobies
-
- 61 posts
Stage One Kit Fitted
Posted 07 February 2012 - 07:49 AM
We have the full standard interior but he decideded he wanted the leather one his mate was getting rid off. So ive got all the door cards and bits spare. Gona stick to that interior whilst I'm trying to get her on the road as its there and then convert her back as I start finding the odd few bits I need to complete it.
#20
welshraider
-
- Noobies
-
- 61 posts
Stage One Kit Fitted
Posted 08 February 2012 - 04:25 PM
now for the dilemma. I've decided to put her back to the original colour. (when all the body work is done), and change out the head so that i can run her on unleaded as she's gona be used quite regularly and i cant be bothered with the hassle. now for the issue. im torn between putting her back to fairly standard conditon so as its saving a special so to speak. the other option im looking at is that as she is gona be used alot im looking at a stage one kit of mni spares to give her some more grunt ( www.minispares.com/Product.aspx?ty=pb&pid=37334&sku=0&tc=1#submenu <<<<<<<that one me thinks ) and converting the front end to disc breaks for better stopping power. any thoughts on this change........ answers on a post card..
on the same sort thing been looking round on here and seen bits about the 1098 engine not liking to rev much at all. im gona be doing mostly of motorway milage in her to work and back, and then up to north wales to play on weekends, would the head and the stage one help take some of the load outa the engine or any other things that can be done to help it last longer (other than a lighter right foot)
on the same sort thing been looking round on here and seen bits about the 1098 engine not liking to rev much at all. im gona be doing mostly of motorway milage in her to work and back, and then up to north wales to play on weekends, would the head and the stage one help take some of the load outa the engine or any other things that can be done to help it last longer (other than a lighter right foot)
#21
oltonlad
-
- Banned from Buying/Selling
-
- 2,401 posts
Up Into Fourth
- Location: west midlands
Posted 08 February 2012 - 07:15 PM
i would certainly keep the car as original as possible as the values of original mini 1100 specials will only go up due to their rarity and the fact that they were the benchmark of all the mini limited editions that followed.
fitting a stage 1 kit is a good idea as it will enhance the (already) good low down torque characteristics of the 1098 engine but don't use an LCB manifold, use a maniflow cooper freeflow manifold as these work better with the small bore engines and provide more torque over an LCB, even though the 1098 engines dont like loads of revs they are perfectly capable of motorway cruising speeds, although you may benefit from fitting something like a 2.9 differential if you are doing a lot of motorway driving as it will lower the revs down, the extra torque of the 1098 engine will happily accomodate this.
i rarely rev the engine in our 1100 special over 4500rpm as there is no need to because of the torque available.
if you are keeping the car in its original colour then the code is BL 202, and as its silver it will still look good (its not as if the car is painted in one of the putrid nasty colours that some of the cars in the 70's were painted).
keep us updated with the cars progress.
Edited by oltonlad, 08 February 2012 - 07:17 PM.
#22
welshraider
-
- Noobies
-
- 61 posts
Stage One Kit Fitted
Posted 09 February 2012 - 07:59 AM
The long real move away from standard was gona be the stage 1 and discs mostly cause if it was the. Sold it is fairly easy work to convert her back to standard drum all round. How do u find just the drums on urs. Do u get much fade from them or not enough to write home about
#23
welshraider
-
- Noobies
-
- 61 posts
Stage One Kit Fitted
Posted 05 March 2012 - 09:25 PM
Finally have her home and in the garage. Starting the strip down most of the interior out and just the dash to go. Had the vinal off the roof and found a nice amount of holes around the gutter where someone has just fitted the roof with what looks like chemical metal. Great. Gota get the sun roof off now so I can assess if its a new roof or maybe repairable
#24
welshraider
-
- Noobies
-
- 61 posts
Stage One Kit Fitted
Posted 13 March 2012 - 09:12 PM
Well the bodywork has begun. I have removed her facd and found 3 more holes great. Oh well getting there quicker that I thought may get some of the holes filled in and patched Tomoz and then get round to her wings later. I can see an expensive trip to Malvern coming up. Lots of shiny shiny. Now shall I be good, make a list to stick to or just go nuts and get anything that catches my eye.
#25
mini_mad69
-
- Traders
-
- 5,417 posts
Let future you worry about it
- Local Club: urrrr no
Posted 13 March 2012 - 09:24 PM
That's the way!! we'll get it done soon enough!
#26
welshraider
-
- Noobies
-
- 61 posts
Stage One Kit Fitted
Posted 15 March 2012 - 01:11 PM
Right then. My list for today....
Job 1 take pics to go on here for progress report.
Job 2 rip out rest of drivers side floor pan .
Job 3 tidy the remains of floor to take me panel and fit driver side scuttle closing panel.
Job 4 take more pictures.
Job 5 where did I put the beer!
Job 1 take pics to go on here for progress report.
Job 2 rip out rest of drivers side floor pan .
Job 3 tidy the remains of floor to take me panel and fit driver side scuttle closing panel.
Job 4 take more pictures.
Job 5 where did I put the beer!
#27
welshraider
-
- Noobies
-
- 61 posts
Stage One Kit Fitted
Posted 15 March 2012 - 07:13 PM
Well managed to. Take out part I'd the drivers floor pan and get the scuttle close and repair the base of the fold line for the a panel. Got do pics so will stick them up later.
#28
Mad Max
-

- Members
-
- 306 posts
Speeding Along Now
- Location: On a driveway under a car
Posted 15 March 2012 - 08:10 PM
Nice little project you've got yourself. Good luck
#29
mini_mad69
-
- Traders
-
- 5,417 posts
Let future you worry about it
- Local Club: urrrr no
Posted 15 March 2012 - 10:34 PM
She's getting there!
#30
oltonlad
-
- Banned from Buying/Selling
-
- 2,401 posts
Up Into Fourth
- Location: west midlands
Posted 15 March 2012 - 10:36 PM
keep up the good work................and hurry up with that special................... 


1 user(s) are reading this topic
0 members, 1 guests, 0 anonymous users


