Right then floor pan take 2. Half way out so far, just stuck with the flintstones music in me head now though.


Austin Special 1100 Rebuild
Started by
welshraider
, Jan 22 2012 11:46 AM
52 replies to this topic
#32

welshraider
-
- Noobies
-

- 61 posts
Stage One Kit Fitted
Posted 20 March 2012 - 12:04 AM
right then time to get some pictures up, here goes nothing.

the state of the inner floor pan needed a cut out on the inner flitch and patched to get rid of the rust.

floor pan out most of the way. notice the bar in the middle of the hole. seems someone has put an extra line to run an earth back to the battery at the back. no idea why....
a few piles of random body parts dotted round so i can get in the garage and work.


right then. cant find any pics of the repaired floor pan. will try and get some up later when i take a pic tomoz. so finished that and now on to sorting out the sill. was quite happy about the jacking of the car to get it sorted.


and this is the sill that needs to be destroyed, i mean replaced


have managed to remove it after this pic but not enough light left to take any more. just gota take the old weld lines back and then on it goes. next in lie. rear quarter repair panel to sort out.
any comments welcome
the state of the inner floor pan needed a cut out on the inner flitch and patched to get rid of the rust.
floor pan out most of the way. notice the bar in the middle of the hole. seems someone has put an extra line to run an earth back to the battery at the back. no idea why....
a few piles of random body parts dotted round so i can get in the garage and work.
right then. cant find any pics of the repaired floor pan. will try and get some up later when i take a pic tomoz. so finished that and now on to sorting out the sill. was quite happy about the jacking of the car to get it sorted.
and this is the sill that needs to be destroyed, i mean replaced
have managed to remove it after this pic but not enough light left to take any more. just gota take the old weld lines back and then on it goes. next in lie. rear quarter repair panel to sort out.
any comments welcome
#33
mini_mad69
-
- Traders
-
- 5,417 posts
Let future you worry about it
- Local Club: urrrr no
Posted 20 March 2012 - 01:31 AM

Scuttle close panel on, repair around vent hole, and bottom of flitch.

Floor tacked in, was then seam welded in. (no picture)
Front end has been removed, and a few pin holes welded up, and a repair behind driver side shock mount.
Sill is now mainly removed and a couple of small patches repaired on the inner sill area.
I'm giving Matt a hand with this incase anyone thought I was stalking.
Ben
#34
welshraider
-
- Noobies
-
- 61 posts
Stage One Kit Fitted
Posted 22 March 2012 - 01:43 AM
Right the time to go ott with the prep on the sill so as it should never need replaceing again, well any time soon anyway. Wire brush and sand paper to prep the area, coating of kurust, primer, and any random paint. Then attach new sill. Repeat on outside of sill. Find or make hole to stick a probe in to fill sill with waxoil so as its sorted out and the rubber grommet in hole I made. Repeat on passenger side. Hows that sound
#35
mini_mad69
-
- Traders
-
- 5,417 posts
Let future you worry about it
- Local Club: urrrr no
Posted 22 March 2012 - 09:59 AM
sounds good, but you don't need to bung up the hole. There are vents along the sill, just use one of those.
#36
welshraider
-
- Noobies
-
- 61 posts
Stage One Kit Fitted
Posted 01 April 2012 - 07:44 PM
A good run up to Malvern today got lights and all but one part for a disc conversion on the front, yay. Just gota get started and finish off all the bodywork so I can crack on with the engine,
#37
oltonlad
-
- Banned from Buying/Selling
-
- 2,401 posts
Up Into Fourth
- Location: west midlands
Posted 01 April 2012 - 07:46 PM
A good run up to Malvern today got lights and all but one part for a disc conversion on the front, yay. Just gota get started and finish off all the bodywork so I can crack on with the engine,
did you see my car there?
#38
welshraider
-
- Noobies
-
- 61 posts
Stage One Kit Fitted
Posted 01 April 2012 - 08:06 PM
Yeap I hung round by it taking loads of pics for bout 30mins but u must have been off shopping. When I came back later everyone of the tmf lot had left
#39
oltonlad
-
- Banned from Buying/Selling
-
- 2,401 posts
Up Into Fourth
- Location: west midlands
Posted 01 April 2012 - 08:38 PM
Yeap I hung round by it taking loads of pics for bout 30mins but u must have been off shopping. When I came back later everyone of the tmf lot had left
yeah, i was trying to get some gearbox bits and pieces, i didn't spend much time around my car to be honest.
#40
welshraider
-
- Noobies
-
- 61 posts
Stage One Kit Fitted
Posted 02 April 2012 - 04:28 PM
No worrys. Managed to get some picks around it anyway. Just making my ideas now for how I want it to look
#41
swidds
-

- Noobies
-
- 22 posts
Learner Driver
- Location: Warfield
Posted 16 June 2012 - 08:41 PM
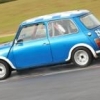
also, when you get to the point of refurbing the wheels, a lot of people just paint them silver all over which looks rubbish, this is what they should look like.

Hello Paul, whats the colour/paint code for the darker grey?.
Also great to find someone else doing up a mini special!. I've been taking loads of pictures of my rebuild so I can write a thread up later..http://s333.photobucket.com/albums/m400/swidds/Mini%20Special/
Edited by swidds, 16 June 2012 - 08:47 PM.
#42
oltonlad
-
- Banned from Buying/Selling
-
- 2,401 posts
Up Into Fourth
- Location: west midlands
Posted 16 June 2012 - 10:01 PM
also, when you get to the point of refurbing the wheels, a lot of people just paint them silver all over which looks rubbish, this is what they should look like.
Hello Paul, whats the colour/paint code for the darker grey?.
Also great to find someone else doing up a mini special!. I've been taking loads of pictures of my rebuild so I can write a thread up later..http://s333.photobucket.com/albums/m400/swidds/Mini%20Special/
hi paul, its a nissan colour, i will get the code for you tomorrow
paul.
#43
oltonlad
-
- Banned from Buying/Selling
-
- 2,401 posts
Up Into Fourth
- Location: west midlands
Posted 18 June 2012 - 08:55 PM
i've sent you a pm with the paint code for the wheels paul....
#44
welshraider
-
- Noobies
-
- 61 posts
Stage One Kit Fitted
Posted 10 July 2012 - 01:01 PM
managed to get a lot of this done, (well looks like it) over the last few months of quiet on here. got her se all on again and just got to get it all preped ready for paint. decided finally that as much as it is a shame to do, i am going to make it my own version of a special, or how i think it would be, still goning to be silver, all be it a gun metal finish compared to the light silver now, and gona have the strip down the side but in colour's to match the shade of paint. gona have a black and red finished interior along with the dash being in a red/black and silver.
will have to get some pics up so as people can see. although have realised that my bonnet is bent to buggery so will need to find one to fit to get her finished up front.
will have to get some pics up so as people can see. although have realised that my bonnet is bent to buggery so will need to find one to fit to get her finished up front.
#45
welshraider
-
- Noobies
-
- 61 posts
Stage One Kit Fitted
Posted 12 February 2013 - 01:02 PM
Right then finally found this thread again and the time and space to start back on the project. I've got a week set to sort garage and put in a proper work bench so I can get started properly and get her on the road again. Just got a new car being a bini cooper d so the drive to have her insperation and big sister on the road.


1 user(s) are reading this topic
0 members, 1 guests, 0 anonymous users


