Jump to content


Photo
- - - - -

Smurf The '77 Leyland Mini 1000


  • Please log in to reply
5 replies to this topic

#1 AC&SONS

AC&SONS

    Mini Mad

  • Noobies
  • PipPipPipPip
  • 127 posts
  • Location: Sheffield

Posted 10 February 2012 - 05:05 PM

Some of you may have seen some of this before as when I joined this forum I posted it in Introduce Yourself - I have since realised that it wasn't the best place for it so any future updates will be in here.

My son is coming up to his 17th birthday, and with the ever-increasing price of insurance for new drivers, I decided to go down the Mini route having owned a 60s Roundnose and then a 1275 GT in my earlier years. Insurance restricted us to 998s so I set my sights on 80s Mayfairs and Citys, but then I stumbled across this:

Posted Image

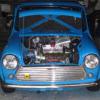
It was a 1977 model so a bit older than I was looking for, but it had only covered 40,000 miles and had been owned by the same family since new. It had been restored in 2007 when the owner put new Minilife wheels on it and a new, much nicer interior, but most of all, it claimed to be solid bodywork-wise. After viewing the car and finding virtually no rust at all, the deal was done. It may have been in great condition, but we had plans for it. My son named it Smurf due to the colour and the reg number which starts with URF :lol:


The first thing we did was have all the wheels off and rustproofed under the wheelarches and in the sills, before painting it all black.

Before: Posted Image

After: Posted Image


We also detailed the wheels (I've now got some new Minilife centre caps for these as well)
Posted Image

The underneath of the car was also rustproofed whilst the exhaust was re-painted:
Posted Image


After this, we set to work on the interior. We removed the seats and carpets (and underfelt!) which revealed a reassuringly solid shell. This was then cleaned and any surface rust was treated and painted with Hammerite. We then removed the dashboard and soundproofing ready for some new, less grubby foam to be installed later.
Posted Image

Edited by AC&SONS, 10 February 2012 - 05:15 PM.


#2 AC&SONS

AC&SONS

    Mini Mad

  • Noobies
  • PipPipPipPip
  • 127 posts
  • Location: Sheffield

Posted 10 February 2012 - 05:10 PM

We then started the biggest job - under the bonnet. The engine bay was the weak point of the car and my son was very keen to get it looking as good as the rest of the car, so we decided to remove the engine in order to paint it and then spray the engine bay itself.


The engine as it was before removal:
Posted Image

Hung on the hoist!
Posted Image
Posted Image


The engine was then placed in front of the car so that we could begin grinding off surface rust and dirt. The results were very surprising - even before painting, it was looking quite shiny!
Posted Image

The block was then painted black, with the rest including the cylinder head silver.
Posted Image
Posted Image

Meanwhile, the gaping hole in the engine bay meant that we could re-paint the bulkhead and all exposed metal the original blue it once was. Surface rust was removed and then it was sprayed with grey primer before the blue was added on top. We also painted the subframe with black Hammerite.
Posted Image
Posted Image
Posted Image


Here is a collection of bits that were taken off the engine before removal which have also been cleaned where necessary and sprayed black/silver:
Posted Image

Edited by AC&SONS, 10 February 2012 - 05:11 PM.


#3 muddd001

muddd001

    TMFs Calender King

  • Traders
  • PipPipPipPipPipPipPip
  • 817 posts
  • Location: Sussex

Posted 10 February 2012 - 06:04 PM

Looks Good!

#4 AC&SONS

AC&SONS

    Mini Mad

  • Noobies
  • PipPipPipPip
  • 127 posts
  • Location: Sheffield

Posted 10 February 2012 - 06:09 PM

After all the work on the engine and under the bonnet was done, it was time to get it back in. We knew that getting the driveshafts back in would be the most difficult part, although actually it was less trouble than we expected.

Posted Image

Straight after the hoist was removed:
Posted Image

We then added the blue rocker cover which set the engine bay off nicely:
Posted Image

It took a bit of cranking which we expected, but once a tight throttle cable had been sorted, it was running brilliantly.

All the grilles were then put back on - I got a new grille surround kit from Mini Spares which we fitted and then the front was done.
Posted Image

Meanwhile, I was alerted to the bolts holding the spacers onto the rear drums fitted to cars of this age, which are prone to shearing - not good! I bought some new, updated brake drums with built-in spacers which are much safer, so they were fitted.
Posted Image

The headlining had orange patches all over it and looked like something had been stuck to it at one time, so we used some white primer and sprayed it, which avoided the big task of fitting a new headlining.
Posted Image

The rear speakers were installed in the parcel shelf - I didn't realise they were so small when I bought them but they had good reviews and it's only a small car so they should be adequate.
Posted Image

Thanks for looking :)

#5 richw911

richw911

    Up Into Fourth

  • Members
  • PipPipPipPipPipPipPipPipPip
  • 2,084 posts
  • Location: UK

Posted 10 February 2012 - 06:44 PM

Great work :shades: Very tidy mini

#6 AC&SONS

AC&SONS

    Mini Mad

  • Noobies
  • PipPipPipPip
  • 127 posts
  • Location: Sheffield

Posted 11 February 2012 - 07:25 PM

After the engine, it was time to put all the interior back in. We put some new soundproofing in and covered that with a new dash liner, and we added a rev-counter, as well as the radio which is now finally installed. The car has a battery cut-off switch, which meant having to put a bypass wire in for the radio memory - bit annoying >_<

Posted Image

Posted Image

I also wanted a boot liner, but I wasn't prepared to pay the ridiculous prices at Mini Spares, so we made one instead by cutting some wood and sticking my old bedroom carpet on it :lol: I was very happy with the result.

Before:
Posted Image

After (apologies for the quality):
Posted Image

Mudflaps are also now on the back, as well as a subtle piece of chrome trim I got from Halfrauds to cover up the sharp edge which runs along the front and rear valance.

Posted Image

I went to Bingley and got an alloy door handle kit, some new shock absorbers and some new halogen lights - I will get some pics up of these soon :proud:


1 user(s) are reading this topic

0 members, 1 guests, 0 anonymous users