Hi there,
I've bought 4 new rubber springs and thought it was going to be pretty straight forward to fit them (as it was when I fitted my Hi Los), however I didn't realise that I needed to remove the front upper suspension arms in order to get the rubber springs out/in. The problem is I can't see how to get access to the front bolt holding each arm, whilst the engine still in place!
Any advice would be greatly appreciated!
Thanks,
Phill


Removing Front Upper Suspension Arm
Started by
phill82
, Feb 15 2012 04:45 PM
17 replies to this topic
#1

phill82
-
- Noobies
-

- 4 posts
Starting My Mini Up
- Location: Shropshire
Posted 15 February 2012 - 04:45 PM
#2
Dan
-

- TMF+ Member
-
- 21,354 posts
On Sabbatical
Posted 15 February 2012 - 05:06 PM
You don't need to release the large nut from the front of the shaft. You release the nut from the rear and then the two smaller screws that hold a plate over the front end of the arm shaft in place. One has a nut and the other is screwed into the subframe. With the plate loose, you only need to pull the shaft forward a bit and you can then drop the arm off it backwards. When refitting make sure the frame is clean so the plate seats properly.
#3
phill82
-
- Noobies
-
- 4 posts
Starting My Mini Up
- Location: Shropshire
Posted 15 February 2012 - 06:33 PM
oh right, thanks for that, I will give that a try! (why can't the Haynes manual say that?!)
#4
tiger99
-

- Members
-
- 8,584 posts
Crazy About Mini's
- Location: Hemel Hempstead
Posted 15 February 2012 - 10:40 PM
There are lots of things that the Haynes manual doesn't say, for example my favourite is changing the final drive gears and/or diff with the engine in the car. That is because the "official" way is easier for those who are properly equipped, but that is probably not most of us. What we lack in fancy workshop facilities to make engine removal really easy can be worked around by ingenuity and manual dexterity in many cases.
Always have a close look. If your eyeball says there is room to do something in situ, and your fingers seem to be small enough, give it a go.
Always have a close look. If your eyeball says there is room to do something in situ, and your fingers seem to be small enough, give it a go.
#5
chrisandsarah
-

- Members
-
- 746 posts
One Carb Or Two?
Posted 16 February 2012 - 12:51 AM
Tiny hands helps with this one like tiger99 says!!!
#6
Wakey-Dan
-

- Members
-
- 256 posts
Mini Mad
- Location: Leeds
- Local Club: Leeds Classic Mini Owners Club
Posted 16 February 2012 - 10:01 AM
I tried and failed with this job last weekend, making another attempt at it this weekend but the above hasnt clicked with me yet. Some pics would be really helpful if anybody has any. Are the front upper suspension arm and the radius arm the same thing? Ive been told to remove the radius arm?
#7
rendersonique
-
- Members
-
- 386 posts
Speeding Along Now
- Local Club: http://www.dcmoc.co.uk
Posted 16 February 2012 - 10:14 AM
I have just done my cones. As with any job with a mini, it always takes a dam site longer than you expect. I did manage to do the drivers side cone with the engine in situe but I had to take the verto clutch slave off to do this. However, I came to the conclusion that the passenger side was going to be nigh on impossible without taking the radiator off to get access to (and remove) the pivot pin for the top arm on that side. I have decided to replace the steering rack to be on the safe side, so the engine has come out anyway. not much help to you though 
#8
Dan
-
- TMF+ Member
-
- 21,354 posts
On Sabbatical
Posted 16 February 2012 - 10:14 AM
The front suspension doesn't have radius arms, if you need to change the springs it is the top arm that comes out.
The engine doesn't have to come out to do either of those jobs, in fact to change the passenger side top arm you don't even have to open the bonnet really. There is an access window in the flitch under the rad that is there specifically to access the top arm fixings and brake lines without pulling the rad.
The engine doesn't have to come out to do either of those jobs, in fact to change the passenger side top arm you don't even have to open the bonnet really. There is an access window in the flitch under the rad that is there specifically to access the top arm fixings and brake lines without pulling the rad.
#9
rendersonique
-
- Members
-
- 386 posts
Speeding Along Now
- Local Club: http://www.dcmoc.co.uk
Posted 16 February 2012 - 10:59 AM
I had decided my engine was going to come out prior to doing the passenger side cone due to the change of steering rack and I also wanted to give it a lick of paint at the same time. If your a dab hand (as you must be) I would imagine you could do it without moving the rad. Two of the more fustrating jobs on a mini (steering rack and cones).The engine doesn't have to come out to do either of those jobs, in fact to change the passenger side top arm you don't even have to open the bonnet really. There is an access window in the flitch under the rad that is there specifically to access the top arm fixings and brake lines without pulling the rad.
Sorry to thread jack... :-(
Edited by rendersonique, 16 February 2012 - 11:00 AM.
#10
Nikral
-

- Members
-
- 274 posts
Mini Mad
Posted 16 February 2012 - 11:13 AM
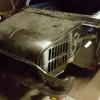
Wakey Dan here is picture that may help for the passenger side.
Attached Files
-
 mini rebuild 231.JPG 2MB
392 downloads
mini rebuild 231.JPG 2MB
392 downloads
#11
Wakey-Dan
-
- Members
-
- 256 posts
Mini Mad
- Location: Leeds
- Local Club: Leeds Classic Mini Owners Club
Posted 17 February 2012 - 12:28 AM
Cheers Nikral, thats a great help. I saw my mate do his and just pulled it out with a pry bar and brute force. He didnt have to worry about getting a new one back in because he was replacing with springs which are much smaller but im using cones. Theres a lot of hilo replacement guides online and in the mags but ive found nothing on removing/replacing the cones so thanks again.
#12
minidave1991-89
-
- Noobies
-
- 406 posts
Speeding Along Now
- Location: Loughborough
- Local Club: Charnwood Minis
Posted 17 February 2012 - 12:43 AM
I've had to replace all of this last week took me an age to get it out the passenger side. My hands are too big to fit in the gaps so bent the inner wing out slightly to get to the front plateand became soo much more easier  then bent it back when i'd finished. This wasnt to remove the cones just to get a repair pin etc in. Cant afford any new cones or hi'los at the moment so will have to wait a bit.
then bent it back when i'd finished. This wasnt to remove the cones just to get a repair pin etc in. Cant afford any new cones or hi'los at the moment so will have to wait a bit.
#13
Abbot
-

- TMF+ Member
-
- 105 posts
Mini Mad
- Location: Croissy sur Seine
Posted 02 December 2017 - 12:39 PM
Help please.
I have the submarine out so I would have thought easy life. Ooops forgot its a Mini I'm working on.
I have undone all the bolts plates etc and driven the pivot bar out towards the front. I just want to be sure that is correct as it does not seem to want to move much more. I presume I just have to hit it harder. Is that correct
#14
Abbot
-
- TMF+ Member
-
- 105 posts
Mini Mad
- Location: Croissy sur Seine
Posted 02 December 2017 - 03:00 PM
So I managed to get upper arms out but now am stuck trying to remove the old bearings. so far not much luck, any bright ideas?
#15
Swift_General
-
- Members
-
- 871 posts
One Carb Or Two?
- Location: England
Posted 02 December 2017 - 03:08 PM
You can buy a dedicated extractor. Or use a drift which you may have to modify to get it to 'catch'. Or do what I do - Weld a bolt with a 17mm head on the end of the bearing. Put a suitable socket over the bolt so thread of the bolt goes through the socket, then tighten a nut down onto the socket, drawing the bearing out.
Edited by Swift_General, 02 December 2017 - 06:07 PM.


1 user(s) are reading this topic
0 members, 1 guests, 0 anonymous users


