Jump to content


Photo

Hard To Access Areas


  • Please log in to reply
29 replies to this topic

#1 Brams96

Brams96

    Up Into Fourth

  • Members
  • PipPipPipPipPipPipPipPipPip
  • 2,308 posts
  • Local Club: Kentish Mini Club

Posted 04 April 2012 - 02:38 AM

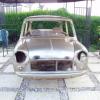
I need a little advice on the best way to tackle the rust in the areas circled in red, it's really hard to get right in the corners behind those strengthening pieces. Should I just use wire brush attachments on a drill & grinder to get in there best as I can then cover in kurust before painting?
Also right in the corner where the three panels meet, in the area circled in green, I have a rust hole. Should I just chop the corner out & try to rebuild it with 3 different layers of metal like original or put in 1 shaped patch back in welded to the 3 different panels?
Posted Image

#2 lil3on

lil3on

    Speeding Along Now

  • Members
  • PipPipPipPipPip
  • 379 posts
  • Location: wales

Posted 04 April 2012 - 08:20 AM

im not sure on the green one but im pritty sure you can remove the strengtheing bits!, also not sure how!ive just seen someone do it in there project thred hope it helped

#3 PaulColeman

PaulColeman

    One Carb Or Two?

  • Members
  • PipPipPipPipPipPipPip
  • 712 posts
  • Location: Bedford

Posted 04 April 2012 - 12:29 PM

Find somebody with a sandblaster. Job done :)

#4 grahama

grahama

    Up Into Fourth

  • Members
  • PipPipPipPipPipPipPipPipPip
  • 2,442 posts
  • Location: Warrington
  • Local Club: None in my area !!

Posted 04 April 2012 - 02:30 PM

It all depends upon how bad the rust is. Put a couple of pics up. Think, without looking, that the stregtheners are spot welded on so could be drilled out easy enough.

Underneath, easy if engine out and u can roll the car, otherwise bit of a pain, upside-down welding is not easy!!

#5 Brams96

Brams96

    Up Into Fourth

  • Members
  • PipPipPipPipPipPipPipPipPip
  • 2,308 posts
  • Local Club: Kentish Mini Club

Posted 04 April 2012 - 05:45 PM

Only thing left in my car at the moment is the handbrake lever! lol It's on a spit so I can tackle all the welding needed. Here's some pics

Posted Image

Posted Image

Looks mostly like surface rust but I'm just unsure how to get right in the corners where the seam sealer is.

#6 Brams96

Brams96

    Up Into Fourth

  • Members
  • PipPipPipPipPipPipPipPipPip
  • 2,308 posts
  • Local Club: Kentish Mini Club

Posted 04 April 2012 - 05:49 PM

Here's one of the corner I was talking about.
Posted Image

#7 grahama

grahama

    Up Into Fourth

  • Members
  • PipPipPipPipPipPipPipPipPip
  • 2,442 posts
  • Location: Warrington
  • Local Club: None in my area !!

Posted 04 April 2012 - 07:05 PM

Personally I would start with a wire cup on a grinder for the underneath and as much as you can get to on the upper part. For the rest of it a high speed drill with various wirs brushes on it and see how it looks when all cleaned up.

#8 Brams96

Brams96

    Up Into Fourth

  • Members
  • PipPipPipPipPipPipPipPipPip
  • 2,308 posts
  • Local Club: Kentish Mini Club

Posted 04 April 2012 - 08:09 PM

Yeah thats what I thought I might have to do. What about the corner repair?

#9 sonikk4

sonikk4

    Twisted Paint Polisher!!!

  • Admin
  • PipPipPipPipPipPipPipPipPipPipPip
  • 16,168 posts
  • Name: Neil
  • Location: Cotwolds.

Posted 04 April 2012 - 08:39 PM

I chopped out the lower sections of the triangular gussets by removing the spot welds and carefully cutting down the sides to get to the corrosion behind the plates. Glad i did as it was rank.

To really get in the corners without removing the gussets then media blasting is the way forward if not then some careful cutting with a slitting disc and removing the spot welds to remove the gussets completely to get to the affected areas.

#10 Brams96

Brams96

    Up Into Fourth

  • Members
  • PipPipPipPipPipPipPipPipPip
  • 2,308 posts
  • Local Club: Kentish Mini Club

Posted 04 April 2012 - 09:21 PM

I didn't really want to cut out the strengthening gussets but it looks like the way forward I guess if your saying there will be more rust underneath them. Cheers for the advice

#11 sonikk4

sonikk4

    Twisted Paint Polisher!!!

  • Admin
  • PipPipPipPipPipPipPipPipPipPipPip
  • 16,168 posts
  • Name: Neil
  • Location: Cotwolds.

Posted 04 April 2012 - 09:26 PM

On the lower front section of the gusset where its is spot welded to the bulkhead cross member this was starting to bulge slightly, so when i took the lower piece off the cross member was heavily pitted so it was worth chopping it out and then making a new lower gusset section.

Use a 1mm stainless steel slitting disc to make any cuts for a much neater finish.

#12 Brams96

Brams96

    Up Into Fourth

  • Members
  • PipPipPipPipPipPipPipPipPip
  • 2,308 posts
  • Local Club: Kentish Mini Club

Posted 04 April 2012 - 09:42 PM

Ok thanks for the tip, I only use 1mm discs as I find anything bigger feels just like cutting with a grinding disc. I think I'll try the spot weld drill first then cutting/grinding anything remaining.
Sonik how would you tackle the corner repair? I'm moving onto this section next as soon as I've finished welding the inner sill/flitch repair.

#13 sonikk4

sonikk4

    Twisted Paint Polisher!!!

  • Admin
  • PipPipPipPipPipPipPipPipPipPipPip
  • 16,168 posts
  • Name: Neil
  • Location: Cotwolds.

Posted 04 April 2012 - 09:45 PM

For me i would use a high speed grinder and rotary burr to remove all of the damage. I use a right angle grinder to get into tight corners but also a straight one as well. You could also use this technique to remove all of the old sealant as well.

I did some small repairs on Erms bulkhead using this process.

#14 Brams96

Brams96

    Up Into Fourth

  • Members
  • PipPipPipPipPipPipPipPipPip
  • 2,308 posts
  • Local Club: Kentish Mini Club

Posted 04 April 2012 - 10:13 PM

Sorry I meant the corner repair circled in green (post #1 & pic in #6). There's 3 sections of metal coming together there :unsure:

Edited by Brams96, 04 April 2012 - 10:14 PM.


#15 sonikk4

sonikk4

    Twisted Paint Polisher!!!

  • Admin
  • PipPipPipPipPipPipPipPipPipPipPip
  • 16,168 posts
  • Name: Neil
  • Location: Cotwolds.

Posted 04 April 2012 - 10:18 PM

Ahh got you, its on the lower bulkhead section.

Yes there are several sections but only on the joints where they lap over each other.

Drill out the spot welds and then cut out the damaged section layer by layer. Then you can make up some repair sections and weld these in individually before you plug weld them together.


0 user(s) are reading this topic

0 members, 0 guests, 0 anonymous users