Jump to content


Photo
- - - - -

1996 Mini 1.3I Yeah You Guessed It... Lots Of Rust!


  • Please log in to reply
99 replies to this topic

#1 n1tr0_9

n1tr0_9

    Stage One Kit Fitted

  • Noobies
  • PipPipPip
  • 59 posts
  • Location: Cranbrook, Kent

Posted 20 August 2012 - 04:52 PM

This is my cousins Mini that needs lots of welding. I started a thread on retro rides, but its probably better up on here, as hopefully you guys and girls can give me advice when i need it, as i know nothing about Mini's!

Ive just copied what ive put up on retro rides, so some of the cometary may not make sense, but later posts will if you get what i mean.

So the beginning....

This is my cousins mini, its had a new engine and box but the body and interior lets it down. It was dropped off at a bodyshop where they removed the front wings with an air chisel then the chap doing it mysteriously left the company.

Posted Image

Posted Image

Posted Image

Today was very much a strip down and poke the crusty bits day, so I started by removing the seats and getting the carpets up so I could check on the floors and sills.

Carpets up and I could see both front floor pans have been dented up into the cabin, probably from careless jacking. Also bits of rust on the inner sills and front bulkhead. The sills have had repairs before and new sills have been put on over the top, so really they need to come off again. Doh!

Posted Image

Posted Image

Posted Image

So I got on with a job I hate and chiselled off the factory applied sound deadening. Then cleaned the residue off with petrol. I was grateful for a windy day so I didnt get a headache from fumes like last time. All that revealed the rust on the inner sills. At least I can now see what needs to be cut out and repaired.

Posted Image

Posted Image

Posted Image

After I could see the floors I had a poke at the rest of the car. Starting at the rear.

There has been a previous repair which is pretty messy and has blown apart the rear seam.

Posted Image

Both rear wing lower edges

Posted Image

Posted Image

The A-post on driver side is pretty scabby, to the point where the door has dropped. At first I thought it was worn hinges, but its actually the whole A-post flexing!!! The driver side has had repairs previously but may need more attention as rust is coming through again.

Posted Image

Posted Image

A bit of a scab on the scuttle, but that panel itself is sound. There are further scabs on the roof and b posts but nothing too bad.

Posted Image

Front inner wing need a repair

Posted Image

Further poking revealed cracks in the inner wings just forward of the damper mounts. Not sure if this is a common thing on minis or if its from a previous accident? Its cracked both sides. Easier to see on the drivers side.

Posted Image

Posted Image

Spent the rest of the afternoon drilling out spot welds at the front of the car to remove the flanges left by the front wings. Then I pulled the front panel off.

Posted Image

Posted Image

Posted Image

Posted Image

I'm going to the BMC and BL show and spares day on Sunday in Peterborough, so I can get photos of minis and how I need to put it all back together!

I did a bit more on the Mini today.

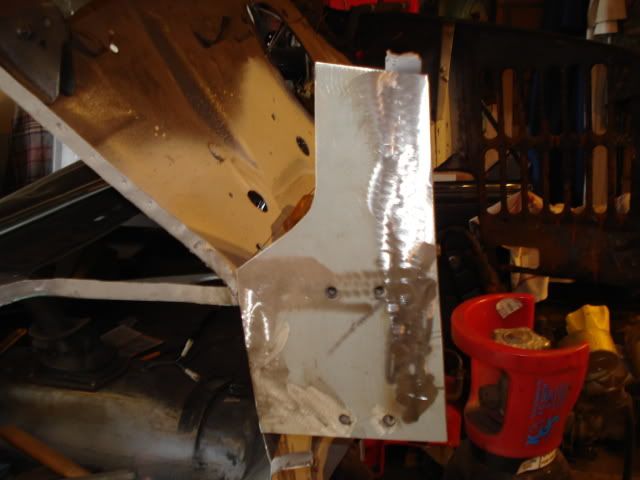
I repaired the front inner panels. They had rotted where the front panel was spot welded on. Water had got trapped between the metal and blown them apart.

Posted Image

Posted Image

Posted Image

Posted Image

I put the font panel back on. Its just temporarily tacked to the inner wings so that the front subframe cant move around. I balanced the front wings on just to see what the fit might be like, and for a bit of motivation. They fit where they touch as expected!

Posted Image

I am wondering whats up with the front towing eye bolts. They are quite different passenger side to drivers side. One side has 3 shims, the other side has a massive washer and 4 shims and the towing eyes are quite different?

Posted Image

Then I had some advice from a chap named Kevin. He is a bit of a Mini guru and came to take a look and offer advice with the order I should tackle the A-post and sill repairs. Even though he has restored many Minis he was surprised by how rusty this car is. I'm going to repair the a-post first, then rebuild the front and wings, then sill last.

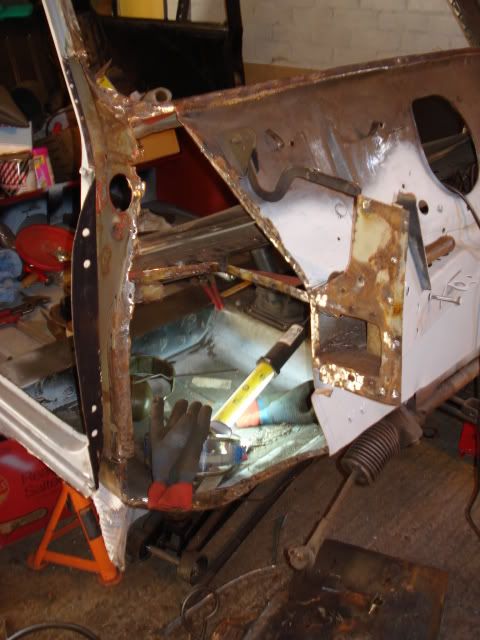
So with the front panel tacked on I set about the a-post.

I got the drivers door off, only one stud sheared off. The remains of the a-panel just pulled off. I then took a chisel to the remainder of the inner wing panel. It crumbled away to reveal a the main hinge panel in remarkably solid condition. This is very good news as it hasnt moved at all, so it should be a good reference for rebuilding the inner panel.

Posted Image

Posted Image

Posted Image

Posted Image

Last thing today I pulled the screen out.

Had a NASTY surprise.

The scuttle is rusty, but on the inside :(

Posted Image

Posted Image

Not good

#2 n1tr0_9

n1tr0_9

    Stage One Kit Fitted

  • Noobies
  • PipPipPip
  • 59 posts
  • Location: Cranbrook, Kent

Posted 20 August 2012 - 04:52 PM

Been busy on the mini again today. Tackled the A-post. Cleaned it all up and had a look at the underside of the scuttle.

Posted Image

Posted Image

Not nice, so I took out the small under scuttle closing panel. I couldn't find the spot welds as it was so corroded so I cut it off with a grinder and then had to rebuild the flange ready for the new one. I have another scuttle closing panel coming in the post, should be here on thurs / fri.

I also put a patch in where the metal had rotted away completely.

Posted Image

Posted Image

Posted Image

Posted Image

Posted Image

Next I trial fitted the new door and the a-post closing panel. The door is an original door that has been reskinned. Its a pretty good fit, certainly it fits as well as the original door. I took loads of pics of the car when I first got it that I could use for reference, and they are good to have now for comparisons. The door is a bit close in the lower rear corner, and its a bit off in a couple of places, but all the same places as the original door, so I'm confident that the a post is in the right place.

I put the door in place, then used a g clamp to lift it up at the rear edge while I prepared the closing panel at the front. This is now tacked in place. It isnt strong enough to take the weight of the door without flexing yet. But I don't want to weld it in fully till I have got the new upper door hinge that I need. I also need to repair the front of the door sill/step as its all rotten. And that may have an effect on the a post.

Posted Image

Posted Image

Posted Image

Posted Image

Posted Image

Took a look at the passenger side and scraped all the paint and sealer off it. Its not as bad as the drivers side, but its pretty crap. I'm not if I should patch it of do the whole side like ive done on the drivers side. Ill talk to my cousin!

Posted Image

Posted Image

Today I repaired the lower front edge of the drivers door aperture. It was pretty rusty and I need this bit repaired and strong before I finalise the welding of the front inner panel to a-post. It also needs doing before I cut the sill off or it'll all bend. So off with the door again.

Posted Image

Posted Image

I drilled out the old spot welds, cut out the rot, then offered up a section from the new panel.

Posted Image

The steps at the bottom needed a bit of fettling to sit right, but I got pretty close in the end. All zinc painted after welding.

Posted Image

Posted Image

Later I went round the car with a high speed drill and wire brush and removed all the flaking paint I could find. There was lots on the roof gutter rails, a bit where the rear wings fold onto the b-posts and a bit around the rear screen. I took all the filler and crap out of the rear panel where it was hidden by the rear bumper. Then I covered everything in Bilthamber Hydrate 80 rust killer. I also applied it to the front inner panel that I have repaired.

Posted Image

Posted Image

Posted Image

Posted Image

It seems that everyday I find more rust to repair. Today while I was wire brushing what I though was surface rust, I found the door steps are actually pretty rotten. They will need new lower lips and maybe part of the flange in places. Doh!

Posted Image

Posted Image

Today started badly. First the new upper door hinge I got off ebay was total rubbish. Not only did it not fit, but the holes didnt line up and the pin was such a sloppy fit that it rattled! So I refrained from fitting it and I'm sending it back. Ive got a genuine used hinge coming in the post.

So I started on the passenger side. This didnt go well either. I tried to bolt the old hinges to the new reskinned door only to find one of the captive threads pretty chewed up. So a trip to my mates dads house to borrow an imperial tap and now its sorted. But I did notice that the new door is an early door and doesnt have the crash support bar, and the inner panel has had a section cut out of it, probably for a larger speaker.

The rest of the day I spent repairing the passenger side. I removed the old d-shaped upper closing panel which was rotten.

Posted Image

Then I treated the whole area with rust neutraliser. Then I began the reconstruction. This started with a patch to the inner wing. Welded in and with a spot weld to the flange behind.

Posted Image

I trimmed the replacement panel to fit. I didnt need as much of this side as the drivers which is good. On the drivers side I had to drill out the spot welds to a vertical member as the whole panel was rotten. This side its all good, so its a smaller repair and it has retained its original shape better. I fitted the new door with new nuts washers and plates and the original shims then checked the fit.

It was pretty poor and the door was hitting at the top rear of the frame. So I took the door off and re adjusted the flange and the new panel. Refitted the door and it was much better. A final yank on the door and it was pretty damn good.

After I was reasonably happy that the flange was in the right place I began tacking the panel in. I manipulated the door up and down and watched where the panel flexed. Then I used G-clamps to hold the door slightly too high and slightly too far into the aperture and put in a few tacks. I did this so I could take the clamps off and check alignment again. I didnt want to weld the panel then take the clamps off only to find the weight of the door caused the frame to sag and my alignment to be wrong.

Posted Image

Posted Image

I then repeated the above operation putting in more tacks till I was happy it wasnt going to move anymore. Then I welded it fully.

Posted Image

Posted Image

Any final adjustment of the door can be done by filing the holes or shims.

Posted Image

Posted Image

Last thing I gave it a quick coat of zinc.

Posted Image

#3 n1tr0_9

n1tr0_9

    Stage One Kit Fitted

  • Noobies
  • PipPipPip
  • 59 posts
  • Location: Cranbrook, Kent

Posted 20 August 2012 - 04:52 PM

Today I welded up the drivers a-post using the same technique as I used on the passenger side. G-clamps and lots of small spots. Then I zinc'ed it.

Posted Image

Back to the passenger side. I bought a new wire brush attachment for the drill and cleaned up the whole area before rust treating it.

Posted Image

I welded in a new closing panel under the scuttle. Its not pretty, but its hard to weld nicely up under there. But its solid and decent penetration.

Posted Image

Whilst wire brushing I found 2 parst of the flange for the front wing were full of holes, so I cut it out and welded in new pieces.

Posted Image

Ground back and wire brushed before another light coat of zinc primer.

Posted Image


Slowly making progress. I rehung the doors....again! I moved some shims around to try and get the fit better as I planned to fit the A-panels. But before I got on with A-panels I needed to weld up the stress cracks near the damper mounts while the access was still good. Passenger side was easy. Drivers side was a bit worse as I saw a tiny smidge of rust coming from behind the damper mount. So I unbolted it to rust treat it. Guess what MORE RUST! After wire brushing I was left with a hole which meant more cutting and welding.

Posted Image

Posted Image

What looked to be a single skin was infact 2 skins. So after I cut the rot out I welded the 2 seams together. I was carfeul when I cut it out to stay inside of the spot welds. Then I put in a plate of 1.5mm steel which should be plenty. This middle area isnt actually stressed as the mount bolts above and below and thats 4mm steel.

Posted Image

Posted Image

Posted Image

Posted Image

Posted Image

The bracket itself was also rotting so I cut out the rot and put a plate of 5mm steel in. Then seam welded it. Its all rust treated now and ill bolt the bracket in tomorrow. Its these little jobs that seam to eat up all the hours!

Posted Image

Posted Image

Posted Image

#4 MyZeemaxMiniTurbo

MyZeemaxMiniTurbo

    Stage One Kit Fitted

  • Noobies
  • PipPipPip
  • 55 posts
  • Location: Midlands
  • Local Club: Leamington spa mini massive

Posted 20 August 2012 - 05:39 PM

nice to see some 1 else hard at work to bring a mini back to glory, iv just bought a second mini to play with, not quite as bad as this...and mostly a bad front end which was easily replaced, but still il be doing some of this to it soon. keep up the good work :)

#5 sledgehammer

sledgehammer

    Up Into Fourth

  • TMF+ Member
  • PipPipPipPipPipPipPipPipPip
  • 3,098 posts
  • Location: I'm sittin here besides my self

Posted 20 August 2012 - 05:49 PM

Well I can honestly say - the garage wouldn't have gone to that much trouble

most of that rust would have been undersealed & forgotten

good workmanship

I would look into the cause of those cracks - could be subframe movement ?

#6 leadly

leadly

    One Carb Or Two?

  • Members
  • PipPipPipPipPipPipPip
  • 779 posts
  • Location: Derby
  • Local Club: [] D.C.M.O.C []

Posted 20 August 2012 - 07:44 PM

Great work so far. Glad to see every spot of rust being fixed before slopping on the paint!

#7 sonikk4

sonikk4

    Twisted Paint Polisher!!!

  • Admin
  • PipPipPipPipPipPipPipPipPipPipPip
  • 16,040 posts
  • Name: Neil
  • Location: Oxfordshire

Posted 20 August 2012 - 07:58 PM

Its a double skin for a reason there as its a stiffener for the inner wing to cross member. With the inner wing off it looks like this
Before
Posted Image
and after
Posted Image

and as you can see the shock mounts do attach to it.

#8 fattail95

fattail95

    One Carb Or Two?

  • Members
  • PipPipPipPipPipPipPip
  • 873 posts
  • Location: East Sussex

Posted 20 August 2012 - 11:44 PM

Looking great keep up the good work!

#9 digler

digler

    Speeding Along Now

  • Traders
  • PipPipPipPipPip
  • 439 posts
  • Location: harrogate

Posted 21 August 2012 - 04:59 AM

another mpi saved!!! good work though, ;D

#10 jagman.2003

jagman.2003

    One Carb Or Two?

  • Members
  • PipPipPipPipPipPipPip
  • 1,307 posts
  • Location: In the shed.
  • Local Club: Owner of my own club of Minis

Posted 21 August 2012 - 07:32 AM

Great work. All the common mini rot spots in one page.

#11 Jasonc

Jasonc

    Mini Mad

  • Members
  • PipPipPipPip
  • 183 posts
  • Location: Hampshire

Posted 21 August 2012 - 09:34 AM

Keep up the good work!

#12 n1tr0_9

n1tr0_9

    Stage One Kit Fitted

  • Noobies
  • PipPipPip
  • 59 posts
  • Location: Cranbrook, Kent

Posted 21 August 2012 - 10:34 AM

Not sure whether to fit up the front end now, or do the sills then the front end? Suggestions please!

#13 sonikk4

sonikk4

    Twisted Paint Polisher!!!

  • Admin
  • PipPipPipPipPipPipPipPipPipPipPip
  • 16,040 posts
  • Name: Neil
  • Location: Oxfordshire

Posted 21 August 2012 - 07:52 PM

I would sort the sills and door step first. You may want to replace the complete door step as the they from the inside out. With the outer sill off you can then look up and see how far its actually spread. If you see more then change the complete thing.

#14 digler

digler

    Speeding Along Now

  • Traders
  • PipPipPipPipPip
  • 439 posts
  • Location: harrogate

Posted 21 August 2012 - 09:18 PM

yeah i'd do the wings after all the side's are done, access been a big reason for me, but if you start on the sills then i'd follow the rust around!

#15 n1tr0_9

n1tr0_9

    Stage One Kit Fitted

  • Noobies
  • PipPipPip
  • 59 posts
  • Location: Cranbrook, Kent

Posted 21 August 2012 - 09:48 PM

Cool thanks. Sills it is! Ill put some pics up tomorrow night. James


1 user(s) are reading this topic

0 members, 1 guests, 0 anonymous users