Jump to content


Photo
- - - - -

My Mini Mini Restoration


  • Please log in to reply
8 replies to this topic

#1 6joshh6

6joshh6

    Mini Mad

  • Members
  • PipPipPipPip
  • 224 posts
  • Location: Crewe

Posted 02 September 2012 - 12:45 AM

Hi, I'm josh and this is my 1987 city e as I bought it.

Posted Image

It looks quite good in the photos but it did have a few rusty stone chips that needed attention. So a few months of learning to drive in it I got a driving instructor and it was decided to do some remedial work. Which resulted in this

Posted Image

As you can see, modern garages are quite small :lol: but it is definately better than being outside. As we took the paint back, the rust kept on going. In the end it turned out that the rust had spread about 3 inches around each chip, but fortunately it was only surface rust and it came off nicely. A wire brushing and some hydrate 80 rust killer lead to the mini becoming a speckled mess. I will let the pictures do the talking Posted Image

Posted Image

Posted Image

A few days after these photos, my dad went into hospital for spinal surgery and the project stalled. I had a few things to do but it did slow to a crawl in retrospect. I did however drop on a bargain at smallwood vintage rally, and I managed to bag myself a 3 clock dash including the gauges for the low low price of £5 :D. This was promptly cleaned, sprayed in matt black and is now waiting to be installed. As dad improved, we managed to get the mini into primer and looking more like it should. However before we put the primer on, we discovered that the rust killer hadn't worked. After some thought and a reading of the instructions we found that it had spread round the back of the panel and that the rustproofing needs to be very thickly applied. With that seen too, the primer went on...

Posted Image

Posted Image

With the body work well under way, I bought some 2k paint and with dad, painted the bonnet. However other things such as the garden have taken over from the mini. So I started to deal with the mechanicals. The mini had a smokescreen which could have come right out of an 80's music video :unsure: . So with trepidation, I decided to sort this out. I bought myself a minisport gasket set and some tappet chest gaskets. While I was stripping the engine I decided to paint the block as the mustard yellow lurking in the engine by was way past its best. After an uneventful strip down, I found the source of the bad emissions, an inlet valve with about 3 mm of hardened deposits welded to it. After a clean up of the valves and head, I started to paint the engine block. Heres a photo of the engine before:

Posted Image

After:

Posted Image

Posted Image

I'm quite pleased at how well it came out in the end :D

And thats all for now :-)

#2 666junky

666junky

    One Carb Or Two?

  • Members
  • PipPipPipPipPipPipPip
  • 1,225 posts

Posted 02 September 2012 - 08:45 AM

Shes so pretty! I love standard cars.. please dont ruin her xx

#3 miniBrain

miniBrain

    Mini Mad

  • Members
  • PipPipPipPip
  • 192 posts
  • Location: Preston

Posted 02 September 2012 - 09:56 AM

Hi Josh,
Nice car and nice job on the engine. Not sure about your diagnosis re: engine smoke - its unlikely that carbon deposits will be the cause. If your engine blows blue smoke on startup after sitting for a day or so its more likely that you have worn valve guides or worn valve stem seals (or both). Let us know how it goes when you put it back together.
Bob

#4 6joshh6

6joshh6

    Mini Mad

  • Members
  • PipPipPipPip
  • 224 posts
  • Location: Crewe

Posted 03 September 2012 - 06:05 PM

Hi Josh,
Nice car and nice job on the engine. Not sure about your diagnosis re: engine smoke - its unlikely that carbon deposits will be the cause. If your engine blows blue smoke on startup after sitting for a day or so its more likely that you have worn valve guides or worn valve stem seals (or both). Let us know how it goes when you put it back together.
Bob


I have replaced the valve stem seals so if that doesn't work it seems like a convenient excuse to swap for a 1275 head :lol: I only mention the deposits as possibly causing the smoke because the smoke wasn't very blue but it was quite a large amount for a little mini so i suspect it could be unburnt hydrocarbons. Either way I should know by this weekend hopefully.

#5 timothy9601

timothy9601

    On The Road

  • Noobies
  • PipPip
  • 49 posts
  • Location: Birmingham, United Kingdom
  • Local Club: Unknown

Posted 04 September 2012 - 04:30 PM

She doesn't look too bad. Following


#6 mk1leg

mk1leg

    Crazy About Mini's

  • Members
  • PipPipPipPipPipPipPipPipPipPip
  • 9,343 posts
  • Location: Jersey
  • Local Club: Mini Club Jersey, MCR

Posted 04 September 2012 - 10:27 PM

nice little project.............keep up the good work............... :proud:

#7 6joshh6

6joshh6

    Mini Mad

  • Members
  • PipPipPipPip
  • 224 posts
  • Location: Crewe

Posted 09 September 2012 - 08:21 AM

Quick progress update 09/09/2012.

Well this week I have been back at college so I have been a bit busy but it looks like this top end gasket replacement mission is going to take longer than I thought. While the head was off, I thought I would clean up the ports a bit and get rid of some of the worse pitting in the combustion chambers and on the valve faces. So armed with an air powered die grinder, I set about improving the head. After about an hour, and some messed up carbide bits, I had found the right grade of grinding bit and progress was swift. I managed to get the inlets and exhausts to about 1mm smaller than the gasket lines and a lovely clean entry, free of ridges and lumps. I cleaned up the worst of the pitting on the chambers with the aim of reducing any carbon build up when the head was on the car (ensuring I avoided the seats although I left the valves in so the inevitable scraping was only aesthetic). While David Vizard is probably quite safe at the moment, I think I have probably have improved it slightly. A side effect of all this grinding was a lot of dust. I therefore had to go and wash the head down and clean it up inside. With the valves out, I simply doused the head in paraffin, scrubbed it with an old paintbrush and hosed the lot down. The now clean head then revealed some issues. I put it in the conservatory to dry, which made me notice a cracked valve stem seal. I replaced it with one of the ones I had taken off which turned out to be less worn at any rate. I also noticed at the exhaust valve seats were pitted and one of the inlets had some damage too. So today I am going to be trying to lap the valves and seats or if that fails, find a new head...

So with all this in the background I have only managed to remove and paint the radiator and surround, the pulley, the fan, cleaned up the alternator and plumbed that back in, fitted a new belt and put a engine mount back on. Even getting the yellow paint was a pain as B&Q Northwich refused to give me a 100ml of yellow spray paint despite me being 17, the legal age 16 and the fact that I had bought 400ml of spray paint from another store the week before! When questioned the woman said she wouldn't serve me 'in case you sniff it'. I just left at that point in case her stupidity was catching. Seriously, I could understand if it was super glue but spray paint? wouldn't it be obvious if I was a habitual spray paint sniffer? Symptoms like watery red eyes, dizziness, a technicolour face...

At least I should have a nice mini at the end of all this! I will be back soon with news about how the valve lapping and startup goes.

#8 6joshh6

6joshh6

    Mini Mad

  • Members
  • PipPipPipPip
  • 224 posts
  • Location: Crewe

Posted 05 November 2012 - 12:41 AM

I haven't updated this in a while but in the meantime I have been pretty busy on the mini so time for an update!

Well the engine is now back together! It isn't smoking and after a bit of messing with timing and tappets its running sweetly. However I have had a load of trouble with the carburettor filling with crud, which had been a minor problem while it was on the road but after 6 months being laid up it had got worse somehow. Anyway a new fuel filter sorted that out nicely and I have also put the interior back together (I had intended on putting a 3 clock dash in but I can't be bothered with any more messing around atm so if anyone wants one: here I am :D ). So while I was replacing the head I had put all new seals and gaskets on and I extended this treatment to the float bowl so random petrol leaks are a thing of the past :w00t:. Bodywork wise, I have cleaned off the front valance and covered it in enough hydrate 80 to sink a battleship so I defy it to rust (which it no doubt will now just to prove me wrong...). After some looking about underneath, I had actually found the cause of my mini's awful ride which I can only compared to having someone hit you with a sledgehammer every time you hit a pot hole. A collapsed cone and a knackered shock absorber combined with Hi-los does not make for a comfy ride! So with the money from my 18th burning a hole in my pocket, I went and ordered some shiny new parts :D

So £170 lighter I got this from minisport who did a great job and had the parts with me very quickly and with minimal fuss. Can you guess what lurks within?

Posted Image

Suspension parts! With some GMAX shock absorbers which should hopefully make roundabouts and tight corners even more fun!

Posted Image

So I now have 2 cones, 4 shocks, and 2 knuckle joints waiting to go on. I just need to beg/borrow/steal/honestly obtain a cone compressor and I can get cracking.

Another mini project I did over the summer was the restoration, and what can only be described as disinfecting, of a pair of recaro recliners from an 80s capri. It was a chance trip to a landrover breakers and I had spotted these recaros there before. The guy seemed pretty friendly so I asked him how much he wanted for them and 5 mins later I was carrying them to the car. They were absolutely filthy, As in the sort of thing your mum would have made you throw out as a kid. This pic is after 3 hours of cleaning, a blast from an air compressor, a can of upholstery cleaner and a wet vacuuming with a vax carpet cleaner.

Posted Image

By this point I was worried they would never clean up! However, another 3 seperate hits with the carpet cleaner managed to bring them back round to being clean enough to go in the mini.

Posted Image

I spent ages on these seats but it was totally worth it because I actually got them for £20 for the pair including runners! My dad's friend is big into capris and he reckons that seats in this condition would probably fetch about a hundred pounds so I am so happy that I took a chance on them. The guy that sold them to me was robbed!

So that is pretty much it for now, hopefully the bodywork should be done in the next week and I will try to crack on with the suspension.

I will leave you with a final pic of my engine bay after another round of painting

Posted Image

Bye for now :)

#9 6joshh6

6joshh6

    Mini Mad

  • Members
  • PipPipPipPip
  • 224 posts
  • Location: Crewe

Posted 04 September 2013 - 07:38 AM

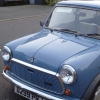
I haven't updated this in ages but I think I should really finish off the saga as the mini has ended up having a little more work than anyone expected. When I say a little more I mean a lot more, in fact this update is going to have to be in two parts. Anyway, about two weeks after I last updated, the mini was given a front end respray (except for the n/s wing; we couldn't get at it because the garage is too narrow) and so far the rust hasn't come back. 


DSCF0631_zpsf70e1640.jpg


During late November, my Dad was called back to hospital for another round of spinal surgery which slowed progress on the mini until Christmas, when during the holidays I decided to get the front suspension sorted. This turned into a nightmare on several counts and a couple of times it looked like it might have been a step too far. It all went nice and smoothly until I had to split the ball joint to swap the cones, which turned out to be much easier said than done. Every trick in the book was tried including heat, two hammers, putting the nut back on and hitting that (just destroyed the nut), even placing a jack under the arm, none of which shifted it. Eventually it decided to let go, after 6 hours of being beaten with a lump hammer, which I'm pretty sure is probably a record of sorts. Anyway, after I sorted that, I removed the old cone without undoing the upper arm, which again turned into a job from hell. After hours of struggling, I had to remove the clutch cylinder to actually get my hand in enough to get at the retaining plate. After I'd got all that lot sorted, I put the cone in, and put it all back together. When the car was back on its wheels, it looked really low on the side that I'd just done, which caused some headscratching till I realised that actually, I'D PUT THE CONE IN THE WRONG WAY ROUND :cry: . After stripping it all again, and turning it around, I found that while I'd been tightening up the cone compressor, which obviously wouldn't compress a cone placed in upside down, I'd actually managed to crush the bulkhead, including the anti crush bar inside. The subframe tower bolt wouldn't go in any more and I had damaged the tower bushes while trying to line it all up. So I gave up on the job for about 2 weeks. During this time I put together a plan to try and rescue the mini. I eventually ended up welding in about 9 millimetres of steel plate as a giant washer, grinding out the bulkhead around the hole so that the bolt could go in straight again, and installed a set of KAD tower mounts. The bolt went in with a little persuasion and has been fine since.


In the meantime I'd taken my driving test in February, and failed, although I rebooked it for about early April, giving me a very short deadline to get the mini sorted. I spent ages trying to get the engine running nicely, and struggled a lot with the carb and dizzy, which both of which ultimately had to be rebuilt before it would run nicely. During this time I also bought another set of clocks for the princely sum of £1 off ebay, which allowed me to swap over the binnacle to one that didn't rattle. I also dropped lucky on a pair of rev counters, which I won for £10 and look like period aftermarket items.

 DSCF0637_zps3036ad9c.jpg


After a flurry of activity, the mini was starting to look ready for its MOT, when I found something rather interesting in the drivers side footwell...

IMAG0019_zpsfad6cfd9.jpg

This is the first of four pieces of filler/fiberglass that I have had to remove from the boot floor, footwell and rear bumper valence, all of which have now been patched properly, given a corrosion preventative primer and painted. 


Second time round I passed my driving test with only two minors. However due to various niggles and problems, the mini didn't go for its MOT until May, where it failed on emissions, which I have now put down to a leak in the exhaust system. After some fettling, it passed, and I was insured as the main driver, fully comp 6000 miles a year for £750 with Admiral, which makes my mates green with envy :D. On my first drive in it in over a year, it duly performed awfully. The engine had no power low down, and would stall unless you really thrashed it. Emerging on a fast junction I terrified my mum who was in the car with me when I avoided stalling by revving the nads of it, ensuring she no longer comes in the car with me if she can avoid it >_< . As a grand finale, the speedo cable snapped. all on a journey of 2 miles...


Over the next few weeks, I played with the timing and generally tweaked and tuned it till it was running better, polished it up and generally enjoyed it. I fitted a stereo system from bits out of the garage, which was quickly replaced with a pair of JBL 6x9's after I realised that I couldn't distinguish any lyrics on the REM cassette I was listening to. I tried to be as neat as possible and I think it came out rather well considering I'd never done any interior work before.


IMAG0008_zps13c1ae25.jpg


I also cleaned up a set of magslot imitation alloy wheels, which had been sat in a tyre fitters for years. When I bought them they were initially painted in some sort of metal paint and I decided to return them to polished alloy. I ended up having to paint them after about 30 hours of rubbing and scrubbing in an attempt to clean them up. Unfortunatly they were 10" and I had 8.4" discs which meant that they ended up getting sold on ebay for £40, a shame really as I would have liked to have kept them.

IMAG0018_zpsa8926963.jpg


1 user(s) are reading this topic

0 members, 1 guests, 0 anonymous users