Hi , wondewring if anyone could help with a wiring diagram for a 1978 1000cc mini, in particular for the windscreen washer circuit
thanks


Wiring Diagram For Windscreen Washer
Started by
Kiwi Den
, Dec 23 2012 10:25 PM
13 replies to this topic
#2

grahama
-

- Members
-

- 2,442 posts
Up Into Fourth
- Location: Warrington
- Local Club: None in my area !!
Posted 23 December 2012 - 11:30 PM
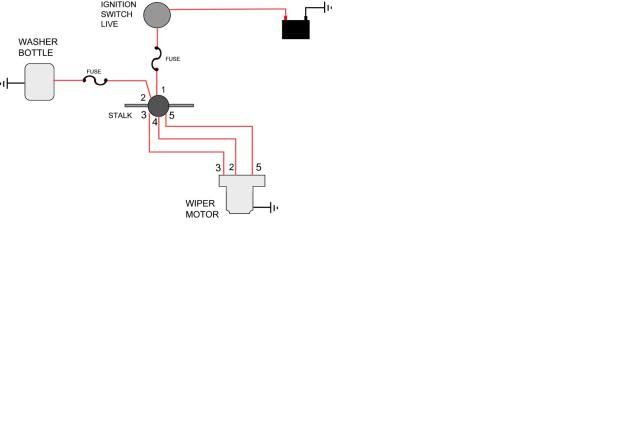
Basically the control wires come from the stalk, the black earth wire which is loomed in with the other earths. There is a live feed, red wire I think, the other coloured ones you can see in the plug on the stalk, small plug I think, and that's it I think from memory.
If that's not enough I will search my loom but there was one wire going to the wiper motor loom that I couldn't see the purpose of as it did nothing, orange I think.
5 wires, earth, live feed, speed 1, speed 2 and the other one !!
Graham
If that's not enough I will search my loom but there was one wire going to the wiper motor loom that I couldn't see the purpose of as it did nothing, orange I think.
5 wires, earth, live feed, speed 1, speed 2 and the other one !!
Graham
#3
Kiwi Den
-
- Noobies
-
- 38 posts
On The Road
Posted 24 December 2012 - 01:00 AM
The wiper motor is fine, all working , its the washer that I am looking for info on.
#4
grahama
-
- Members
-
- 2,442 posts
Up Into Fourth
- Location: Warrington
- Local Club: None in my area !!
Posted 24 December 2012 - 07:45 AM
sorry, misread your post. Very similar though, just two wires, power feed to the washer bottle pump is from the stalk rhs, and the earth is bundled in to an earth loom, earthed on the left of the brake cylinder near the cross beam.
If the washer bottle isn't working, unconnect the two wires from the pump take it out and test it independantly from the loom. Also make sure you are getting 12v at the pump feed when the stalk button is pressed.
pretty much like this except no fuse
Graham
If the washer bottle isn't working, unconnect the two wires from the pump take it out and test it independantly from the loom. Also make sure you are getting 12v at the pump feed when the stalk button is pressed.
pretty much like this except no fuse
Graham
Edited by grahama, 24 December 2012 - 07:47 AM.
#5
AlasdairM
-

- Members
-
- 240 posts
Mini Mad
- Location: Glasgow
Posted 15 May 2020 - 02:15 PM
Hi
My washer pump isn’t working (1990 cooper) and so I pulled off the wires, and tested with a volt meter across the terminals.
I’m only getting 0.2V across the terminals when I press the stalk on the steering column.
Any ideas why?
My washer pump isn’t working (1990 cooper) and so I pulled off the wires, and tested with a volt meter across the terminals.
I’m only getting 0.2V across the terminals when I press the stalk on the steering column.
Any ideas why?
#6
cal844
-

- Members
-
- 9,645 posts
Crazy About Mini's
- Location: Ballingry, Fife
- Local Club: TFMOC
Posted 15 May 2020 - 02:36 PM
Remove the stalk(3 screws) and give it a clean, also check the fuses (iirc the washer is fused with the stalk)
You also want to test the motor, if you have a means of running a live to it, use the earth that's connected to test.
You also want to test the motor, if you have a means of running a live to it, use the earth that's connected to test.
#7
AlasdairM
-
- Members
-
- 240 posts
Mini Mad
- Location: Glasgow
Posted 15 May 2020 - 05:01 PM
Thanks. I’ll try cleaning the connections tomorrow.
Yes my pump may still be working fine of course.
I had another electrical problem this evening too. The indicators all used to work, including the hazard light switch. Tonight though, the hazard switch wouldn’t work at all, and the indicators would stay on for a second before going off- so the frequency was too low.
Could this indicator problem be caused by a bad earth?
#8
cal844
-
- Members
-
- 9,645 posts
Crazy About Mini's
- Location: Ballingry, Fife
- Local Club: TFMOC
Posted 15 May 2020 - 05:56 PM
It may well be a bad earth, give the earth point a clean it should be on the bulkhead triangulation on the drivers side(on a RHD car)
#9
mini-mad-mark
-

- TMF+ Member
-
- 867 posts
One Carb Or Two?
- Local Club: northants wot no brakes
Posted 15 May 2020 - 08:41 PM
If you go here:
http://www.theminifo...agrams-redrawn/
You should find the diagram you need or they are all similar enough that one will be relevant to your car but assuming its this one:
 Capture.JPG 25.39K
15 downloads
Capture.JPG 25.39K
15 downloads
Left the heater in as it shows the LGO wire as its LGO live to the stalk/switch which tees to the heater NB there is a LGO feed direct to the wiper motor from the fuse box so make sure you are looking at the correct LGO
#10
mini-mad-mark
-
- TMF+ Member
-
- 867 posts
One Carb Or Two?
- Local Club: northants wot no brakes
Posted 15 May 2020 - 08:45 PM
LGB from the stalk to the washer motor by the way if you wanted to check that you were getting a feed to the motor (as I was waffling on about LGO to explain how the live got to the stalk)
#11
Ethel
-

- TMF Team
-
- 26,074 posts
..is NOT a girl!
- Local Club: none
Posted 16 May 2020 - 08:36 AM
Voltage is also known as "potential difference". When you use a meter what you see is the difference in potential between the 2 probes. Put both probes on the battery +ve terminal, as you'd expect, the meter reads 0v even though there's 12 volts potential the battery.
Stick one probe on the +ve connector and the other on a good earth to see if the motor's getting 12v. Use the ohmmeter function of your meter in a similar fashion to measure the resistance in an unplugged earth connection.
#12
AlasdairM
-
- Members
-
- 240 posts
Mini Mad
- Location: Glasgow
Posted 16 May 2020 - 07:27 PM
Hi folks
So I haven’t sorted my washer problem, but I didn’t take the stalk off yet- so it may be that.
I cleaned up the in-line fuses and the hazard lights started working fine. All 6 bulbs flash at a normal rate, and I can hear the relay clicking (in the engine bay).
The indicators are still not working though. Both sides may flash once or twice, but then stay on solid. I think I will just buy a replacement flasher unit, to do underneath the steering column.
I should mention that I also have the wiper motor apart atm, as I need to replace the brushes. I think I’ll focus on the wiper/washer problem when I’m tackling that.
#13
AlasdairM
-
- Members
-
- 240 posts
Mini Mad
- Location: Glasgow
Posted 19 May 2020 - 02:44 PM
Update:
I’ve taken off the washer stock- thanks for the warning that it has a spring inside of it!
Does anyone know have any tips for getting it back together? Attached is a picture. I think the spring is in the correct place- correct me if I’m wrong. I’ve been placing the cylinder on 2 of the rollers, trying to press the stalk onto the cylinder, then trying to hook the stalk into place.
After working the switch back and forth, it is giving 12V over the terminals at the pump now. The pump still isn’t working, and I checked it by hard wiring it to the battery. I’ll buy a new pump.
Any help on reassembly would be welcome!
7FBE9AEA-0F93-41DB-AF0B-BA406EC4481B.jpeg 54.31K
6 downloads
#14
AlasdairM
-
- Members
-
- 240 posts
Mini Mad
- Location: Glasgow
Posted 19 May 2020 - 08:14 PM
Incase anyone finds this thread later- I managed to get it back together.
The spring is almost in the correct location in the above pic. I then pressed the cylinder into the end of the stalk (against the spring pressure), with the cylinder aligned with the cylinders on the body. Keeping tension on, I then moved the cylinder and stalk between two of the cylinders/rollers on the body, and then engaged the locating tab on the back.
It wasn’t that complicated after all.


1 user(s) are reading this topic
0 members, 1 guests, 0 anonymous users


