Hey all, I have a question that may seem silly but if i don't ask, then im never going to get anywhere. I have a set of spot lamps waiting to be fixed on but where the feck do you attach the lamp bar?? I have two brackets supplied with the kit but still no ideas.
This is the kit that i have...
http://www.ebay.co.u...d=400263361323
Any help would be greatly appreciated.

Spot Lamps & Fixing...
Started by
i_am_neg
, Apr 23 2013 01:44 PM
14 replies to this topic
#2

minisilverbullet
-
- TMF+ Member
-

- 3,799 posts
Up Into Fourth
- Name: Craig
- Location: Sweden
Posted 23 April 2013 - 02:01 PM
I have the same kind of bar!
the two brackets you use to attach the two outside lamps. the bar attaches to these and the two inside lamps to the bar. You should mount the bar flat, i chose to mount it vertically. I was hoping to eliminate some of the vibrations - didn't work!
you can make out the set up in these pics.


the two brackets you use to attach the two outside lamps. the bar attaches to these and the two inside lamps to the bar. You should mount the bar flat, i chose to mount it vertically. I was hoping to eliminate some of the vibrations - didn't work!
you can make out the set up in these pics.


#3
i_am_neg
-
- Noobies
-
- 31 posts
Passed Test
- Location: Wolverhampton
Posted 23 April 2013 - 02:24 PM
THANK YOU!!!!!! 
Did the whole fix take long?
Did the whole fix take long?
#4
minisilverbullet
-
- TMF+ Member
-
- 3,799 posts
Up Into Fourth
- Name: Craig
- Location: Sweden
Posted 23 April 2013 - 02:28 PM
THANK YOU!!!!!!
Did the whole fix take long?
you will need to take the grill of to secure the brackets. And you will also need to drill holes if you don't already have any!
The whole thing isn't difficult and should be enjoyable!
I take mine on and off for every oil change, so fairly quick and easy to fit (refit)
Edited by minisilverbullet, 23 April 2013 - 02:49 PM.
#5
i_am_neg
-
- Noobies
-
- 31 posts
Passed Test
- Location: Wolverhampton
Posted 23 April 2013 - 02:51 PM
So just to make sure i got this right; It looks like the lamp bar is drilled and fixed into the metal behind the bumper? Thats where Ive been scratching my head because i didnt consider the drilling holes bit.
#6
minisilverbullet
-
- TMF+ Member
-
- 3,799 posts
Up Into Fourth
- Name: Craig
- Location: Sweden
Posted 23 April 2013 - 03:06 PM
the two brackets are attached under the bumper and under the grill. 2 holes per bracket!
#7
SamMason
-

- Members
-
- 235 posts
Mini Mad
- Location: North Devon
Posted 23 April 2013 - 09:43 PM
I've used those brackets (but not the bar, something similar though) for my newest set up.
Whip the bumper off. You see the bolt on the brackets? You need that bolt to go under the bumper, so on that wide strip of metal (I forget the technical term) with the back of the bracket pressed up to the front panel (I did it this way to make sure they were in line) then align a second hole/bolt with the slot in the back of the bracket. Sorry I don't have any photos of mine at the moment, but if I get some time I might be able to get a couple for you.
Then I assume the bar mounts on top of the brackets with the lights attaching accordingly. Just like minisilverbullet says![=]](https://www.theminiforum.co.uk/forums/public/style_emoticons/default/sideways.gif)
Make sure you mount the brackets in the right place! I rushed mine & they're about 1/4 - 1/3 of an inch to one side, not really noticeable to the naked eye, but I know its not right so its bugging me... Anyway, it'd be best to mark it all up with a pen/pencil (I used my missus thin highlighter!) before doing any drilling. I'd mock up the bar-bracket set up to know how far apart to mount the brackets too. Another tip, put a layer of masking tape over the area you want to drill/mark. as that'll be easier to mark & will keep the paint in check when center punching & drilling
Hope that helps?
SM
Whip the bumper off. You see the bolt on the brackets? You need that bolt to go under the bumper, so on that wide strip of metal (I forget the technical term) with the back of the bracket pressed up to the front panel (I did it this way to make sure they were in line) then align a second hole/bolt with the slot in the back of the bracket. Sorry I don't have any photos of mine at the moment, but if I get some time I might be able to get a couple for you.
Then I assume the bar mounts on top of the brackets with the lights attaching accordingly. Just like minisilverbullet says
Make sure you mount the brackets in the right place! I rushed mine & they're about 1/4 - 1/3 of an inch to one side, not really noticeable to the naked eye, but I know its not right so its bugging me... Anyway, it'd be best to mark it all up with a pen/pencil (I used my missus thin highlighter!) before doing any drilling. I'd mock up the bar-bracket set up to know how far apart to mount the brackets too. Another tip, put a layer of masking tape over the area you want to drill/mark. as that'll be easier to mark & will keep the paint in check when center punching & drilling
Hope that helps?
SM
#8
i_am_neg
-
- Noobies
-
- 31 posts
Passed Test
- Location: Wolverhampton
Posted 24 April 2013 - 10:37 PM
I've used those brackets (but not the bar, something similar though) for my newest set up.
Whip the bumper off. You see the bolt on the brackets? You need that bolt to go under the bumper, so on that wide strip of metal (I forget the technical term) with the back of the bracket pressed up to the front panel (I did it this way to make sure they were in line) then align a second hole/bolt with the slot in the back of the bracket. Sorry I don't have any photos of mine at the moment, but if I get some time I might be able to get a couple for you.
Then I assume the bar mounts on top of the brackets with the lights attaching accordingly. Just like minisilverbullet says
Make sure you mount the brackets in the right place! I rushed mine & they're about 1/4 - 1/3 of an inch to one side, not really noticeable to the naked eye, but I know its not right so its bugging me... Anyway, it'd be best to mark it all up with a pen/pencil (I used my missus thin highlighter!) before doing any drilling. I'd mock up the bar-bracket set up to know how far apart to mount the brackets too. Another tip, put a layer of masking tape over the area you want to drill/mark. as that'll be easier to mark & will keep the paint in check when center punching & drilling
Hope that helps?
SM
Pictures would help a great deal when you get a moment.
#9
SamMason
-
- Members
-
- 235 posts
Mini Mad
- Location: North Devon
Posted 24 April 2013 - 11:32 PM
I've used those brackets (but not the bar, something similar though) for my newest set up.
Whip the bumper off. You see the bolt on the brackets? You need that bolt to go under the bumper, so on that wide strip of metal (I forget the technical term) with the back of the bracket pressed up to the front panel (I did it this way to make sure they were in line) then align a second hole/bolt with the slot in the back of the bracket. Sorry I don't have any photos of mine at the moment, but if I get some time I might be able to get a couple for you.
Then I assume the bar mounts on top of the brackets with the lights attaching accordingly. Just like minisilverbullet says
Make sure you mount the brackets in the right place! I rushed mine & they're about 1/4 - 1/3 of an inch to one side, not really noticeable to the naked eye, but I know its not right so its bugging me... Anyway, it'd be best to mark it all up with a pen/pencil (I used my missus thin highlighter!) before doing any drilling. I'd mock up the bar-bracket set up to know how far apart to mount the brackets too. Another tip, put a layer of masking tape over the area you want to drill/mark. as that'll be easier to mark & will keep the paint in check when center punching & drilling
Hope that helps?
SM
Pictures would help a great deal when you get a moment.
Right-o boss! I'll see what I can rustle up for ya

#10
i_am_neg
-
- Noobies
-
- 31 posts
Passed Test
- Location: Wolverhampton
Posted 26 April 2013 - 06:08 PM
I've used those brackets (but not the bar, something similar though) for my newest set up.
Whip the bumper off. You see the bolt on the brackets? You need that bolt to go under the bumper, so on that wide strip of metal (I forget the technical term) with the back of the bracket pressed up to the front panel (I did it this way to make sure they were in line) then align a second hole/bolt with the slot in the back of the bracket. Sorry I don't have any photos of mine at the moment, but if I get some time I might be able to get a couple for you.
Then I assume the bar mounts on top of the brackets with the lights attaching accordingly. Just like minisilverbullet says
Make sure you mount the brackets in the right place! I rushed mine & they're about 1/4 - 1/3 of an inch to one side, not really noticeable to the naked eye, but I know its not right so its bugging me... Anyway, it'd be best to mark it all up with a pen/pencil (I used my missus thin highlighter!) before doing any drilling. I'd mock up the bar-bracket set up to know how far apart to mount the brackets too. Another tip, put a layer of masking tape over the area you want to drill/mark. as that'll be easier to mark & will keep the paint in check when center punching & drilling
Hope that helps?
SM
Pictures would help a great deal when you get a moment.
Right-o boss! I'll see what I can rustle up for ya
Cheers bud. Appreciated
#11
SamMason
-
- Members
-
- 235 posts
Mini Mad
- Location: North Devon
Posted 28 April 2013 - 09:23 PM
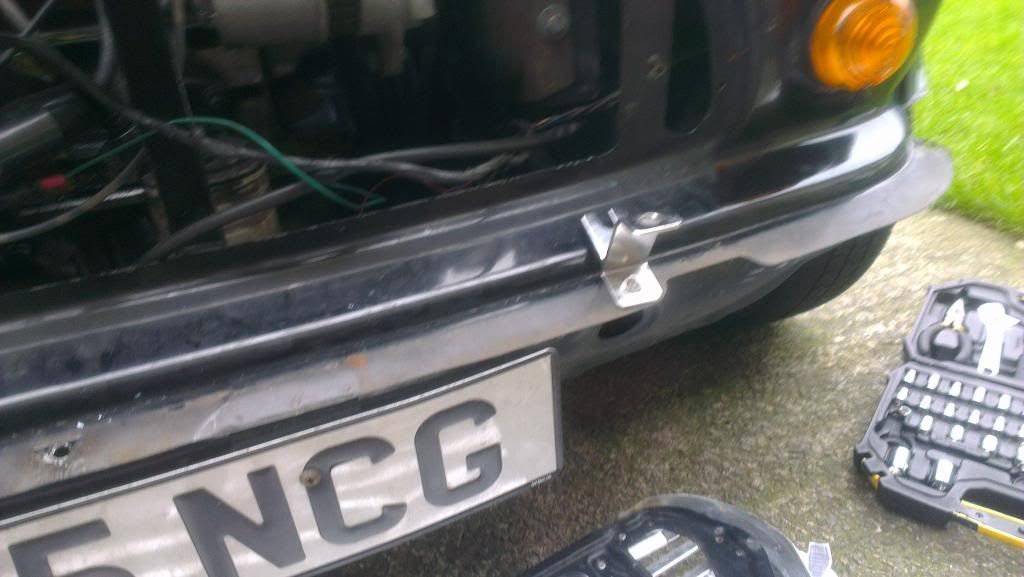
Right, they might not be the best shots. But I didn't have time to take the bumper off, so you'll have to bare with me. Also, they are big pictures, I'm not re-sizing them to make the details less visible 
Mine aren't strictly correct. I already had two holes drilled in the front panel from my previous spotlight setup & didn't want to drill more holes while I could use existing ones with a little modification.
Overview of the bracket. You can see how it sits with one part under the bumper & how its bolted in two places.
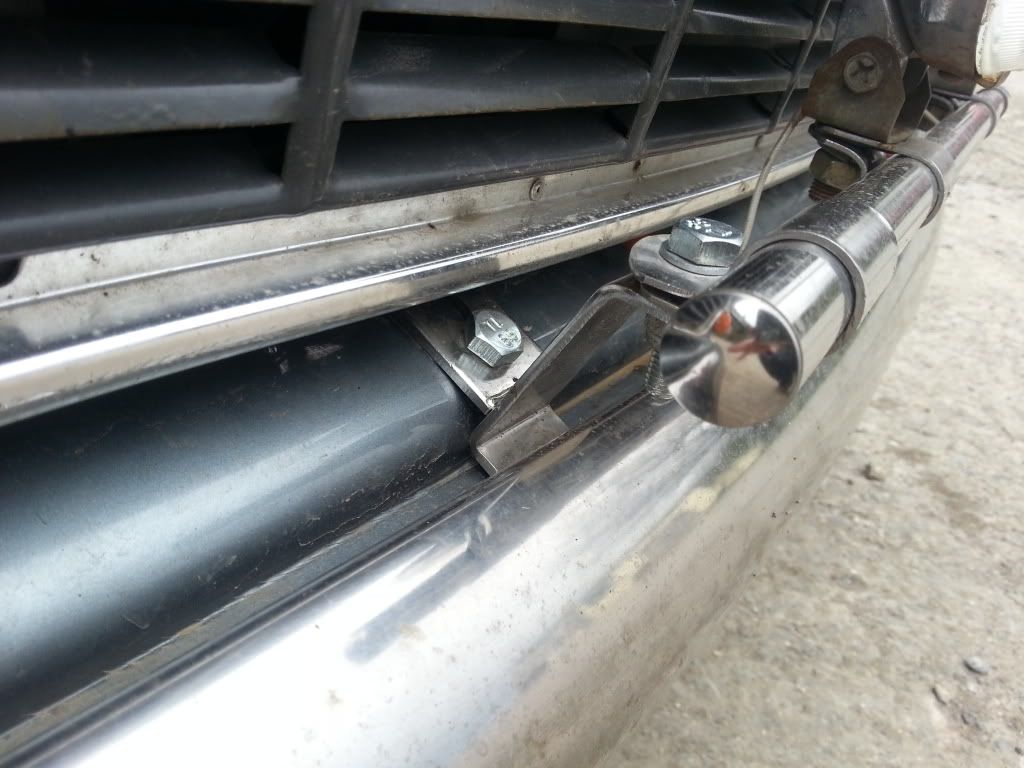
Here is the bolt from underneath the bumper. This is the bolt that is attached to the bracket itself, there will be another bolt like this behind the valance (this one is a real bugger to get to!)
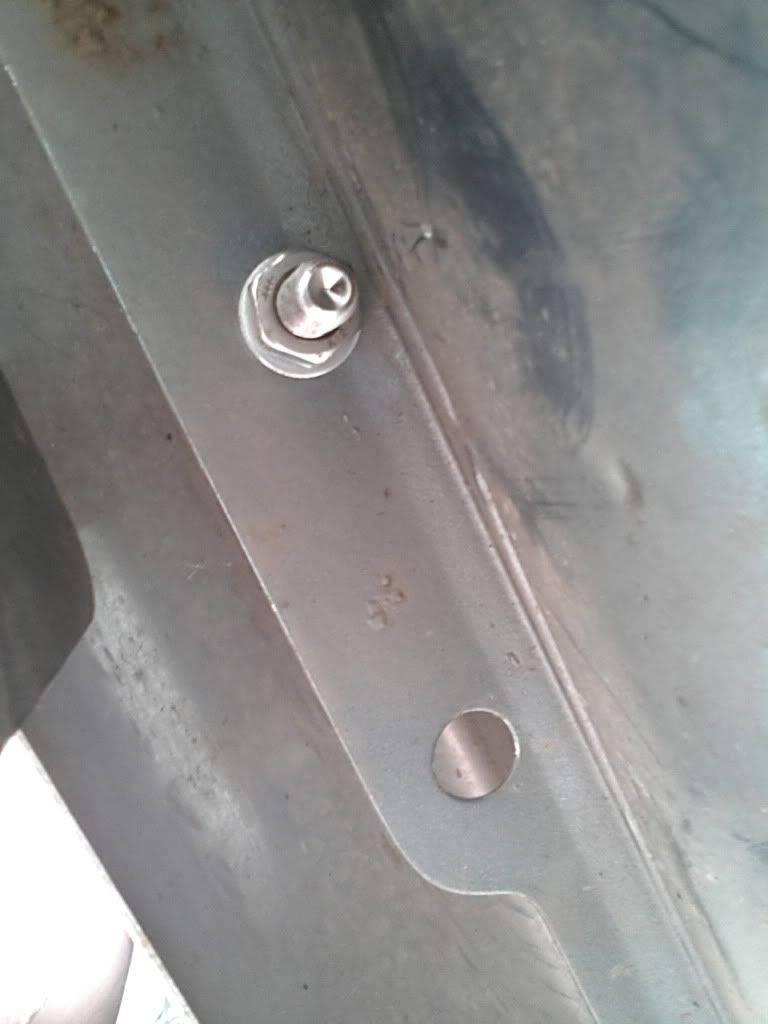
This is a close up of the slot & my modification. I already had a hole drilled where the bolt is so that's why I did it like this. Anyway, you shouldn't need to that so you'll just need to dill a hole in line with the slot.
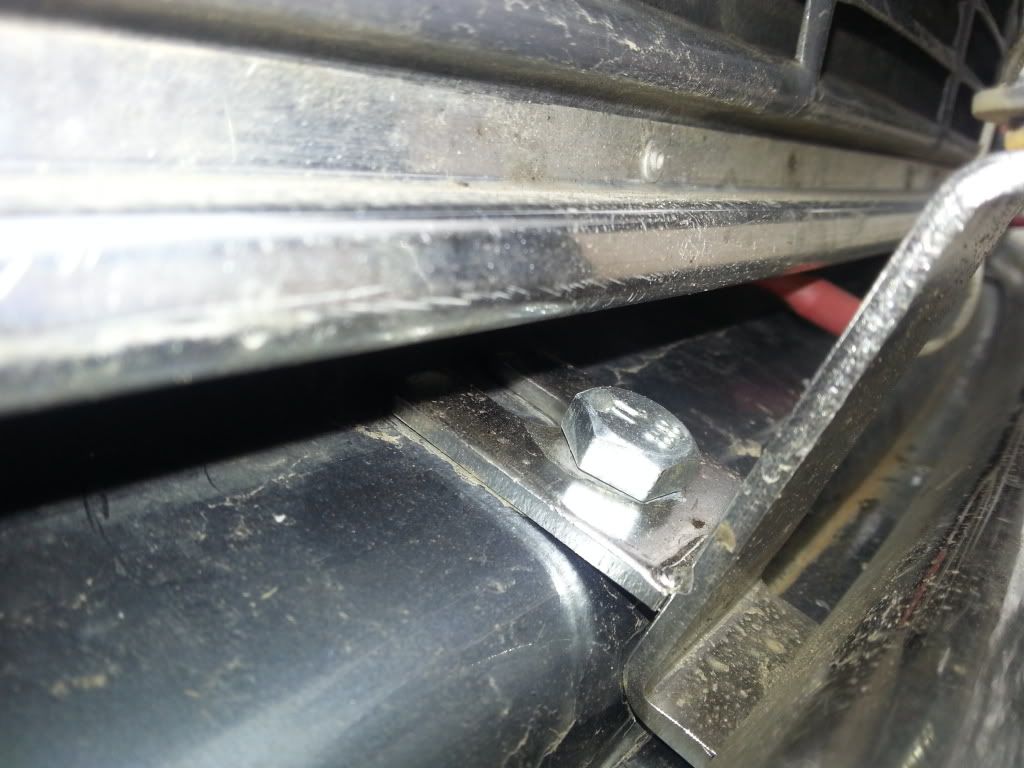
Does that help you at all?
#12
creakyjaws5533
-
- TMF+ Member
-
- 1,195 posts
My jaw needs oiling. Where's the WD40??
- Location: Bristol
Posted 28 April 2013 - 09:43 PM
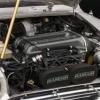
One of my brackets
#13
i_am_neg
-
- Noobies
-
- 31 posts
Passed Test
- Location: Wolverhampton
Posted 02 May 2013 - 08:53 PM
Right, they might not be the best shots. But I didn't have time to take the bumper off, so you'll have to bare with me. Also, they are big pictures, I'm not re-sizing them to make the details less visible
Mine aren't strictly correct. I already had two holes drilled in the front panel from my previous spotlight setup & didn't want to drill more holes while I could use existing ones with a little modification.
Overview of the bracket. You can see how it sits with one part under the bumper & how its bolted in two places.
Here is the bolt from underneath the bumper. This is the bolt that is attached to the bracket itself, there will be another bolt like this behind the valance (this one is a real bugger to get to!)
This is a close up of the slot & my modification. I already had a hole drilled where the bolt is so that's why I did it like this. Anyway, you shouldn't need to that so you'll just need to dill a hole in line with the slot.
Does that help you at all?
Fantastic....
Great photos - I just have to do it now. I hear the weekend is looking nice... maybe a good time. Thanks. If i do it ill post some pics of my progress.
#14
i_am_neg
-
- Noobies
-
- 31 posts
Passed Test
- Location: Wolverhampton
Posted 02 May 2013 - 09:03 PM
Did you guys do anything to protect the metal on the front panel as you drilled through? To stop splitting etc? And should I wax oil the edge of the drilled hole or something before/after I fix the lamps to it to protect from any rusting?
#15
minisilverbullet
-
- TMF+ Member
-
- 3,799 posts
Up Into Fourth
- Name: Craig
- Location: Sweden
Posted 03 May 2013 - 08:31 AM
Just dab some paint on it. or some nail varnish if you have some.
I also cut a thin piece of bicycle tyre tube and placed it between the bracket and car, and waxolyd all toughing surfaces.


1 user(s) are reading this topic
0 members, 1 guests, 0 anonymous users


