Absolutely love it!!!!!!!!!!!!!!!!

Mini City E - Rebuild Of The Rebuild..
Started by
bloomers
, Jul 25 2013 09:39 PM
41 replies to this topic
#31

Minimad100
-
- Members
-

- 416 posts
Speeding Along Now
- Location: Norwich
Posted 10 December 2013 - 09:45 PM
#32
domdee
-

- Members
-
- 1,183 posts
Formally known as dominicdee
- Location: hull
- Local Club: hull clubs on FB
Posted 11 December 2013 - 12:40 PM
nice build
#33
minimissions
-

- Members
-
- 3,427 posts
Up Into Fourth
- Location: North West
- Local Club: M.M.O.C
Posted 11 December 2013 - 01:16 PM
Looks like a really nice car, mate looking forward to seeing it done :)
#34
bloomers
-
- Members
-
- 815 posts
One Carb Or Two?
Posted 12 December 2013 - 09:47 PM
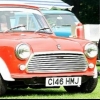
Cheers. She's getting there. Nice to get the glass in as its a massive mile stone. Suddenly looks like a piece of metal which might have an MOT one day..
Bloomers
#35
bloomers
-
- Members
-
- 815 posts
One Carb Or Two?
Posted 30 December 2013 - 07:10 PM
Update -
Over the Christmas break I've managed to make a start on the interior. Firstly, I got two seats as Christmas presents...one from my girlfriend, and one from her mother (wife material!)

I have gone for a single smiths style speedo although will be mounting it in front of the driver rather than centrally.
First I dismantled the clock off of the brackets. I will be using these to make my small dash..

I then made up a plywood face which took the brackets..


I had some old carbon veneer laying around so decided this would look nice to finish the face. This was stuck on with some evo-stik red glue which I had left over from a job. I always paint the surface I'm mounting carbon veneer to as it sometimes has the odd void which would show up.


Next was to cut and trim the carbon. The edges I could trim to near enough with scissors and then sand on a linisher. The middle I cut out roughly and then finished with a half round file, maybe not the correct tool but its what I had!

I have made up a little bracket to hold it in place which I will add on tomorrow.
Thanks for reading!
Bloomers
#36
sam1988
-
- Noobies
-
- 23 posts
Learner Driver
- Location: swindon
Posted 30 December 2013 - 08:54 PM
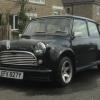
nice build love the colour 
#37
bloomers
-
- Members
-
- 815 posts
One Carb Or Two?
Posted 31 December 2013 - 04:57 PM
A little more progress today..
Quickly got the dash in position to check it all fitted and fitted the rev gauge..

I then started on the harness fixings. I didn't take many photos of this bit but its all pretty self explanatory.

Inside the cab I used 3mm x 60mm round plates to act as large washers.

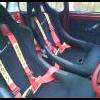
Fitted the drivers seat and harness. beginning to look a bit dust in this picture!

Others bits which are now completed -
Exhaust is now completely done.
Reversing switch has been replaced.
Next -
Wiring, painting front end and arches and fitting tank.
Thanks,
Bloomers
#38
Jared Mk3
-

- Members
-
- 1,974 posts
Has a small thing but it does make a difference
- Location: Kokstad, South Africa
- Local Club: MOCKZN
Posted 31 December 2013 - 05:37 PM
Really coming along nicely there.
#39
bloomers
-
- Members
-
- 815 posts
One Carb Or Two?
Posted 01 January 2014 - 08:00 PM
Hi,
I picked up a TIM Water Temp gauge today which I will be fitting in the center of the dash in a 3 gauge pod. Will post pictures soon!
Happy New Year to all.
Thanks,
Bloomers
#40
bloomers
-
- Members
-
- 815 posts
One Carb Or Two?
Posted 06 January 2014 - 08:40 PM
Got some bits painted last week..
Front end and arches were the last bits to be primed.
First of all I laid everything out and made sure it was all stable enough to withstand the air pressure from the spray gun..
Anyone painted a removable front end, a Black and Decker workmate works perfectly to hold it up!

Quick bit of filler in the old bumper impressions.

This is the primer I have been using throughout. Although the shop gave me black rather than grey...hopefully won't look any different...hopefully! Its a really forgiving product and can be applied nice and thick giving you plenty of material to flat back ready for top coat.

Light dust coat to ensure paint has a good base to adhere to.

Then two/three good coats covered everything. Next will be a sand back by hand and then top coat.

More pictures to come!
Thanks for reading.
Bloomers
Edited by bloomers, 06 January 2014 - 08:41 PM.
#41
CityEPete
-

- Members
-
- 3,920 posts
Up Into Fourth
- Location: On my soapbox....
Posted 06 January 2014 - 09:28 PM
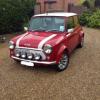
Wicked colour mate, ace!
#42
mahesket
-
- Members
-
- 197 posts
Mini Mad
- Location: Sheffield
Posted 03 February 2014 - 08:03 PM
Said it before but love it!
Tell you what because you are doing such a good job, when done I'll swap you my city e for yours. It's in about the same condition yours was to start with.
Deal yeah?
Tell you what because you are doing such a good job, when done I'll swap you my city e for yours. It's in about the same condition yours was to start with.
Deal yeah?


1 user(s) are reading this topic
0 members, 1 guests, 0 anonymous users


