The rear subframe is the same across all mpi/spi models as far as I know. Good luck with the project.


2000 Cooper Sport Project ( Ollie)
Started by
Zeemax Adventure
, Aug 18 2013 07:56 PM
186 replies to this topic
#151
: post #151")
Zeemax Adventure
-
- TMF+ Member
-

- 301 posts
Speeding Along Now
- Location: Llandudno
Posted 28 July 2016 - 08:26 PM
#152
hennasxi
-
- Noobies
-
- 117 posts
Mini Mad
- Location: Hampshire
- Local Club: LSMOC
Posted 28 July 2016 - 09:47 PM
Sportspack rear subbys had extra plates welded on, two each side - you can see one of them in the photo linked below with the yellow S on it (which were factory applied markings!)
This I believe is the only difference, but it was strengthening for the heavy 13" wheels apparently.
https://dl.dropboxus...ed subframe.jpg
#153
Zeemax Adventure
-
- TMF+ Member
-
- 301 posts
Speeding Along Now
- Location: Llandudno
Posted 11 October 2016 - 10:45 AM
Wow didn't realise it had been so long since i'd updated this. Well finally got the young lad running, didn't take long to fire into life once id realised the fuel hoses were on back to front, and I overcame the flat batteries in the fobs. We now have suspension and brakes, still need to buy shock absorbers but I wanted to get it back on its wheels. This is how it stands now :)


Was amazed how this expansion tank turned out after a soak in bleach followed by a poke around inside with a cloth and a bit o copper brake pipe

New radiator painted and cooling fan fitted

I decided to use waterless coolant as it seems to have so many good reviews. Ended up keeping the RC40 backbox but fitting a new standard cat and downpipe, once money is on the up I may change these as would like a full stainless system.
So now were running and on all 4s again Id best start thinking about getting ready for a nice fresh coat of solar red and platinum silver. Cant wait to see it in paint as I know its not going to take long to put back together.
But the money i'd set aside for the respray ended up buying me another toy...got rid of my F in Feb and have missed it so much so with this being one of the very last of the F model before the TF I just had to give in :s

Edited by Zeemax Adventure, 11 October 2016 - 10:50 AM.
#154
Steve220
-

- Members
-
- 5,115 posts
Crazy About Mini's
- Location: Shropshire
- Local Club: BMC
Posted 11 October 2016 - 11:06 AM
Is that a new alternator?
Edited by Steve220, 11 October 2016 - 11:07 AM.
#155
Zeemax Adventure
-
- TMF+ Member
-
- 301 posts
Speeding Along Now
- Location: Llandudno
Posted 11 October 2016 - 11:36 AM
It is indeed, the bearings were knackered in the old one
#156
Jared Mk3
-

- Members
-
- 1,974 posts
Has a small thing but it does make a difference
- Location: Kokstad, South Africa
- Local Club: MOCKZN
Posted 11 October 2016 - 05:49 PM
That engine bay came out really nice!
#157
Zeemax Adventure
-
- TMF+ Member
-
- 301 posts
Speeding Along Now
- Location: Llandudno
Posted 31 December 2016 - 11:21 AM
Not updated in a while but have been slowly tinkering away in the garage. All the welds have been ground down and dressed, dings filled, seams cleaned up and treated... My dad and I spent yesterday in the garage cutting the front panel to allow for the clearance of the 13inch wheels and getting panels, arches, bumpers and grille lined up and drilled prior to paint. Really pleased with how its coming together now and just need to seal and stoneguard front and rear valances before it goes to the paintshop. After 3 years and 4 months I can now see the end in sight... Hopefully my painter can do it in January and I can start putting it all back together again. Heres some pics I took yesterday.


Well that's all for now... Fingers crossed the next update will see it with a lovely fresh coat of solar red ........
#158
GreaseMonkey
-

- Members
-
- 3,663 posts
Has Ratchet, Will Make Noises
Posted 31 December 2016 - 12:59 PM
That engine bay probably looks better than the day it came out the factory! Nice build.
#159
hennasxi
-
- Noobies
-
- 117 posts
Mini Mad
- Location: Hampshire
- Local Club: LSMOC
Posted 18 February 2017 - 10:51 PM
Taking shape nicely, sometimes taking longer and doing it right is worth the wait ! Looking forward to the best part - paint and rebuilding
#160
minimissions
-

- Members
-
- 3,427 posts
Up Into Fourth
- Location: North West
- Local Club: M.M.O.C
Posted 19 February 2017 - 07:55 AM
That is one straight little mpi, like the above comment this thing is going to look amazing in paint, then the rebuild can start :)
#161
Zeemax Adventure
-
- TMF+ Member
-
- 301 posts
Speeding Along Now
- Location: Llandudno
Posted 26 March 2017 - 09:15 AM
Wow, 3 months and i havent updated. Well the car is currently in the paintshop where its been for 4 weeks as they are so busy but promised its getting done this week. Ive been quietly working away at the interior and now about to do a nice long list of parts to get it on the road. Deadline is L2B so need the car back asap, built up and driven a bit. Big update with pics due soon
#162
Alice Dooper
-

- Members
-
- 391 posts
Speeding Along Now
- Location: Co. Antrim
- Local Club: Minis in Northern Ireland
Posted 27 March 2017 - 11:41 AM
Going to be a great car. Will look fantastic with the new paint job. Enjoy.
#163
finch661
-
- Members
-
- 2,340 posts
Up Into Fourth
- Location: Kirkwall
- Local Club: none
Posted 27 March 2017 - 12:53 PM
just read through the thread, well done. impressed you took that project on. I'm looking forward to see it post paint!
#164
Zeemax Adventure
-
- TMF+ Member
-
- 301 posts
Speeding Along Now
- Location: Llandudno
Posted 17 April 2017 - 09:05 AM
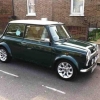
HUUUUGEEE Progress, We have colour. Really impressed with how its turned out. Paintjob is fantastic. So at last the car is home and the rebuild has started. Spent far too much on new parts but didnt want the old ones ruining the finish. Collecting doors, bonnet and boot this weds so thats when it will really start to come together. So here he is in the oven after his fresh coat of solar red and platinum silver


And then a couple once I was back home.


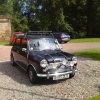
Headlights in, bumper fitted, indicator on. Don't you hate it when you cant find that one clip hence only one indicator until another minispares order  oh and spotlamp brackets fitted....and the wheelarches So exciting seeing it take shape after all this time

Original gutter trim fitted. Really happy that this was still usable. Just missing one of the clips where they join in the centre. I have put a thin smear of grease under this to help prevent corrosion as I have done around any bolts or clips that pass through the bodywork in case paint is caught on the edges.

Wiring loom fed through to the rear and rear lights cleaned up and fitted, and door switches wired up and installed. New screenwash piping fed through from front to rear, boot seal fitted as well as rear arches, and the top dash rail before I forget and fit the screen first.

And then for these tasty overiders and corner bars. Ended up having to remove the bumper to fit them and trim a bit off the front panel edge but really happy with the result. Then again nothing seems to fit straight on with ease, usually missing new nuts or washers to do the job but definitely on track for L2B this year :).

#165
Northernpower
-

- Members
-
- 2,414 posts
Mr. 7-Port
- Name: Graham
- Location: North Yorkshire (God's County)
- Local Club: Its out there somewhere
Posted 17 April 2017 - 09:09 AM
The paint job looks really good. It's great when you get it back from paint and you can start bolting parts on. The only problem you'll have is, you'll want everything as new and shiny as the paint.


4 user(s) are reading this topic
0 members, 4 guests, 0 anonymous users


