Great thread


2000 Cooper Sport Project ( Ollie)
Started by
Zeemax Adventure
, Aug 18 2013 07:56 PM
186 replies to this topic
#76
: post #76")
Hendred
-

- Members
-

- 484 posts
Speeding Along Now
- Location: Cleobury Mortimer Nr Ludlow, Shropshire Name: John
Posted 12 April 2015 - 07:10 PM
#77
Zeemax Adventure
-
- TMF+ Member
-
- 301 posts
Speeding Along Now
- Location: Llandudno
Posted 18 April 2015 - 07:14 AM
I've had the spot welder years. My dad is a retired panel beater so brought it home from work one day when it was replaced by much bigger...more modern equipment.
As for colours I'm thinking a pearlescent blue like audi sepang blue with graphite roof and wheels.
Ps any donations welcome
As for colours I'm thinking a pearlescent blue like audi sepang blue with graphite roof and wheels.
Ps any donations welcome
#78
Zeemax Adventure
-
- TMF+ Member
-
- 301 posts
Speeding Along Now
- Location: Llandudno
Posted 18 June 2015 - 09:57 PM
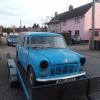
Well fellow mini peeps we're back....this time with a deadline for next years L2B but lets see how things go. Soooooo a few weeks ago I got around to sorting the garage out and pulled Ollie out to remind myself of where i was at........


Now a bit of poking revealed this, it actually goes all the way round the wheelarch and there is no longer a solid lip for the quarter panel to weld too. I decided to order a heritage top arch section to cut out the piece i need and weld into place.

I then had to decide if i was going to remove the original quarter panels and replace, or repair the originals. I have decided to repair so as to keep the original factory spot welds down the door shuts and save a few pennies. They are in decent condition so have purchased repair panels to repair the wheelarch lip. This will be done extremely carefully so as not to distort the panel when removing the old rusty section, or welding in the new piece. Thankfully the repair is behind the sportspack arches, but cutting out and welding in sections to such a flat panel is always tricky to maintain an original factory finish.


So this is where I'm up to. Hopefully get cracking this weekend and finally get working on him. I really want to make some progress with the bodywork while the warm weather is here so keep following :)
thats all for now
#79
Zeemax Adventure
-
- TMF+ Member
-
- 301 posts
Speeding Along Now
- Location: Llandudno
Posted 03 July 2015 - 01:16 PM
Little bit of progress at long last. Removed the upper arch and cut out the rust from the quarter. The quarter was stepped using a stepper tool as it was cut to help prevent any flexing and also provide a recessed surface for the new repair panel to sit and be spot welded against. will also add a few mig welds for added strength. Should be a nice neat repair once ground down and will only need a light skim of filler some pics below


some pics below

#80
Zeemax Adventure
-
- TMF+ Member
-
- 301 posts
Speeding Along Now
- Location: Llandudno
Posted 25 September 2015 - 12:25 PM
Well another couple of months have passed and still nothing exciting to write about  I always seem to be working but really need to make time for this if its going to be ready for L2B 2016 so December is my deadline to finish the body. Doesnt help my mig welder has packed up too Anyway to give me a boost Ive tipped the car on its side and cleaned the underside....Rovers underbody protection wasnt applied with care and protection in mind seeing as one side was thicker than the other, and was very patchy. Still got the boot floor to do, though this is mostly road dirt and surface rust.


Lets hope I can make some serious progress in the coming months
#81
Zeemax Adventure
-
- TMF+ Member
-
- 301 posts
Speeding Along Now
- Location: Llandudno
Posted 22 November 2015 - 04:41 PM
Hey guys and gals......time for another update. Unfortunately i have been crazy busy with work so my dads been busy getting on with the bodywork for me. This however means a shortage of progress pics and more pics of the finished repair. Anyway to start the old rusty bits of sill and floor were cut out and a nice fresh piece welded in, as well as welding the outer sill along the bottom edge. He still needs to finish welding here as will do a continuous weld all the way along.


After cleaning the floor up a few areas needed the rust cutting out and fresh metal welding in. mostly the boot floor and where the real bulkhead is welded to the seat base.


Then it was onto fitting the rear valance...Even though the valance and closing sections were heritage items, they were still a nightmare to align (or so my dad tells me). It does look good now. Its great to see some fresh metal going into the shell again.


While the car was on its side the closing panels were fitted to the scuttle and repairs done to the lower part of the flitch panel. Its great to see it finally taking shape


Now all the welding is pretty much done on the underside and everything ground down, i gave it a thorough degrease and thought id try out this Bilt hamber rust converter gel for the remaining surface rust. It seems to get great reviews on various sites. I covered all areas that had a bit of rust visible and have covered it in clingfilm to leave for 48 hours.

Hopefully will get around to washing this off on tuesday and getting a few coats of bonda zinc primer on. Again after reading various reviews on forums this seems to be a popular and reasonably priced primer that works and gives good protection...Nothing better than peoples personal reviews. I shall then leave this to cure before tidying the repairs with filler, and sealing. Im going to use 3M seam sealer to all joins and once dry a nice even coat of 3M 08668 stonechip protection. This will then be primed and painted in the final colour
Edited by Zeemax Adventure, 22 November 2015 - 04:44 PM.
#82
slidehammer
-

- Members
-
- 1,202 posts
One Carb Or Two?
- Location: Surrey
- Local Club: LSMOC
Posted 22 November 2015 - 07:57 PM
Keep up the good work. I know it is going back over old ground but £1,500 was a good buy, I was worth more than that in parts! Regarding paint keep it standard as it was one of the roll out models even if it isn't a 500 Cooper Sport. In my opinion too many of the rarer Minis are loosing their identities. I think there are still plenty of more common models or models that lost their true identity years ago out there as projects that it doesn't matter if you carry out loads of mods on and doesn't detract from them at all.
#83
wingnut
-
- Members
-
- 467 posts
Speeding Along Now
- Location: bury st edmunds
Posted 22 November 2015 - 08:30 PM
I remember i bought a sport pack new in 2000.It had to go back to the body shop because the underneath was still mainly in primer!
#84
Zeemax Adventure
-
- TMF+ Member
-
- 301 posts
Speeding Along Now
- Location: Llandudno
Posted 22 November 2015 - 09:26 PM
Keep up the good work. I know it is going back over old ground but £1,500 was a good buy, I was worth more than that in parts! Regarding paint keep it standard as it was one of the roll out models even if it isn't a 500 Cooper Sport. In my opinion too many of the rarer Minis are loosing their identities. I think there are still plenty of more common models or models that lost their true identity years ago out there as projects that it doesn't matter if you carry out loads of mods on and doesn't detract from them at all.
I still think it was a good buy... even if the new panels have cost me almost the cost of the car. Will be worth it though. Ive decided to keep it in its original colour...In fact the whole car will be standard apart from the RC40 backbox that came with the car.. minis should ALWAYS be heard ;)
As for underbody protection, if id have bought one new (id have been a very rich teenager at 14) the dealer would have had one extremely pee'd off customer. The boot floor was hardly protected.
#85
slidehammer
-
- Members
-
- 1,202 posts
One Carb Or Two?
- Location: Surrey
- Local Club: LSMOC
Posted 22 November 2015 - 10:33 PM
Keep up the good work. I know it is going back over old ground but £1,500 was a good buy, I was worth more than that in parts! Regarding paint keep it standard as it was one of the roll out models even if it isn't a 500 Cooper Sport. In my opinion too many of the rarer Minis are loosing their identities. I think there are still plenty of more common models or models that lost their true identity years ago out there as projects that it doesn't matter if you carry out loads of mods on and doesn't detract from them at all.
I still think it was a good buy... even if the new panels have cost me almost the cost of the car. Will be worth it though. Ive decided to keep it in its original colour...In fact the whole car will be standard apart from the RC40 backbox that came with the car.. minis should ALWAYS be heard ;)
As for underbody protection, if id have bought one new (id have been a very rich teenager at 14) the dealer would have had one extremely pee'd off customer. The boot floor was hardly protected.
It is amazing when you look at them and see just how little they bothered with rust protection at the factory. Also they only seemed to put paint on where it showed and nowhere else.
#86
Zeemax Adventure
-
- TMF+ Member
-
- 301 posts
Speeding Along Now
- Location: Llandudno
Posted 22 November 2015 - 10:59 PM
Well they defo weren't built to last
#87
Zeemax Adventure
-
- TMF+ Member
-
- 301 posts
Speeding Along Now
- Location: Llandudno
Posted 24 November 2015 - 10:13 PM
Been down to the garage tonight to see how the bilt hamber rust converter was working. I must say its pretty impressive stuff and has certainly made a difference. This is how i found it after 48 hours now the gel has done its work

and now after ive washed it all off

time to skim over the repairs and then a few coats of primer. more pics to come
#88
Zeemax Adventure
-
- TMF+ Member
-
- 301 posts
Speeding Along Now
- Location: Llandudno
Posted 29 November 2015 - 08:30 PM
Well guys and gals, a bit more progress today. Got the repairs skimmed over with filler, rubbed down then applied a coat of Bonda primer. I've read nothing but good reviews about this stuff. In fact I was impressed with how easy it was to apply (i thought it would be watery) but it was just right to paint on with an even coverage. Im unsure whether to give it another coat though...Any of you peeps had any experience with it??


I shall leave it 7 days to cure now (unless I second coat) before applying seam sealer and stoneguard...finally things are taking shape
#89
minimissions
-

- Members
-
- 3,427 posts
Up Into Fourth
- Location: North West
- Local Club: M.M.O.C
Posted 30 November 2015 - 06:34 AM
Thats looking great under there now top work pal...
#90
Zeemax Adventure
-
- TMF+ Member
-
- 301 posts
Speeding Along Now
- Location: Llandudno
Posted 30 November 2015 - 08:16 PM
Got the second coat on tonight. I've decided to tackle this jungle too

Rear loom has been tested, cleaned and is spot on. Just this bit to repair on the SRS loom. Main loom isn't looking too bad apart from a could of broken wires to the headlight adjuster. All will be checked though. Easier sorting wiring issues now than when in the car.


Rear loom has been tested, cleaned and is spot on. Just this bit to repair on the SRS loom. Main loom isn't looking too bad apart from a could of broken wires to the headlight adjuster. All will be checked though. Easier sorting wiring issues now than when in the car.


1 user(s) are reading this topic
0 members, 1 guests, 0 anonymous users


