Hello
After about two hours, finally managed to get the subframe back on but is this normal? The holes didn't align properly? The rear mounting points, but the holes havnt been changed?
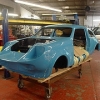
Also I think I've put the radius arms on the wrong sides even though I checked and rechecked and yet if you check out these images, it looks like a huge gap
http://imgur.com/vOw2Gxl
http://imgur.com/3RyBEEc
http://imgur.com/I5ZxvXX
http://imgur.com/ahf2UV4
http://imgur.com/7RfM2JR
What is the ground clearance for a classic mini?
Thank you in advance
Renny


Subframe Problem
Started by
Renny
, Nov 04 2013 01:40 PM
6 replies to this topic
#2

lrostoke
-

- Members
-

- 6,923 posts
Crazy About Mini's
- Location: Maybank, Staffordshire
- Local Club: none
Posted 04 November 2013 - 02:01 PM
new bushes normally cause you to do a bit of swearing and levering to get the subframe in.
Have you fitted new donuts , these take a while to settle.
If the turrets fit then radius arm can't be on the wrong side.
Also make sure the ball and cup are located properely
#3
zerobelow
-
- Noobies
-
- 136 posts
Mini Mad
- Location: San Mateo, California
Posted 04 November 2013 - 04:18 PM
At least on my subframe, the arms wouldn't be able to go on wrong, because the extended bit that catches the knuckle would foul the subframe if installed upside down.
The knuckle should be at the bottom of the radius arm.
Also, and I believe there are different ones, but I found that the rear trunnions that have a long and a short side aren't symmetrical. I had to mount mine with the shorter trunnion side towards the front of the shell to get the holes to line up. This was on a new heritage shell, and it came with the trunniins mounted the other way round.
#4
Renny
-
- Noobies
-
- 61 posts
Stage One Kit Fitted
- Location: Place
Posted 04 November 2013 - 07:59 PM
Thank you both for your replays, both bottom mounting holes aligned up and are flush, therefore I don't see how my rear ones can be out of alignment therefore I believe it is as suggested due to the new bushes I've put on!
My radius arms are I believe correct too as the little loop that the flexie and brake piping attaches on to is on the top, which is the same on my photos of when I first took it off two years ago but, for some reason I still feel like it's not correct, as they can't contract upwards and the suspension strut is extended fully I'll take some photos and edit once I've uploaded em
My radius arms are I believe correct too as the little loop that the flexie and brake piping attaches on to is on the top, which is the same on my photos of when I first took it off two years ago but, for some reason I still feel like it's not correct, as they can't contract upwards and the suspension strut is extended fully I'll take some photos and edit once I've uploaded em
#5
lrostoke
-
- Members
-
- 6,923 posts
Crazy About Mini's
- Location: Maybank, Staffordshire
- Local Club: none
Posted 04 November 2013 - 08:50 PM
were the radius arms free to pivot before you fitted the suspension components.
#6
Renny
-
- Noobies
-
- 61 posts
Stage One Kit Fitted
- Location: Place
Posted 04 November 2013 - 09:29 PM
They did pivot down yes (as in towards the ground) but not up, as they can't go up can they? Or should they be able to?
The first image is it fully extended to reach the hole in the wheel arch to attach
http://imgur.com/BudDvuZ
This is the top of the radius arm, as I say the brake pipe loop is on top, is this correct?
http://imgur.com/rm3FMcl
The first image is it fully extended to reach the hole in the wheel arch to attach
http://imgur.com/BudDvuZ
This is the top of the radius arm, as I say the brake pipe loop is on top, is this correct?
http://imgur.com/rm3FMcl
#7
lrostoke
-
- Members
-
- 6,923 posts
Crazy About Mini's
- Location: Maybank, Staffordshire
- Local Club: none
Posted 04 November 2013 - 10:21 PM
take the wheel off and show photos side on...so we can see the connection of trumpet to cone, and also how the cone is sitting in the subframe
and also the end of the trumpet where it attaches to the radius arm.


1 user(s) are reading this topic
0 members, 1 guests, 0 anonymous users


