Hi guys, I have got a pair of inner wings to fit, the car is a bare shell and the old inner wings are removed. One of the two new inner wings I have (off side) has the reinforcement panel already spot welded to the inside of the wing, the other does not, making this reinforcement panel is not a problem as I work in a fab shop with guillotine and press brake etc. has anyone experience of this job as I feel it would have been better if neither wing had the extra panel, I would have plugged the reinforcement panel to the crossmember then flushed off a little then plugged the wing to this. As the panel is already on, do I fit it to both wings and then plug right through both panels onto the crossmember. I guess if it is done thoroughly it can be done either way, but will probably do both the same. Any pics would be helpful. Thanks

Fitting New Heritage Inner Wings
Started by
russelli
, Mar 11 2014 07:44 PM
7 replies to this topic
#1

russelli
-
- Noobies
-

- 53 posts
Stage One Kit Fitted
- Local Club: lotus seven ownners club
Posted 11 March 2014 - 07:44 PM
#2
russelli
-
- Noobies
-
- 53 posts
Stage One Kit Fitted
- Local Club: lotus seven ownners club
Posted 13 March 2014 - 06:55 PM
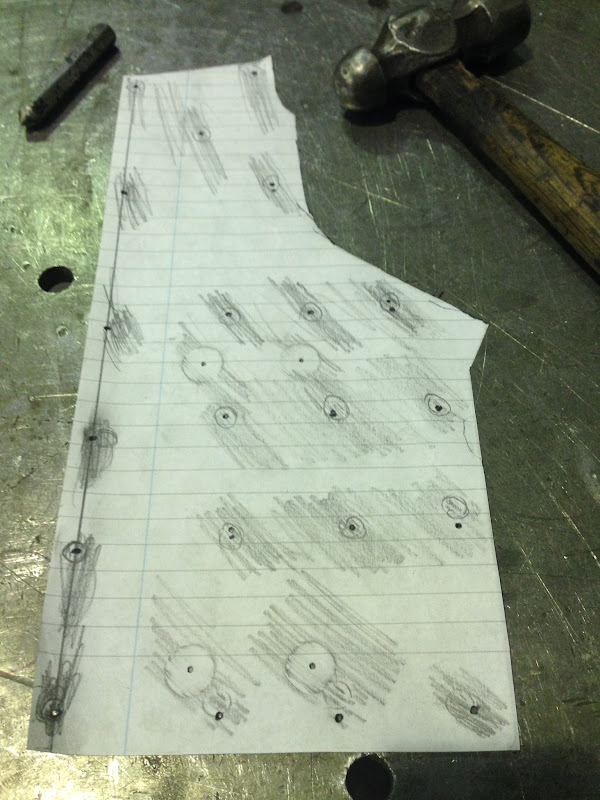
80 views and still no one has any input, well I have made another reinforcement plate and will attach it to the wing, then attach to the cross member, unless anyone can suggest a better way.
Used a piece of paper to rub the detail from the fitted panel to make them for new one.

Used a piece of paper to rub the detail from the fitted panel to make them for new one.
#3
jpw1275
-
- Noobies
-
- 2,803 posts
Up Into Fourth
- Location: Warrington
- Local Club: I'm a carb addict!!!!!!!
Posted 13 March 2014 - 07:56 PM
This is a job I have on cards aswell as full a posts aswell so il be interested in this aswell, just in case mine come the same once I've ordered them
Cheers james
Cheers james
#4
sonikk4
-

- Admin
-
- 16,080 posts
Twisted Paint Polisher!!!
- Name: Neil
- Location: Oxfordshire
Posted 13 March 2014 - 08:00 PM
Sorry i should have piped up with this. have a look at the Project Erm link below and you will see what i did with my inner wings and those reinforcement plates.
#5
russelli
-
- Noobies
-
- 53 posts
Stage One Kit Fitted
- Local Club: lotus seven ownners club
Posted 13 March 2014 - 11:12 PM
Thanks Neil , I see your wing came without the reinforcement attached, would have preferred this, but at this stage I am not going to remove the fitted one. So will do both same I think.
#6
tiger99
-

- Members
-
- 8,584 posts
Crazy About Mini's
- Location: Hemel Hempstead
Posted 15 March 2014 - 07:26 PM
That doubler plate is essential, and without it you will get fatigue cracking after a while. It is in one of the most highly stressed parts of the shell, so making and fitting a new one is the only appropriate thing to do.
There may be some advantage in extending it forwards and downwards, i.e. beyond the cut-out for the subframe tower, if you want the car to be really robust, because cracking sometimes starts just there. That is usually, but not always, caused by an improper set of subframe mounts, sometimes it happens after the toeboard mounts fail, unnoticed, and sometimes it just happens at high mileage, and it is a right nuisance to repair.
Issigonis had retired before the Mini structure was horribly butchered by fitting the rubber mounted front subframe, and as far as I can tell, his original design was much more robust in that area.
#7
russelli
-
- Noobies
-
- 53 posts
Stage One Kit Fitted
- Local Club: lotus seven ownners club
Posted 15 March 2014 - 08:53 PM
My last post perhaps wasn't very clear, when I said I would have preferred to wing without strengthening plate, meaning I would have had to have made both myself and like you say tiger99 perhaps made them a bit heavier gauge and more comprehensive. Thanks for the input, have you had experience of fitting the wings with the strengthening already factory fitted?
#8
tiger99
-
- Members
-
- 8,584 posts
Crazy About Mini's
- Location: Hemel Hempstead
Posted 15 March 2014 - 10:47 PM
No, I have never fitted one with the doubler plate already fitted, because a long time ago, it came without the doubler plate, from a Rover dealer. It wasn't cheap either, and I had difficulty finding a suitable piece of steel to make the doubler. The supply of body parts, and sheet steel, is better these days, although some don't fit very well (ask if in doubt, plenty of people here know whose panels fit best where), and no-one that I am aware of lists the doubler plate by itself. Not Somerford, Minispares, Minisport, Bull Motif, or even M-Machine. I don't know why, unless tha flitch panels that they all supply are supposed to have it fitted, and yours was forgotten. There seem to be some other panels that come pre-assembled, for instance the A panel can come welded to the scuttle closer, and in that case I can't see why anyone would bother. Likewise floors, or floor edges, with outer sill fitted, and I can't even begin to imagine how you could use such a thing, as it makes welding the vital rear heelboard/subframe stiffening brackets to the floor (inner sill) impossible. But the case of the flitch panel is much simpler, and if I was a panel supplier, I would fit the doubler, as absolutely everyone is going to need it. (I am at the planning stage for my next Mini project, which is why I have been researching the availability of practically every body panel, and lots of other bits. When I have the car, I know that I will need lots of panels, as is usually the case with Minis. I have also been investigating to see whether there are any parts that can't be replaced at home, and have concluded that anything on a Mini is possible, but the bulkhead is the most difficult, and the steering rack mount is unavailable on its own. I am not normally a body panel "anorak"!)
It makes the fitting quicker if the doubler is already fitted. If not, the new one has to be welded with lots of spots or plugs. Last time I ground the remnant of the flitch off, having cut most of it away. That was not helpful for reassembly. How I will do it next time is to drill the spot welds out, about 8mm (wing will be removed at that stage), and drill right through the flitch panel, doubler and crossmember flange. Then, after a good cleanup and derusting, lots of weld-through primer, etc, (my standards have improved in that area, no more useless chemical rust treatments), the new flitch gets Clecko'd in place, everything around it tried for correct fit, and once it is good, it is plug welded, in that area at least, from the inside, through the holes left in the crossmember flange from the removal process. There is also usually some seam weld between the heavy gusset and the doubler plate, and between the front edge of the doubler and the flitch, although in my cars that seam weld was not always there, possibly only in one. Although not having a Mini for a while, I have replaced a few panels on other cars the same way, by drilling through both old panels, and plug welding through the holes left in the original bodywork, adding seam welds where feasible, and it has worked well.
I have a tendency these days to double seam weld overlapping joints for better water-tightness (the Mini prototypes were fabricated by hand from lots of small pieces of metal, and the seams were MIG or gas welded, so the water leaks were not discovered till the production models, made with pressed panels and spot welds, hit the roads), and it also makes the car withstand impacts better, Many modern cars have robotic MIG seam welding in certain areas for that reason, as testing has shown that it really makes a difference. The flitch can be single or double seam welded to the bulkhead and floor, at least, while the floor, where Issigonis had his leaks, can be double seam welded to the toeboard.
There was a thread on another forum (which I avoid these days, as the people were generally rude and ignorant, and doing illegal things) where someone had TIG welded all the seams, double where they were overlaps, including both edges of the triangular gusset to the doubler plate, and as far as I recall, everywhere else on the car. I think that was going a bit too far, and must have risked serious distortion, as the heat input with TIG is actually more than with MIG. Lovely neat welds though, but how he found the time, I can't begin to imagine. TIG is so slow....
In places where there is poor welding access on the inside, it is not good to drill right through when removing it, and in these places I would cut away as much as possible, and finish with the grinder, as before.


1 user(s) are reading this topic
0 members, 1 guests, 0 anonymous users


