Jump to content


Photo

12V Cigarette Lighter Socket Installation Problem In Spi Mini


  • Please log in to reply
14 replies to this topic

#1 katsuro

katsuro

    On The Road

  • Traders
  • PipPip
  • 44 posts
  • Location: Warwickshire

Posted 16 April 2014 - 04:08 PM

Please bear with me as I’m not well versed at auto-electrical terminologies. I was trying to connect a 12v cigarette lighter type socket to my 1996 Mayfair SPi to use for my SatNav & possibly charging my phone. The method I employed hasn’t quite worked  :unsure: . It has also made me even more confused as to what’s now happening. Basically I’ve read through a number of the previously listed Lighter threads to get some info on how to do this, but so far none of them seemed to apply to my SPi. I looked behind & under the dash for ‘brown’ or ‘green & yellow’ wires. I was met by a jungle of multi-coloured wires where none of them matched what most people have been saying to wire the component to.


However, after finding what appeared to be a separate bunch of 3 wires connected to disused plug tucked behind the passenger air vent under the dash (*See Photo1), I used a voltage meter to test which one had power coming through to it. This bunch has a solid black, brown/black and white/black wire. The white/black wire gave a reading of 11.8 volts. This was without the key on. So I proceeded to wire it up adding a 20A inline fuse as recommended (*See Photo2) to the positive red on the socket. I attached the black negative one to an existing earth point on the bodywork next to it (*See Photo3).


NOW, THIS IS WHERE THINGS GET INTERESTING....

I plugged in an FM Mp3 Transmitter and it didn’t power up. I then plugged in my Samsung phone charger, no sign of charging. I then plugged in a friend’s HTC phone charger & the light on the charger came on. The charging icon on his phone was flickering. When I ran the engine, the flickering icon stabilised slightly, but still flickered. I then used the voltage meter on the inside of the socket to see if any power was coming through. I was still getting a constant 11.8v reading. I then plugged in my TomTom, again the charger showed a green light, but still no power to the TomTom! Checked the earth was connected properly, no change. Since then I’ve been getting static electricity shocks when I touch the door. I'm rather confused by it all now.


Obviously something is amiss here. With my inexperience, I don’t know whether I’ve wired it all incorrectly or is the lighter socket itself faulty? Does anyone know what this seemingly unused bunch wires is because everything electrical is still working in the car?


Your help & advice on how to wire it in properly would be most appreciated. 


*Photo1: https://farm8.static...b700fd290_c.jpg


*Photo2 : https://farm4.static...4b0d935d5_c.jpg


*Photo3: https://farm8.static...b3f8b52a9_c.jpg


Many thanks in advance  :-) 


#2 silve1999

silve1999

    One Carb Or Two?

  • Traders
  • PipPipPipPipPipPipPip
  • 1,146 posts
  • Location: Sussex
  • Local Club: MiniFreakz, Brighton Mini Club

Posted 16 April 2014 - 04:19 PM

black white wire i think is for rev counter... wire it from the ignition switched fuse in the engine bay with a suitable core sized wire :)


#3 katsuro

katsuro

    On The Road

  • Traders
  • PipPip
  • 44 posts
  • Location: Warwickshire

Posted 16 April 2014 - 05:14 PM

black white wire i think is for rev counter... wire it from the ignition switched fuse in the engine bay with a suitable core sized wire :)

Before the installation, I looked & looked for a way into the engine bay from the cabin. Couldn't find an easily accessible place without having to take the dash apart or ripping the soundproofing/insulation foam from the engine bay. Surely there is an easier way of wiring it up to an existing circuit. I'm not confident enough to start dissembling  part of the car to feed a wire through to the engine.


#4 Badboytunes

Badboytunes

    Camshaft & Stage Two Head

  • Members
  • PipPipPipPipPipPipPipPip
  • 1,615 posts
  • Location: Northampton
  • Local Club: MINIS Unleashed

Posted 17 April 2014 - 06:38 AM

I fitted a dual socket to our SPI lat year. I took the power from the heater fan switch with an inline fuse. I cut the original terminal off the heater wire and fitted the extra wire and heater power lead to a new terminal. I have the socket under the dash , below the drivers side air vent. The earth wire was mounted to the dash rail using the screw to secure the socket to the dash rail.This has worked fine and there have been no issues. It took about 10 minutes to do.,


Edited by Badboytunes, 17 April 2014 - 06:39 AM.


#5 bluedragon

bluedragon

    Mini Mad

  • Members
  • PipPipPipPip
  • 287 posts

Posted 17 April 2014 - 09:39 PM

I ran a power wire of the appropriate gage (14?) from the battery in back. I put in an inline fuse for protection (a step which I feel must not be left out.) The wire is hidden beneath the carpeting, and there's a gap to fish the wire through from the boot/battery area. The only drawback is that this is live all the time, so one can drain the battery if you leave something plugged in with the car shut off.


#6 L400RAS

L400RAS

    Up Into Fourth

  • Traders
  • PipPipPipPipPipPipPipPipPip
  • 2,479 posts
  • Local Club: Lincolnshire Mini Owners Club

Posted 18 April 2014 - 04:59 PM

20A blade fuse ?!?   change that for max 5A, possibly 3A.


#7 domdee

domdee

    Formally known as dominicdee

  • Members
  • PipPipPipPipPipPipPip
  • 1,183 posts
  • Location: hull
  • Local Club: hull clubs on FB

Posted 22 April 2014 - 04:45 PM

I fitted a dual socket to our SPI lat year. I took the power from the heater fan switch with an inline fuse. I cut the original terminal off the heater wire and fitted the extra wire and heater power lead to a new terminal. I have the socket under the dash , below the drivers side air vent. The earth wire was mounted to the dash rail using the screw to secure the socket to the dash rail.This has worked fine and there have been no issues. It took about 10 minutes to do.,

is this heater fan switch easy to get at?


#8 Badboytunes

Badboytunes

    Camshaft & Stage Two Head

  • Members
  • PipPipPipPipPipPipPipPip
  • 1,615 posts
  • Location: Northampton
  • Local Club: MINIS Unleashed

Posted 22 April 2014 - 04:48 PM

Yup, its the switch that turn the heater blower on.


Cheers


#9 katsuro

katsuro

    On The Road

  • Traders
  • PipPip
  • 44 posts
  • Location: Warwickshire

Posted 23 April 2014 - 04:00 AM

I fitted a dual socket to our SPI lat year. I took the power from the heater fan switch with an inline fuse. I cut the original terminal off the heater wire and fitted the extra wire and heater power lead to a new terminal. I have the socket under the dash , below the drivers side air vent. The earth wire was mounted to the dash rail using the screw to secure the socket to the dash rail.This has worked fine and there have been no issues. It took about 10 minutes to do.,


Thanks for the tip :). I did look at your method initially, but struggled to find the power wire leading from the loom to the heater switch. Only managed to find the one from the switch to the heater unit located on the passenger side (left). Using the voltage meter I quickly establish that this wire only had power when the switch was turned ON. So couldn't use that one as I'd essentially have to run the heater just to power the socket. I'll probably have to partly dismantle the centre console on the driver side to get to the wire you're on about as it's not immediately visible in the jungle of wires tucked away under the console & wooden dash. I'll let you know how I get on.


#10 katsuro

katsuro

    On The Road

  • Traders
  • PipPip
  • 44 posts
  • Location: Warwickshire

Posted 23 April 2014 - 04:06 AM

I ran a power wire of the appropriate gage (14?) from the battery in back. I put in an inline fuse for protection (a step which I feel must not be left out.) The wire is hidden beneath the carpeting, and there's a gap to fish the wire through from the boot/battery area. The only drawback is that this is live all the time, so one can drain the battery if you leave something plugged in with the car shut off.


Thanks for this tip :). I'll certainly look into this method too. Out of interest how much of the power wire did you use length wise in the end? Also, where did you end up mounting your socket & what amp inline fuse did you use for that? I don't mind having the socket live all the time as I don't tend to have a habit of leaving things plugged in anyway. 


#11 Badboytunes

Badboytunes

    Camshaft & Stage Two Head

  • Members
  • PipPipPipPipPipPipPipPip
  • 1,615 posts
  • Location: Northampton
  • Local Club: MINIS Unleashed

Posted 23 April 2014 - 06:01 AM


I fitted a dual socket to our SPI lat year. I took the power from the heater fan switch with an inline fuse. I cut the original terminal off the heater wire and fitted the extra wire and heater power lead to a new terminal. I have the socket under the dash , below the drivers side air vent. The earth wire was mounted to the dash rail using the screw to secure the socket to the dash rail.This has worked fine and there have been no issues. It took about 10 minutes to do.,


Thanks for the tip :). I did look at your method initially, but struggled to find the power wire leading from the loom to the heater switch. Only managed to find the one from the switch to the heater unit located on the passenger side (left). Using the voltage meter I quickly establish that this wire only had power when the switch was turned ON. So couldn't use that one as I'd essentially have to run the heater just to power the socket. I'll probably have to partly dismantle the centre console on the driver side to get to the wire you're on about as it's not immediately visible in the jungle of wires tucked away under the console & wooden dash. I'll let you know how I get on.


There are 2 wires on the back of the switch, one is a switched live. I just spliced into that wire with a fuse. Easy as that, no dismantling of the centre console required.


#12 katsuro

katsuro

    On The Road

  • Traders
  • PipPip
  • 44 posts
  • Location: Warwickshire

Posted 23 April 2014 - 05:56 PM


I fitted a dual socket to our SPI lat year. I took the power from the heater fan switch with an inline fuse. I cut the original terminal off the heater wire and fitted the extra wire and heater power lead to a new terminal. I have the socket under the dash , below the drivers side air vent. The earth wire was mounted to the dash rail using the screw to secure the socket to the dash rail.This has worked fine and there have been no issues. It took about 10 minutes to do.,


Thanks for the tip :). I did look at your method initially, but struggled to find the power wire leading from the loom to the heater switch. Only managed to find the one from the switch to the heater unit located on the passenger side (left). Using the voltage meter I quickly establish that this wire only had power when the switch was turned ON. So couldn't use that one as I'd essentially have to run the heater just to power the socket. I'll probably have to partly dismantle the centre console on the driver side to get to the wire you're on about as it's not immediately visible in the jungle of wires tucked away under the console & wooden dash. I'll let you know how I get on.


There are 2 wires on the back of the switch, one is a switched live. I just spliced into that wire with a fuse. Easy as that, no dismantling of the centre console required.


I wish it was easy as that :). In mine, I would need to remove part of the center console to get to the back of that heater switch. Believe me I've tried to get to that switch wire you're on about. You'd need hands of a toddler to squeeze your fingers into the back. I guess they don't call them Minis for nothing :D


#13 bluedragon

bluedragon

    Mini Mad

  • Members
  • PipPipPipPip
  • 287 posts

Posted 24 April 2014 - 04:12 AM

Thanks for this tip :). I'll certainly look into this method too. Out of interest how much of the power wire did you use length wise in the end? Also, where did you end up mounting your socket & what amp inline fuse did you use for that? I don't mind having the socket live all the time as I don't tend to have a habit of leaving things plugged in anyway. 


I used about 2.5 meters of 12 gauge wire (probably only needed 14 gage though.) I have an AGC30 amp fuse - probably excessive in terms of capacity, but the socket is rated for that input, and the wire gage more than matches what is needed to safely handle that load over that length.


Short of plugging in a refrigerated picnic cooler or a massive DC/AC converter unit, I cannot ever see needing that much juice. But if I ended up needing to run multiple devices, I could safely use a splitter. I suppose this was a reaction to renting cars that had non-functional 12V sockets, because the previous renters had blown the fuse.


I mounted it to the right of the heater control pull knob, but recessed it about 8" back so I could mount it to solid metal. It can't be seen unless you stoop your neck to look for it, but I can easily plug items in by feel and it's easy to reach. My car is LHD, so for RHD cars you might go the opposite side...


Edited by bluedragon, 24 April 2014 - 04:18 AM.


#14 katsuro

katsuro

    On The Road

  • Traders
  • PipPip
  • 44 posts
  • Location: Warwickshire

Posted 08 June 2014 - 07:57 AM

UPDATED!
 
I finally managed to wire up the 12v socket. Thought I would explain how I did it in the end for those that are looking for info on how to wire theirs. I employed the method "Badboytunes" suggested by taking the power from the Heat Fan switch.
 
 
I started by removing the drivers side panel on the centre console to gain better access to the wires behind the heater fan & rocker switch panels. I then fed the red live wire from the 12v socket under the dash and behind the rocker switches so that it was nearer the heater fan switch wiring. Using a flat screwdriver, I then unclipped the switch from the fan control panel to get to the back of it. That way I was able to quickly identify the ignition switch live wire connected to it. It was an Orange/Green wire covered with what appeared to be some sort of insulation jacket. I'm not sure if all Minis have that colour wire, but I suggest using a voltage tester to confirm it is the right one. I used a circuit tester light whilst turning the ignition to the ACC position to confirm it was indeed the correct wire.
 
 
https://farm4.static...3e77deb5f_c.jpg


After identify the correct wire, I just cut the black insulation jacket around it being careful not to cut into the wire itself. I then fed the heater fan switch (Orange/Green) wire through the open ended side of a 15 Amp cable lock connector. The red wire from the 12v socket was fed into the dead end side of the same connector. I made sure that the red wire was fully inserted into the slot. From there it was a matter of closing the connector & pressing it shut with a pair of pliers. The connector splices the wires & completes the circuit for you. Turned the ignition to the ACC position and hey presto it worked  :D 
 
 
https://farm4.static...c3f09ba76_z.jpg
 
 
Without having to take the centre console panel off, the whole installation should take no less than 30 minutes to do. If you don't have a centre console, it is very easy to locate the heater fan's power wire. Before using the cable connector, I suggest checking the wire with a circuit tester to make sure you have the correct one. You can get a cheap circuit tester light & cable connectors from Halfords or online. Hopefully the info helps those looking to install a 12v power socket in their Mini  :-) .
 
 
https://farm6.static...bd9d9ebea_z.jpg

Attached Files

  • Attached File  1.jpg   90.87K   24 downloads
  • Attached File  2.jpg   49.34K   21 downloads
  • Attached File  3.jpg   71.73K   17 downloads

Edited by katsuro, 08 June 2014 - 08:01 AM.


#15 cambiker71

cambiker71

    One Carb Or Two?

  • Members
  • PipPipPipPipPipPipPip
  • 1,050 posts
  • Location: Peterborough, Cambs
  • Local Club: Cambscustomclassics.com

Posted 08 June 2014 - 06:59 PM

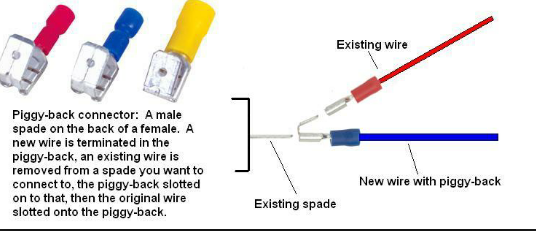
Just to add a little help as requested by Katsuro, instead of using scotch loks a piggyback connector onto the heater switch would make things more reliable, as shown in this picture....
2014-06-08%2009.42.08_zpsz5kf9tiy.png


1 user(s) are reading this topic

0 members, 1 guests, 0 anonymous users