Hi,
I am progressing with the restoration work of my Inno Cooper and the guy who is changing me the floor panels and sanding the car is asking me where do I want to apply Waxoyl.
I explained him that after apply it underside, we should paint it in the body colour to look as the original cars but is coming to me with more questions:
- Where to stop it? I think sill should not be Waxoiled. Isn't it? He says it would be better for rust protection to stop at the door step.
- He suggest to apply it also on the inside of the floor. Is this necessary?
- Would be good if the boot inside is also protected with Waxoyl?
Regards

Full Restoration. Waxoil. Where To Apply It?
Started by
Caribdis
, Jun 01 2014 07:40 AM
9 replies to this topic
#2

Minigirl
-

- Members
-

- 1,109 posts
With Steve
- Location: scottish borders
Posted 01 June 2014 - 08:24 AM
I would paint first then wax oil to avoid it waxing up
#3
sonikk4
-

- Admin
-
- 16,076 posts
Twisted Paint Polisher!!!
- Name: Neil
- Location: Oxfordshire
Posted 01 June 2014 - 09:01 AM
As Minigirl has said paint the car first including the floors. Then you can start adding Waxoil or whatever product you decide on. Any cavity will need some in so definitely the sills, rear valance close outs etc etc.
#4
Caribdis
-
- Noobies
-
- 22 posts
Learner Driver
- Location: La Coruña
Posted 02 June 2014 - 05:59 AM
Thanks for the anwers.
What about the boot? Should I also apply it inside?
Regards
What about the boot? Should I also apply it inside?
Regards
#5
sonikk4
-
- Admin
-
- 16,076 posts
Twisted Paint Polisher!!!
- Name: Neil
- Location: Oxfordshire
Posted 02 June 2014 - 07:06 AM
Inside the boot, no. As long as the boot has been seam sealed around the edges then a decent paint job should suffice.
#6
Rog46
-

- Noobies
-
- 465 posts
Speeding Along Now
- Location: Sussex
- Local Club: NSMOC
Posted 02 June 2014 - 08:37 AM
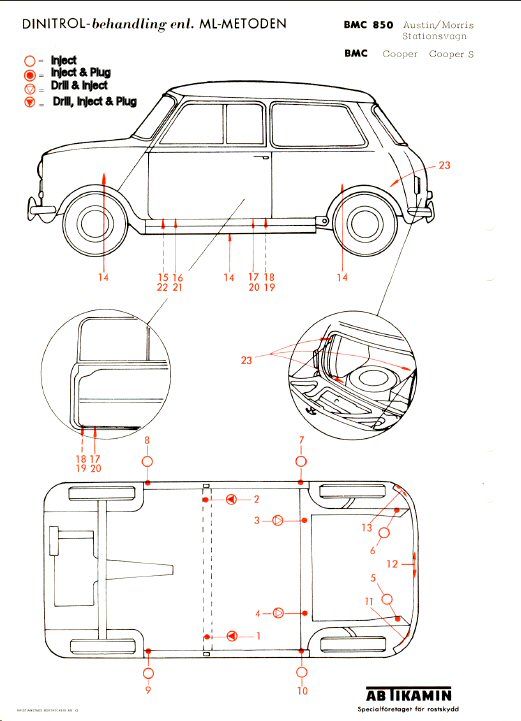
Whilst you are at it here is the diagram of all the cavities that need protecting
http://i1310.photobu...injection-1.jpg
1. There is the forward bulkhead cross member, the floor cross member,
2. the, scuttle corners accessed at the top of the bulkhead near the bonnet hinges,
3 the rear valance closure panels
4. there are 6 coming down from the roof - the door posts which you can do through the hole where the check strap goes
5. the rear subframe, in between/ below where the trumpet sits as this can collect water
6. All of the underneath,
7. battery box, and
8. all the subframe mounting points!
9. Inside the doors especially at the bottom.
Doors - There should be three holes in the bottom of the doors about 1/4" diameter. One in the middle and then one at each end by the curved section Try and drill as close to the radius of the internal door frame flange as possible but don't drill into the door skin. Then paint and then waxoyl (or whatever your choice is) inside the door but make sure your new drain holes are clear.
You can inject Sills through the vents or through the seatbelt holes with an extension probe.You can also stick the tube into the sill from the rear companion bin, take out the liner and you will see the inner sill splits and there is a gap where you can get the lance into.
The vulnerable areas at the front (including the rear of the front wheel arch), at the rear and around the jacking points.
The rear subframe needs protecting all around the radius arm mounting areas and in the trough and webs that run behind the arm.
The A-panels are difficult, being a three layer metal sandwich which is not accessible. Make sure seam sealer is intact where the A-panel joins the inner wing under the car and keep well waxed. Also wax the inner part of the A-panel in the door opening.
#7
neon*girl
-

- Noobies
-
- 98 posts
Stage One Kit Fitted
Posted 02 June 2014 - 09:25 AM
I am in the process of doing a full restoration at the mo and with all panels I am cleaning, neutralising, priming, seamsealing, then rust prevention paint then a coat of standard paint on top.
A little ott maybe but I'm hoping she'll never rust again (!!)
#8
Rog46
-
- Noobies
-
- 465 posts
Speeding Along Now
- Location: Sussex
- Local Club: NSMOC
Posted 03 June 2014 - 06:37 PM
You need to reapply it EVERY year to really keep the rust at bay!
#9
KernowCooper
-

- Mini Docs
-
- 7,847 posts
Sparkie
- Name: Dave
- Location: The South West
- Local Club: Kernow Mini Club
Posted 03 June 2014 - 07:32 PM
Remove the door switch should give access down into the A Panel
#10
Miniminx71
-

- Members
-
- 508 posts
Super Mini Mad
- Location: Wiltshire
Posted 04 June 2014 - 09:35 AM
Inside the boot, no. As long as the boot has been seam sealed around the edges then a decent paint job should suffice.
I would say yes - especially in the battery well. It doesn't do any harm.


1 user(s) are reading this topic
0 members, 1 guests, 0 anonymous users


