Jump to content


Photo

Inner Sill And Floor Repair Panels.


  • Please log in to reply
16 replies to this topic

#1 DiscoDarren

DiscoDarren

    Mini Mad

  • Noobies
  • PipPipPipPip
  • 136 posts
  • Location: Billinghay, Lincolnshire

Posted 06 June 2014 - 03:45 PM

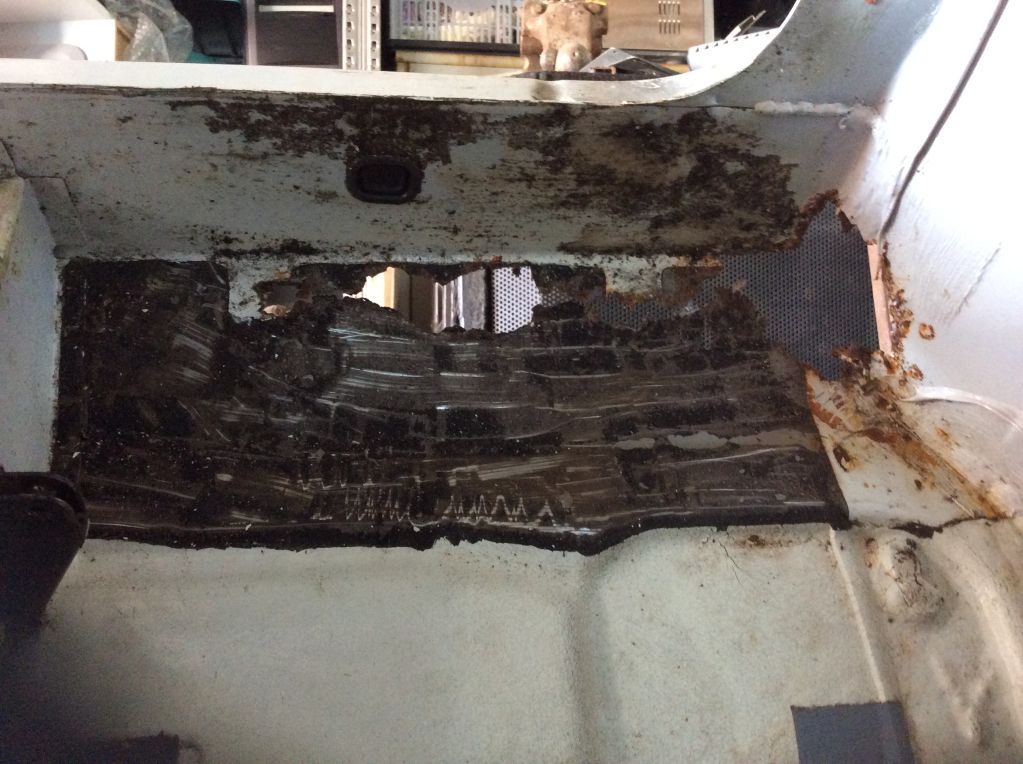
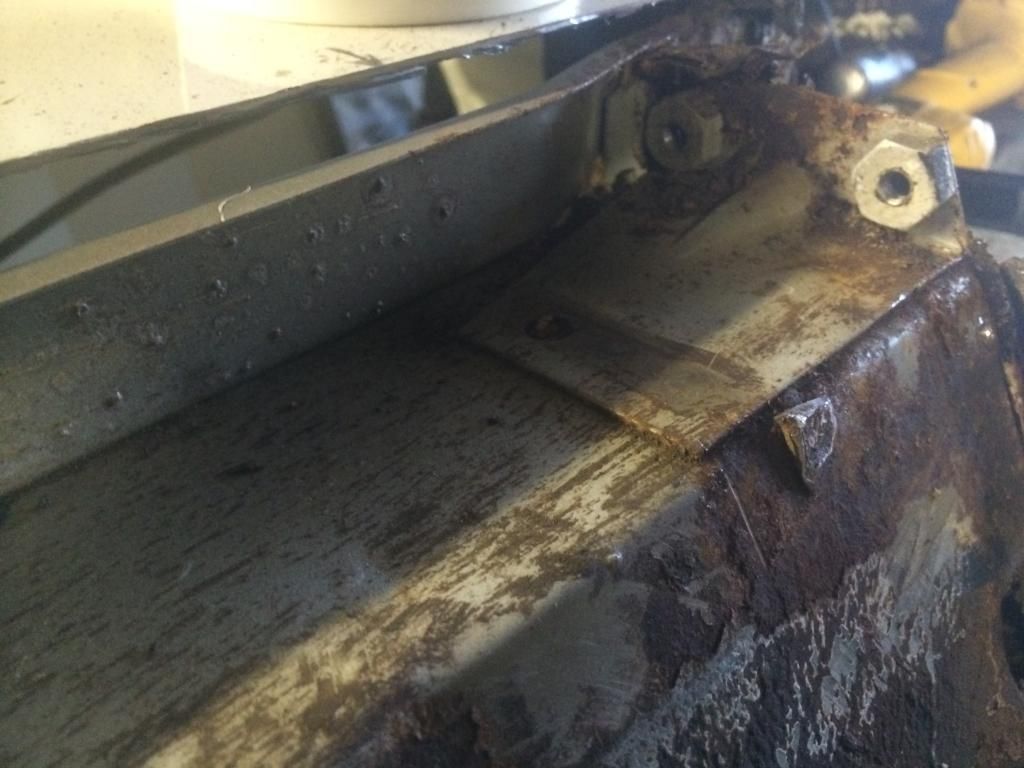
I'm at the stage where I need to start thinking about ordering all the panels I'm going to need to repair my mini. Just need to remove the factory original n/s outer sill to get the full picture......a job that I intend doing after I've finished typing this. I've already took the other outer sill off. It looked like it had been replaced probably 5 or 6 years ago but with very poor protection paint wise and very untidy in general (extremely polite way of describing the Bodge job). The slightly wider replacement sill had been covering up 3 or 4 areas of rot - all in a line, mostly forward of the middle crossmember, presumably where the original sill had been chopped off. I therefore turned to the inside of the car and scrapped away the underseal/sound deadener stuff from the floor. I only needed to go as far as the first flute. The rest appears really sound, inside and out.

So my question is this. Would you advise me to get a new inner sill, because the floor beyond the sill appears ok, or would it be best to get the front floor. That would just leave a couple of bits to patch in the rear. Hopefully the photo will explain better than I can.
3ce184bee8c039428aecf30a43f4a25d_zps2ef3

#2 petehuws

petehuws

    Speeding Along Now

  • TMF+ Member
  • PipPipPipPipPip
  • 329 posts
  • Location: UK

Posted 06 June 2014 - 03:48 PM

Just get the sill for that, I'm in exactly the same boat as you right now with the same rust & I'm just cutting out the inner sill and welding back onto the good floor beyond it, no need for a floor section there as you say it looks good beyond the sill point.


#3 DiscoDarren

DiscoDarren

    Mini Mad

  • Noobies
  • PipPipPipPip
  • 136 posts
  • Location: Billinghay, Lincolnshire

Posted 06 June 2014 - 03:55 PM

Just get the sill for that, I'm in exactly the same boat as you right now with the same rust & I'm just cutting out the inner sill and welding back onto the good floor beyond it, no need for a floor section there as you say it looks good beyond the sill point.


I need a Fitch anyway so I guess that will take care of the big hole you can see at the RH side of my picture. I've been looking at the magnum panels but am I right in thinking the one they describe as a tailored inner sill panel is one of the Bodge it panels you tack over the top?? because I want to cut it out and do the job properly if pos

#4 petehuws

petehuws

    Speeding Along Now

  • TMF+ Member
  • PipPipPipPipPip
  • 329 posts
  • Location: UK

Posted 06 June 2014 - 04:05 PM

Yep, we're definately in the same boat, I too had to replace part of the flitch.  For the sill I bought a full length MMachine part from Somerford here = http://www.somerford...products_id=689 which is excellent quality certainly designed to replace rather than cover.

I had initially bought the cheaper one but when it arrived I was none to please hence me stopping by  Somerford for the M-Machine full length.


in my picture of the drivers footwell you can see the unfinished repairs to my flitch together with my inner sill corrosion and the line wherein I am going to cut away then replace with a section from the M-Machine.


20140606_1649401_zps789832ed.jpg


#5 henri1972

henri1972

    Mini Mad

  • Noobies
  • PipPipPipPip
  • 277 posts
  • Location: north herts

Posted 06 June 2014 - 04:06 PM

hi mine was like that i would change the sill to the first flute that way it will look original i know it is extra work but it is better than having repair plates all over the place you can also buy the repair section for the bottom of the inner flitch where you have the big hole


#6 henri1972

henri1972

    Mini Mad

  • Noobies
  • PipPipPipPip
  • 277 posts
  • Location: north herts

Posted 06 June 2014 - 04:18 PM

sorry to hijack your thread this is mine at the mo

33mbck7.jpg


#7 DiscoDarren

DiscoDarren

    Mini Mad

  • Noobies
  • PipPipPipPip
  • 136 posts
  • Location: Billinghay, Lincolnshire

Posted 06 June 2014 - 04:53 PM

hi mine was like that i would change the sill to the first flute that way it will look original i know it is extra work but it is better than having repair plates all over the place you can also buy the repair section for the bottom of the inner flitch where you have the big hole

.

What if any problems does that present when you get to the back where the companion boxes are? Is it difficult to get at? As for the fitch it's rotted around the air vent and door hinges too unfortunately.

#8 henri1972

henri1972

    Mini Mad

  • Noobies
  • PipPipPipPip
  • 277 posts
  • Location: north herts

Posted 06 June 2014 - 05:00 PM

when you clean the floor underneath you can see the spot welds for the companion bin also look at the base of the b post there is a square plate that is spot welded through the inner sill b post and outer b post  also what condition is the bottom of the companion bin from inside the sill stiffener and closing panels may be rotten can you post a pic 

plus you will have to de weld where the heel board is and the cross member where the seats bolt onto


#9 DiscoDarren

DiscoDarren

    Mini Mad

  • Noobies
  • PipPipPipPip
  • 136 posts
  • Location: Billinghay, Lincolnshire

Posted 06 June 2014 - 05:11 PM

when you clean the floor underneath you can see the spot welds for the companion bin also look at the base of the b post there is a square plate that is spot welded through the inner sill b post and outer b post  also what condition is the bottom of the companion bin from inside the sill stiffener and closing panels may be rotten can you post a pic 
plus you will have to de weld where the heel board is and the cross member where the seats bolt onto

.

Companion bins look good from the inside. I need the ends of the heel boards tho. There's I patch of rust near the subby mounting bolts. I will upload some pictures in a bit. Not at home at the minute

Edited by DiscoDarren, 06 June 2014 - 05:17 PM.


#10 DiscoDarren

DiscoDarren

    Mini Mad

  • Noobies
  • PipPipPipPip
  • 136 posts
  • Location: Billinghay, Lincolnshire

Posted 06 June 2014 - 08:20 PM

Right I've managed to get the n/s outer sill off now. And I've cut the bottom inch or so of the rear quarter off so I could get a better look.

0A098944-9FD0-4BD4-9261-683962AD864D_zps

The sill stiffener that's missing came off with the sill. It's not rotten but the spot welds snapped. Think it was down to my choice of hammer size. 😀. All looks pretty good to me.

Edited by DiscoDarren, 07 June 2014 - 08:40 AM.


#11 jpw1275

jpw1275

    Up Into Fourth

  • Noobies
  • PipPipPipPipPipPipPipPipPip
  • 2,803 posts
  • Location: Warrington
  • Local Club: I'm a carb addict!!!!!!!

Posted 07 June 2014 - 07:52 AM

Have you braced the inside of the car ? You need to do this before you chop your inner and outer sill out otherwise your shell may twist

Cheers james

#12 jpw1275

jpw1275

    Up Into Fourth

  • Noobies
  • PipPipPipPipPipPipPipPipPip
  • 2,803 posts
  • Location: Warrington
  • Local Club: I'm a carb addict!!!!!!!

Posted 07 June 2014 - 07:54 AM

Here's a picture of mine , I've braced to the windscreen as I'm cutting the whole passenger corner out at some point

image_zps31f5b1a6.jpg

Cheers James

#13 DiscoDarren

DiscoDarren

    Mini Mad

  • Noobies
  • PipPipPipPip
  • 136 posts
  • Location: Billinghay, Lincolnshire

Posted 07 June 2014 - 08:49 AM

Here's a picture of mine , I've braced to the windscreen as I'm cutting the whole passenger corner out at some point image_zps31f5b1a6.jpg
Cheers James


Yes James I have braced her up a bit, not as much as you have done tho, I hope I've done enough. I've welded some inch box across the door holes then diagonally between the two. My door posts and dash rail and solid and I'm doing the repairs one by one rather than chopping loads out in one go. Do you think it'll be ok? Will try and find a picture. Yours looks a proper job. I remember seeing it on a visit to your build thread. Must check back in on everybody else's work when i get time, I find it very inspiring

#14 Daz1968

Daz1968

    Up Into Fourth

  • Members
  • PipPipPipPipPipPipPipPipPip
  • 2,058 posts
  • Location: Dudley

Posted 07 June 2014 - 09:16 AM

Bracing looks good, but I would reconsider the inner sill left inside the car, they are not really suitable for a good repair as they fit around the common rot areas and rely on an over outer sill to cover all the holes mini machine inner and outer to first groove are best I know of

#15 jpw1275

jpw1275

    Up Into Fourth

  • Noobies
  • PipPipPipPipPipPipPipPipPip
  • 2,803 posts
  • Location: Warrington
  • Local Club: I'm a carb addict!!!!!!!

Posted 07 June 2014 - 09:17 PM

Hi daz.... dont worry the inner sill repair panel isnt being used.... sorry for the high jack of your thread

cheers james


1 user(s) are reading this topic

0 members, 1 guests, 0 anonymous users