Jump to content


Photo
- - - - -

Project "unknown"


  • Please log in to reply
6 replies to this topic

#1 AzMaN

AzMaN

    Speeding Along Now

  • TMF+ Member
  • PipPipPipPipPip
  • 457 posts
  • Location: Bedfordshire
  • Local Club: BMC

Posted 22 June 2014 - 05:04 PM

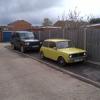
here is my latest acquisition, although this isn't technically true as its been sat in our garage for the last 7 years, but it was my mums and is now mine (i think)


anyways i got it down the lockup to see what i could see. my dad started doing a few bits to it but ran out of time and space so its mainly stripped with the odd patch carried out.


list of things so far to do :

Boot hinges

boot repair panel needs grinding down and re-welding (ran out of gas when welding and looks a mess) also needs battery box but i may be able to patch this.

rear quarters need a patch or suchlike at the bottom of the seam and just a general once over check for rust/filler.

inner sills + passenger side floor patch, both front flinch panels.

passenger door needs either re-skin or a patch weld at bottom of the door.

drivers door is totally gone at the bottom, i may be able to repair it but its looking like a new door to me.

the usual a panels and scuttle.

new bonnet


that's the welding/bodywork side so far, i'll worry about the interior & engine at a later date.


NEVER done bodywork before other than a bit of filler so this is going to be a big learning curve for me in terms of preparation and welding. i took a welding course the other month so i know the gist of what i'm doing but i can see me going through a lot of practice pieces before i take the welder to the car and i'll start in the boot so its not so noticeable if it goes wrong.


ill add decent pictures later in the week but for now my phone ones will have to do.


20140622_155414.jpg

20140622_151135.jpg

20140622_151147.jpg

20140622_151217.jpg

20140622_151126.jpg

20140622_151102.jpg

20140622_151116.jpg


#2 megamini_jb

megamini_jb

    Crazy About Mini's

  • Members
  • PipPipPipPipPipPipPipPipPipPip
  • 5,491 posts
  • Name: Jamie
  • Location: -

Posted 22 June 2014 - 05:11 PM

Looks a decent project to get stuck into. Enjoy!

#3 AzMaN

AzMaN

    Speeding Along Now

  • TMF+ Member
  • PipPipPipPipPip
  • 457 posts
  • Location: Bedfordshire
  • Local Club: BMC

Posted 29 June 2014 - 04:32 PM

new update, rear sub frame dropped and rear valance removed so i can get room to clean up the boot floor and re-weld it also took the fuel tank out which had half a tank of 7yr old fuel (it didn't taste nice when i tried to siphon it)


20140629_154543.jpg


and this is what it had done to the sender unit.


20140629_143753.jpg


#4 kel

kel

    Passed Test

  • Noobies
  • PipPip
  • 34 posts
  • Location: sheffield
  • Local Club: Sheffield mini owners

Posted 29 June 2014 - 08:34 PM

Looks like tar. That's crazy didn't think it would go like that.

#5 AzMaN

AzMaN

    Speeding Along Now

  • TMF+ Member
  • PipPipPipPipPip
  • 457 posts
  • Location: Bedfordshire
  • Local Club: BMC

Posted 14 July 2014 - 05:10 PM

no pictures on this update as i forgot but basically last couple of weekends I've cut out and re-fitted half the boot floor, fitted the 2 new closing panels and halfway through welding the rear valance back on.


Its not very easy to weld upside down I've noticed, the weld dosn't flow more just globules, and then finds its way down the back of your watch strap to burn a hole in you, or just sets fire to your trousers when you wern't looking :( oh and sets fire to that little bit of under-seal that was in a crevice you couldn't get out


next up is to finish the valance weld, paint and under-seal the boot floor section + valance, then to weld in new rear corners of the rear quarter panels (both sides) and a little hole by the drivers tail lights to patch. oh and to patch the floor by the rear seat bins/seat 


#6 AzMaN

AzMaN

    Speeding Along Now

  • TMF+ Member
  • PipPipPipPipPip
  • 457 posts
  • Location: Bedfordshire
  • Local Club: BMC

Posted 21 July 2014 - 02:50 PM

2 steps forward, 3 steps back.


got the floor repair panel welded in along with the closing panel and scuttle. had a deeper poke into the heel board area and its covered in rust all up the side of the arch from under the rear seats. i'm wondering if its wise to just replace the whole floor + arches and be done with it instead of patching here and there. what do you people think. ill put up a pic of my holes.


20140721_144954.jpg

20140721_144942.jpg

20140721_144929.jpg


also how the hell do you get the spot-welds out from panels and release the panel. i tried in vein to do it earlier and got so frustrated that it wouldn't release.


#7 AzMaN

AzMaN

    Speeding Along Now

  • TMF+ Member
  • PipPipPipPipPip
  • 457 posts
  • Location: Bedfordshire
  • Local Club: BMC

Posted 23 July 2014 - 06:38 PM

rolled the shell onto its side, sooooo much easier to work on the floor area like this.


removed the old over-sill to uncover a bucket load of rust. hopefuly can save the inner sill with just a couple of patches to it. also had to cut out some of the floor by the heel board as it had rotten through. will pick up a new sill tomoro and front lower wheel arch repair panel and rear arch for this side, then start to patch the floor and inner sill.


might be a strange question, has anyone fitted a couple of sealed flaps on the inner sill so you can open it up and inject waxoil every now and again? i'm thinking a plate on a hinge oversized for the hole with a zeus fitting and some sort of rubber seal.


pics below


IMG_20140723_131342.jpg

20140723_161920.jpg

20140723_161931.jpg


1 user(s) are reading this topic

0 members, 1 guests, 0 anonymous users