Hi there,
My rear windscreen heater hasnt been working and we found out that one of the connectors wasn't properly connected! Can anyone recommend how you connect the wire to the windscreen? Ie is there a special glue or does it need soldering?
Many thanks
Paul


Cooper Rear Windscreen Heater Connector?
Started by
WinstontheMini
, Sep 06 2014 11:58 AM
3 replies to this topic
#1

WinstontheMini
-
- Noobies
-

- 19 posts
Learner Driver
- Location: Sevenoaks
- Local Club: SMOC
Posted 06 September 2014 - 11:58 AM
#2
dklawson
-

- TMF+ Member
-
- 10,923 posts
Moved Into The Garage
- Name: Doug
- Location: Durham, NC - USA
- Local Club: none
Posted 06 September 2014 - 03:04 PM
If the spade lug has broken off the glass and is no longer making contact you can typically repair this yourself but it is a multi-step process. You may have to repeat one of the steps a couple of times as the repair may not be "permanent".
Clean the broken spade lug and its location on the glass using isopropyl alcohol. Clean both points multiple times to make sure there is no grease, film, etc. Use slow set epoxy to attach the spade lug to the glass. Do not use the quick 5-minute epoxy and be sure to tape the lug in place until the epoxy cures. Apply the epoxy to the bottom surface of the spade lug only and do not build up a huge mound of glue to hold it on. Just apply the glue between the lug and glass. An alternative to epoxy is the glue used to attach rear-view mirrors to windshields. That glue will typically set faster and will be as strong as the epoxy.
Once the glue has cured clean the glass and spade lug again with isopropyl alcohol. From the automotive parts store buy a vial of the conductive paint that is used to repair the traces on heated windscreens. Apply several layers of the paint to connect the exposed metal surface of the spade lug to the conductive traces around where the spade lug is bonded on. Apply several light coats and make sure you have the paint touching as much/many of the traces as possible. This conductive paint part is important as it will re-establish the lost continuity. It is also the part that is likely to fail again as the temperature cycles can cause it to delaminate from the surfaces. Expect to have to repeat the conductive paint application every now and then.
There are also some companies that make a conductive epoxy that will allow you to combine these two steps into one. I don't know who sells such things in the U.K. but it would be worth doing a bit of searching for them. The pictures below show both the conductive paint and the conductive epoxy.
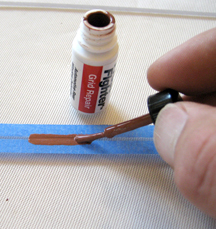
and a conductive epoxy kit...
http://www.frostfigh...ng-kit-2000.htm

#3
KernowCooper
-

- Mini Docs
-
- 7,847 posts
Sparkie
- Name: Dave
- Location: The South West
- Local Club: Kernow Mini Club
Posted 06 September 2014 - 11:31 PM
I have very carefully tinned and soldered the connection back on, you need a flat tip iron and 40w+ and a quick touch
#4
WinstontheMini
-
- Noobies
-
- 19 posts
Learner Driver
- Location: Sevenoaks
- Local Club: SMOC
Posted 07 September 2014 - 10:26 PM
Thank you so much! Lovely detailed description on how to do it, I will let you guys know how it goes!


1 user(s) are reading this topic
0 members, 1 guests, 0 anonymous users


