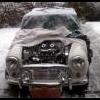
thats a nice repair on that firewall 


Three Classics. One Passion.
Started by
Stu.
, Nov 10 2014 10:45 PM
160 replies to this topic
#91
 Guest_johnylässig_*
Guest_johnylässig_*
-

- Guests
Posted 06 May 2015 - 06:36 AM
#92
Stu.
-
- Members
-

- 912 posts
One Carb Or Two?
- Location: My workshop.
Posted 06 May 2015 - 06:45 AM
Thanks Johny :)
#93
Ben_O
-

- Paint Doctor
-
- 9,794 posts
Mill Road Garage
- Location: Isle of Wight
Posted 06 May 2015 - 06:54 AM
That came out lovely!
well done
#94
Stu.
-
- Members
-
- 912 posts
One Carb Or Two?
- Location: My workshop.
Posted 06 May 2015 - 08:07 AM
Thanks Ben. It took a long time but turned out well and worth the effort I think.
#95
Stu.
-
- Members
-
- 912 posts
One Carb Or Two?
- Location: My workshop.
Posted 06 May 2015 - 10:14 PM
Got the welding finished and zinc primed it tonight. Happy with it now. Got some other bulkhead repairs to do and then move onto the drivers side inner wing renewal.

#96
Stu.
-
- Members
-
- 912 posts
One Carb Or Two?
- Location: My workshop.
Posted 14 May 2015 - 08:15 PM
Works come to a brief halt on Felix as I need to re-spray Molly's bonnet and front end.
I've managed to fit a spare bonnet I have so I can take her to the local shows in a couple of weeks. Would look kinda funny with no bonnet on.

Looking at Molly's bonnet, when I took off the badge I could really see how much the original paint has browned.

It's also got a hole I'll need to deal with before spraying, and some pretty bad seam corrosion on the front lip.


This really needs cutting out and new metal but I know it'd end up being a new bonnet, so I'll clean it up as best I can and probarbly POR 15 it. I'm fairly sure this will sort it, and for now it's my only realistic option. If it gives me a few years I'll be happy, and it's been like it is for years and not got worse so should be ok.
I'll post up some pics once I've cleaned it up a bit.
#97
Stu.
-
- Members
-
- 912 posts
One Carb Or Two?
- Location: My workshop.
Posted 16 May 2015 - 04:58 PM
OK so my conscience got the better of me and I decided to remove all the filler and see what metal I'd be left with. Not much it seems ..........

It's not too bad, and I think I'll be able to retain some of the edge of the bonnet so I have a few reference points.


So I cut out the areas which need new metal, and managed to keep in some reference points where the metal was ok, which was lucky really.
I'll be applying some POR 15 to the inside of the bonnet stiffener braces as they are so difficult to clean up without removing them, but there has to be a compromise somewhere, and at £175 for a new bonnet, I'm keen to make this repair work.

Not too much bad metal removed ......

This was one section I managed to retain for a reference point.

and this is the other.

I re-fitted the grill trim carrier to check alignment, and to check I can get the curve of the new metal right.

I also re-fitted the grill bonnet trim which will help ensure I get the new sections right, which will be next up, although I'll be ordering a new trim carrier as the originals got holes in it where I drilled it out from the bonnet lip.

So hopefully I'll be able to keep this bonnet as long as these repairs go ok. We'll find out soon enough!
#98
Stu.
-
- Members
-
- 912 posts
One Carb Or Two?
- Location: My workshop.
Posted 01 June 2015 - 07:05 PM
Made a bit of progress on the bonnet. I got the welding done and the paintwork cleaned and sanded ready for epoxy primer.


I didn't get any photos of the end repairs but you get the idea.
I plug welded a new bonnet trim carrier on as the original was beyond saving unfortunately.

and this is the bonnet with the repairs completed.

Trial fitted back on the car with the grille to make sure it's all ok before I start painting.

I was planning to lay on the epoxy primer tonight but the winds got up and its raining, so I think I might leave it until the weather calms down.
#99
Stu.
-
- Members
-
- 912 posts
One Carb Or Two?
- Location: My workshop.
Posted 03 June 2015 - 10:14 PM
Last night it was really windy here. I was planning to prime the bonnet but thought better of it at first, then temptation got the better of me and I decided to throw caution to the wind, and quite a bit of primer too as it turned out 
Anyway I did manage to get three coats of epoxy primer laid on without too much grief and can report that its really great stuff, and goes on extremely well from the gun. I had to turn up the pressure a bit due to the paint being a little cold, but I've learned now to keep the paint inside so it keeps warm and more runny. Better for the gun and makes life much easier.


This evening the wind was gone and was much warmer, so I sanded the primer ready for the celly topcoats.


The celly went on extremely well over the epoxy primer. I'm used to getting at least a little reaction somewhere when I put celly on due to the aggressive nature of the solvent, but over the epoxy it was very stable with no reactions at all so I'm really happy 
I'll be re-spraying the front end of Molly next, so lots of rubbing down and prep work to come.
#100
feybrand
-
- Members
-
- 1,247 posts
One Carb Or Two?
- Location: Rugeley
Posted 05 June 2015 - 09:04 AM
I did an inner wing on my last project but I didn't have the panels to line it up properly ...I also had the gutter problem you had...anyway u were right to wait and line everything up with the other panels the panels gaps on mine p****d me off the whole time I had the car it kinda ruined it to be honest
My new project should look a bit like molly when its done and this time the panel gaps will be right lol
Good work its looking spot on keep it up
My new project should look a bit like molly when its done and this time the panel gaps will be right lol
Good work its looking spot on keep it up
#101
Stu.
-
- Members
-
- 912 posts
One Carb Or Two?
- Location: My workshop.
Posted 05 June 2015 - 09:37 AM
Thanks mate. Let me know if you get a page going. Would be good to follow your progress.
#102
Stu.
-
- Members
-
- 912 posts
One Carb Or Two?
- Location: My workshop.
Posted 12 June 2015 - 02:57 PM
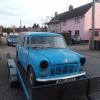
I've been quite busy over the last week. I got Mollys front end re-sprayed
Started by flatting it all back with the DA.

Then sprayed on 3 coats of epoxy primer.

Flatted it all back and laid on 6 coats of cellulose to finish.


Just need to get some new bits from MiniSpares tomorrow and I can get it back together and start on the door frames and A panels 
#103
wingnut
-
- Members
-
- 464 posts
Speeding Along Now
- Location: bury st edmunds
Posted 12 June 2015 - 06:03 PM
Great work
#104
Ben_O
-
- Paint Doctor
-
- 9,794 posts
Mill Road Garage
- Location: Isle of Wight
Posted 13 June 2015 - 03:44 AM
looks like a decent finish, Nice one
#105
Stu.
-
- Members
-
- 912 posts
One Carb Or Two?
- Location: My workshop.
Posted 13 June 2015 - 02:46 PM
Thanks Ben. Ive just got to be patient now and wait 3 weeks before flatting and polishing. Lots more body paintwork to do though.


1 user(s) are reading this topic
0 members, 1 guests, 0 anonymous users


