Jump to content


Photo
- - - - -

Was 88 Red Hot Rescue Rebuild Now 1987 Advantage


  • Please log in to reply
99 replies to this topic

#1 MINIMADrt

MINIMADrt

    Speeding Along Now

  • Members
  • PipPipPipPipPip
  • 465 posts
  • Location: oxford
  • Local Club: none at mo

Posted 14 November 2014 - 10:20 PM

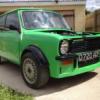
hi all here is my new project i got this 2 weeks ago and as it sits is still as it is.


i was given a rear end to rebuild this out of but the only usable panel is the rear seat back so this will be getting used. 


IMG_2244.png

IMG_2248.png

IMG_2247.png

IMG_2242.png

IMG_2249.png

IMG_2250.png


this is the seat panel i intend on using so got about sorting it


IMG_2281.jpg

IMG_2282.jpg

IMG_2283.jpg

IMG_2284.jpg


you may have noticed the two hole that are holding it should not be there this is were it had rusted through were they are welded to the waste rails from factory


IMG_2286.jpg

IMG_2286.jpg

IMG_2288.jpg

IMG_2289.jpg


then had to rub back all the places were its going to be welded and covered in weld through primer for some added protection.


IMG_2290.jpg

IMG_2291.jpg


Edited by MINIMADrt, 03 April 2015 - 09:32 PM.


#2 MINIMADrt

MINIMADrt

    Speeding Along Now

  • Members
  • PipPipPipPipPip
  • 465 posts
  • Location: oxford
  • Local Club: none at mo

Posted 15 November 2014 - 10:14 AM

hi all right after managing to get pictures on last night thought i would up date a bit since i have had some sleep.  


im not new to minis but am when it comes to all this panel work i have been quite lucky in the past with almost all my minis needing none or very little welding so as i wanted more of a challenge i brought this. not bad at £200 i thought


as you can see its had a rear end crunch at some point and the rear quarter and back panel taking the brunch of it and the seat back getting rippled at the same time hence the replacement panel hoping to get this fitted today.


not to sure what way to go with this one thinking mk1 outside with a modern take on the in. will see how we get on my plans always seem to change when it comes to a mini


#3 Archived4

Archived4

    One Carb Or Two?

  • Archived
  • PipPipPipPipPipPipPip
  • 822 posts

Posted 15 November 2014 - 10:47 AM

Looks like a good project! Will be watching closely!


#4 MINIMADrt

MINIMADrt

    Speeding Along Now

  • Members
  • PipPipPipPipPip
  • 465 posts
  • Location: oxford
  • Local Club: none at mo

Posted 15 November 2014 - 09:35 PM

right after a day on it i have managed to get the rear seat panel done here are a few pics. was not to bad really but then again i had taken the othere one out so new roughly what i was looking out for.


IMG_2292.jpg

IMG_2293.jpg

IMG_2294.jpg


in those picture you can really see the damage to the panel hence the need for replacement.


IMG_2295.jpg

IMG_2296.jpg

IMG_2297.jpg


all removed with weld through primer sprayed down ready for fit ment look at the rear lights notice how bad of and angle the left one is sitting at.


IMG_2299.jpg

IMG_2300.jpg


welded in and red oxide'ed just to protect. welds need tidying up as lost light so ended up welding with a head torch. not the best.


next job is going to be parcel shelf as some one has cut holes in it in the past gunna be welded up to give the original look


#5 MINIMADrt

MINIMADrt

    Speeding Along Now

  • Members
  • PipPipPipPipPip
  • 465 posts
  • Location: oxford
  • Local Club: none at mo

Posted 19 November 2014 - 08:42 PM

just a small update cant do much during the week due to having to do all my work out side as no shelter anyway managed to cut up the spare parcel shelf i had to make a repair panel.


replacing due to the shelf fitted having holes cut in it but quite lucky there in a diffrent place to this one.


all marked up 


IMG_2304.jpg


cut out to maximum size this way i can cut and shape as needed


IMG_2305.jpg


fully stripped primed to protect and ready to have a play


IMG_2306.jpg


hopefully get this sorted at the weekend


#6 MINIMADrt

MINIMADrt

    Speeding Along Now

  • Members
  • PipPipPipPipPip
  • 465 posts
  • Location: oxford
  • Local Club: none at mo

Posted 23 November 2014 - 11:51 AM

managed to get the rear shelf sorted yesterday just need to finish tidying it up in the welds.


this way its solid again with out speaker holes hacked in to it.


IMG_2313.jpg

IMG_2314.jpg

IMG_2315.jpg

0e0218b5-03b9-4630-a418-6dfc6fa0e329.jpg

IMG_2318.jpg

IMG_2320.jpg


#7 ger

ger

    Mini Mad

  • Just Joined
  • PipPipPipPip
  • 233 posts
  • Location: The Land Of Song
  • Local Club: M4 Minis

Posted 27 November 2014 - 02:31 PM

Nice project will be following this one as I've got a bit of work to do around this area on mine.


#8 MINIMADrt

MINIMADrt

    Speeding Along Now

  • Members
  • PipPipPipPipPip
  • 465 posts
  • Location: oxford
  • Local Club: none at mo

Posted 27 November 2014 - 08:08 PM

Nice project will be following this one as I've got a bit of work to do around this area on mine.

thank you cant wait till saturday first one of in 6 weeks so hoping to get both sat and sun on her and hoping to get the boot floor attacked and damage removed.


#9 andrewblueboy

andrewblueboy

    Learner Driver

  • Noobies
  • PipPip
  • 20 posts
  • Location: bolton

Posted 28 November 2014 - 02:30 PM

some nice repair work going on there


#10 MINIMADrt

MINIMADrt

    Speeding Along Now

  • Members
  • PipPipPipPipPip
  • 465 posts
  • Location: oxford
  • Local Club: none at mo

Posted 28 November 2014 - 03:20 PM

Thank you should be on her this weekend and hopefully get some more done.

#11 CaraMillar

CaraMillar

    Mini Mad

  • Members
  • PipPipPipPip
  • 174 posts
  • Location: Prestonpans
  • Local Club: No club

Posted 28 November 2014 - 06:21 PM

Looking good :-) one thing I wish I could do is weld! Would make life easier lol

#12 MINIMADrt

MINIMADrt

    Speeding Along Now

  • Members
  • PipPipPipPipPip
  • 465 posts
  • Location: oxford
  • Local Club: none at mo

Posted 28 November 2014 - 06:56 PM

best thing to do to weld is get one and try and try. i taught my self and still am i dont say i can weld i just no enough to get by lol


you have 2 ways of doing it: doing right and doing it wrong and if you do it wrong do it again. lol


its not that bad really but i begrudge paying the prices places seem to charge to do it so taught myself 


#13 MINIMADrt

MINIMADrt

    Speeding Along Now

  • Members
  • PipPipPipPipPip
  • 465 posts
  • Location: oxford
  • Local Club: none at mo

Posted 29 November 2014 - 07:02 PM

not much head way today really i got on with the boot as planed but have made a huge mistake look in the bodywork section and all is exsplained.


any body with any idea how to line up a boot repair panel with no back panel please help


here are the pictures from today. 


IMG_2330.jpg

IMG_2331.jpg

IMG_2332.jpg

IMG_2336.jpg


this is were i stopped for the day as i realised i messed up and now have to wait to see if i can get help to line it up correct before i carry on. 


any comments welcome


#14 MINIMADrt

MINIMADrt

    Speeding Along Now

  • Members
  • PipPipPipPipPip
  • 465 posts
  • Location: oxford
  • Local Club: none at mo

Posted 30 November 2014 - 04:25 PM

cheers all very much for your help this morning i was still a little confused on how to did it so i done every thing i was told. measured for reference and put a brace in and put the boot lid back on.


i also found some 1/4 boot floors i forgot i brought and was able to use these a little to match up


here are a few pictures of how far i got till i ran out of gas/ or blow my welder up not sure which yet


IMG_2339.jpg

IMG_2340.jpg


then all clamped up properly ready to weld in


IMG_2341.jpg


i had to stop here for the day as welder decided to pack up and i stained my back again lifting it so now in agony  not sure when i will get back on it now as busy next week end


hope it isn't to long want to get this done


still deciding what back panel to buy mk1 lights or the later?? what do you reckon


any comments welcome


#15 MINIMADrt

MINIMADrt

    Speeding Along Now

  • Members
  • PipPipPipPipPip
  • 465 posts
  • Location: oxford
  • Local Club: none at mo

Posted 01 December 2014 - 10:41 AM

After a few replies in the body work section I'm a little bit worried now that the body may be a little more damaged than I thought from the accident. How is the best way to no if the body is square and the drivers side hasn't been shunted forward at all I don't think it is but now I'm worried.

Can any one help


1 user(s) are reading this topic

0 members, 1 guests, 0 anonymous users