Jump to content


Photo
- - - - -

78 Restoration / Fast 998 Build


  • Please log in to reply
41 replies to this topic

#1 kyle9832

kyle9832

    Speeding Along Now

  • Members
  • PipPipPipPipPip
  • 434 posts
  • Location: leicester

Posted 31 December 2014 - 01:56 PM


I thought I had best start a build thread of my own as ive been a member of the forum for 3 moths now and need to show what all the questions I have been asking are going towards:)

im 16 and am aiming for my car to be done for November next year, it seems like a long time away but lets just say im not the most efficient at the moment as its the biggest project I have undertook, my granddad will try to help me but lives down in devon, im in Leicester! so its not very often I have him to help, my dad has no interest in the workings of a car what so ever so basically its just me and this forum that will get the car done....

I got the car for my birthday in November, me and my mum and dad payed half each for it and I couldn't be happier, we drove it home (with a slipping clutch) and other than that ran like a dream, ive took pictures at each step so far so will post them now, havnt got as far as I had hoped though!:)

I will write upto where ive got already and then I will start to post as I go


images to come...

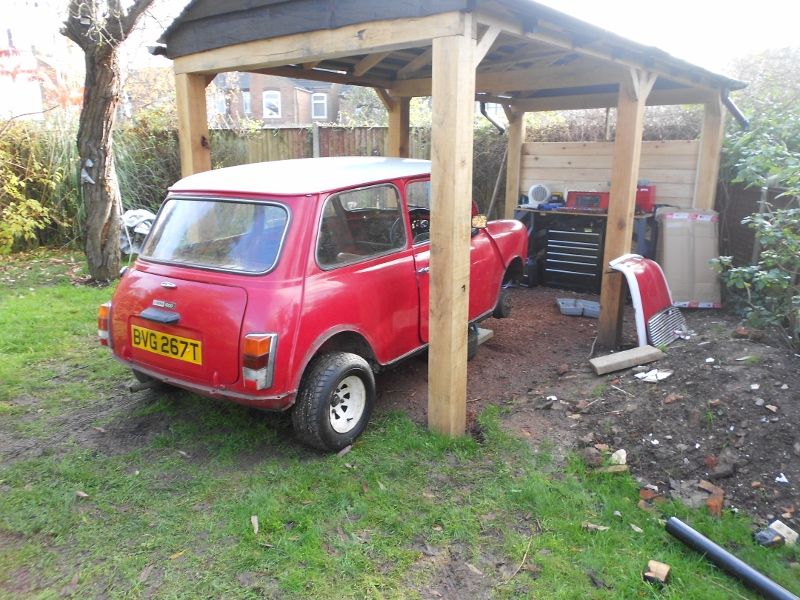
The day it came home..
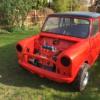
 DSCN0469800x600450x338450x338_zps50eabbc

some more piccs

DSCN0472800x600800x600_zpsc279f4e5.jpg


DSCN0473800x600800x600_zps9a41d894.jpg


DSCN0474800x600800x600_zps344ee278.jpg


after this I started to peel back the "lovely" brown interior, which is where it all started to go wrong....


DSCN0475800x600800x600_zps3c82f172.jpg


DSCN0476800x600800x600_zps10e98c84.jpg

I thought this was all of the rust....

It turns out it wasn't, after prodding around with a screw driver the rust just kept on coming....


DSCN0499800x600800x600_zps05bbc2d2.jpg


DSCN0500800x600800x600_zps1083ad4b.jpg


ontop of that rectangle piece was a piece of body coloured metal that was stuck down to hide the rust, and the metal piece that can be seen was stuck on from underneath!, the side box was also completely rotton and where all of the black is , that was just silicone that was out there to cover up all of the rust!, also where this panel met the front panel there was a massive hole, so water had been getting in and rotted the cross member!


DSCN0503800x600800x600_zpsf23692b4.jpg


and the same on the other side!!!

there was a lot of rust so instead of tackling it myself, I ordered two new panels and sent it away to a professional.

when I brought the car from a classic mini dealer!!! I was told it was a solid car and that it has never been welded, I have found both these statements to be untrue!, and it even came with 12 months mot! with no advisory's!, the man that welded it for me told me that underneath the sills they were also rotton so he has patched them up also. atleast I know its a solid car now though....

pics of new welding:


DSCN0542800x600800x600_zps0cb96232.jpg


DSCN0543800x600800x600_zps6cb093af.jpg


I will try and take some better pictures tomorrow!


Edited by kyle9832, 01 January 2015 - 09:10 PM.


#2 mini stephen

mini stephen

    Mini Mad

  • Noobies
  • PipPipPipPip
  • 138 posts
  • Location: northern ireland
  • Local Club: unkown

Posted 31 December 2014 - 02:25 PM

Atleast you know its solid now looks good what kinda finished look/style you going for

#3 kyle9832

kyle9832

    Speeding Along Now

  • Members
  • PipPipPipPipPip
  • 434 posts
  • Location: leicester

Posted 31 December 2014 - 02:49 PM

Atleast you know its solid now looks good what kinda finished look/style you going for

this is my goal! a long way off I know! and mine will probarbly be no where near as good! but this is my end goal!(only with black stripes on the bonnel instead of white ones)

IMG_1954.jpg


Edited by kyle9832, 31 December 2014 - 02:50 PM.


#4 kyle9832

kyle9832

    Speeding Along Now

  • Members
  • PipPipPipPipPip
  • 434 posts
  • Location: leicester

Posted 31 December 2014 - 03:01 PM

nearer Christmas me, with a help from my granddad took the engine out. it was a brilliant day and loads of fun!

DSCN0527800x600800x600_zps354d64f3.jpg


DSCN0528800x600800x600_zpsb8aaad30.jpg


disconnected everything

DSCN0529800x600800x600_zps787590cc.jpg


halfshafts out and starting to lift out....

DSCN0530800x600800x600_zps99bc095e.jpg


wheels back on to move it out of the way when the engine is high enough...

DSCN0531800x600800x600_zps6db7c0a8.jpg


And the engines out!

DSCN0532800x600800x600_zps64a1d6ed.jpg


and then onto the stand ready to be stripped..

DSCN0535800x600800x600_zps5bae4847.jpg


the next weekend I got round to stripping the engine down to the block to get it ready to be skimmed and re-bored for new things to be put on.

DSCN0537800x600800x600_zps64a20760.jpg


DSCN0540800x600800x600_zps81e6f0ca.jpg


all in pieces... (gulp!)


DSCN0541800x600800x600_zpsfae03e32.jpg


the block how it is now... I am taking the block in on Saturday to be re bored and skimmed.


DSCN0547800x600800x600_zps8cf6945b.jpg


I will keep you updated as I go!, any feedback would be great! and am happy to answer any questions if I can help!:)


Edited by kyle9832, 31 December 2014 - 03:02 PM.


#5 kyle9832

kyle9832

    Speeding Along Now

  • Members
  • PipPipPipPipPip
  • 434 posts
  • Location: leicester

Posted 31 December 2014 - 03:10 PM

the new shiny bits for the engine arrived last week!!! one of the best moments ever ! hahaha

new 12g295 head from vmaxxscart!

DSCN0548800x600800x600_zpsa4c017f7.jpg


33x29 valves, new valve guides and seats and fully gas flowed, I am told it is fully worked( whatever that means) so should be not all show and a lot more go!


DSCN0549800x600800x600_zps9b28365a.jpg


276 cam from kent cams..

DSCN0551800x600800x600_zps27ccdf2d.jpg


and +60 slipper pistons from nural!

DSCN0552800x600800x600_zpsbd31fc05.jpg


and of course not everything can go to plan, as I took my old pistons from the rods I realised that I had brought a+series pistons so they wouldn't fit my currant con rods, so I had to get some a+ rods of ebay which came today

DSCN0550800x600800x600_zps25fa46bd.jpg


there are two more obliviously:) haha,

I have lots of parts that have come but wont list them all as the rest is just boaring stuff like new gaskets and oil filters, lines and bearings....

that's about it for now but will keep everyone posted...


Edited by kyle9832, 31 December 2014 - 03:21 PM.


#6 mini stephen

mini stephen

    Mini Mad

  • Noobies
  • PipPipPipPip
  • 138 posts
  • Location: northern ireland
  • Local Club: unkown

Posted 31 December 2014 - 03:15 PM

Atleast you know its solid now looks good what kinda finished look/style you going for

this is my goal! a long way off I know! and mine will probarbly be no where near as good! but this is my end goal!(only with black stripes on the bonnel instead of white ones)
IMG_1954.jpg
That's gunna be some birthday present lol ul get their plenty of tea and patience it I'll be a top motor

Edited by mini stephen, 31 December 2014 - 03:15 PM.


#7 kyle9832

kyle9832

    Speeding Along Now

  • Members
  • PipPipPipPipPip
  • 434 posts
  • Location: leicester

Posted 31 December 2014 - 03:18 PM


Atleast you know its solid now looks good what kinda finished look/style you going for

this is my goal! a long way off I know! and mine will probarbly be no where near as good! but this is my end goal!(only with black stripes on the bonnel instead of white ones)
IMG_1954.jpg
That's gunna be some birthday present lol ul get their plenty of tea and patience it I'll be a top motor


I hope so!, oh and ALOT!!! of tea haha


#8 megamini_jb

megamini_jb

    Crazy About Mini's

  • Members
  • PipPipPipPipPipPipPipPipPipPip
  • 5,491 posts
  • Name: Jamie
  • Location: -

Posted 31 December 2014 - 05:50 PM

Looks a cracking project!

Good start so far, enjoy!

#9 kyle9832

kyle9832

    Speeding Along Now

  • Members
  • PipPipPipPipPip
  • 434 posts
  • Location: leicester

Posted 01 January 2015 - 02:27 PM

a couple of weeks ago I noticed the gutter on the roof had been hand painted with a different colour white to the rest of the roof, upon further inspection I found at the front of both of the gutters the paint was all bubbled both sides at the front, so today I broke out the trusty screwdriver and hammer, the paint chipped straight off, revealing again! more rust!!!, the gutters will need cutting and repairing and the roof will need repairing also, I will try and weld it up as soon as possible as im sure it will only rust quicker now ive took the paint off!


DSCN0546800x600800x600_zps61c22be5.jpg


DSCN0545800x600800x600_zpsabcdba11.jpg


brilliant start to the year! haha;)


#10 kyle9832

kyle9832

    Speeding Along Now

  • Members
  • PipPipPipPipPip
  • 434 posts
  • Location: leicester

Posted 11 January 2015 - 06:28 PM

been busy this weekend, ive managed to strip the rest of the interior, sand it down and paint it with rust protection, I have also took out the glass and the boot lid, and found again even more rust! but next weekend it will be repaired as I have saved up enough to go and get a welder and all the bits so I will keep you updated with how that goes:)


12345_zpse8e37b38.jpg


painted the floor but ran out of paint half way through!, it looks better, and a plus is that I wont need loads more cellulose to paint the floor!, I can just do the cross bar on the dash and the top bar below the windscreen.

abcd_zpsb7d45848.jpg


Still got to strip the rest out of the engine bay ready for prep for spraying but that shouldn't take too long....hopefully!

kygfkf_zps1a78df4d.jpg


I know this isn't the styling section but if anyone has got a recommendation for the colour please feel free to suggest some!, im thinking a red again, something like rover flame red? but I am open to suggestions!, but the roof and arches will be black.


I will update this in the next week as my newly bored block will be back with the new pistons on the rods!


#11 beaubrad

beaubrad

    One Carb Or Two?

  • Members
  • PipPipPipPipPipPipPip
  • 736 posts

Posted 11 January 2015 - 07:08 PM

House of kolour - candy apple red

#12 kyle9832

kyle9832

    Speeding Along Now

  • Members
  • PipPipPipPipPip
  • 434 posts
  • Location: leicester

Posted 11 January 2015 - 07:20 PM

House of kolour - candy apple red

is candy difficult to paint on?


#13 beaubrad

beaubrad

    One Carb Or Two?

  • Members
  • PipPipPipPipPipPipPip
  • 736 posts

Posted 11 January 2015 - 07:32 PM

I ha e heard it is but it all about preparation, will you be doing it or someone else?

#14 kyle9832

kyle9832

    Speeding Along Now

  • Members
  • PipPipPipPipPip
  • 434 posts
  • Location: leicester

Posted 11 January 2015 - 07:40 PM

I ha e heard it is but it all about preparation, will you be doing it or someone else?

I was going to use cellulose as I have been told its easier to paint with than acrylic, I will be preparing it all, undercoating and top coating in myself, I just havnt got the funds to get it done by a professional, and by the time I have done all the body welding it will need spraying.


#15 kyle9832

kyle9832

    Speeding Along Now

  • Members
  • PipPipPipPipPip
  • 434 posts
  • Location: leicester

Posted 29 January 2015 - 09:46 PM

just a quick update from a bit of work from the weekend,

- took rear subframe out (rotten)

- stripped rest of interior

- took everything out of the engine bay ready for paint prep after fust repairs.


the picture below shows what I thought was the rust on the roof, but it turns out the rust went back a lot further than this! so my FIRST ever time using a welder was on a corner that has to be matched to the other side.....

Before.

DSCN0546800x600800x600_zps61c22be5.jpg


After.

weld_zps4d268079.jpg

picture doesn't do it much justice though! but it does infact match the other sides shape!, I will shape the gutter and tidy the rough edges this weekend.

since my last post I have found more rust in loads of places!!!! Bloody thing! haha

-under rear lights(ordered complete half back end)

-boot floor

-left wheel arch

-rear side panels, both sides!

-subframe mount/kickboard


so lots more to do! I will post some more pictures of the start of my repairs at the weekend!


Edited by kyle9832, 29 January 2015 - 09:47 PM.


1 user(s) are reading this topic

0 members, 1 guests, 0 anonymous users