Jump to content


Photo
- - - - -

My 7.5 Inch Brake Conversion


  • Please log in to reply
8 replies to this topic

#1 Mini-Hazel-Nut

Mini-Hazel-Nut

    Super Mini Mad

  • Members
  • PipPipPipPipPipPip
  • 607 posts
  • Location: West Midlands
  • Local Club: Birmingham Mini Owners

Posted 05 August 2015 - 04:28 PM

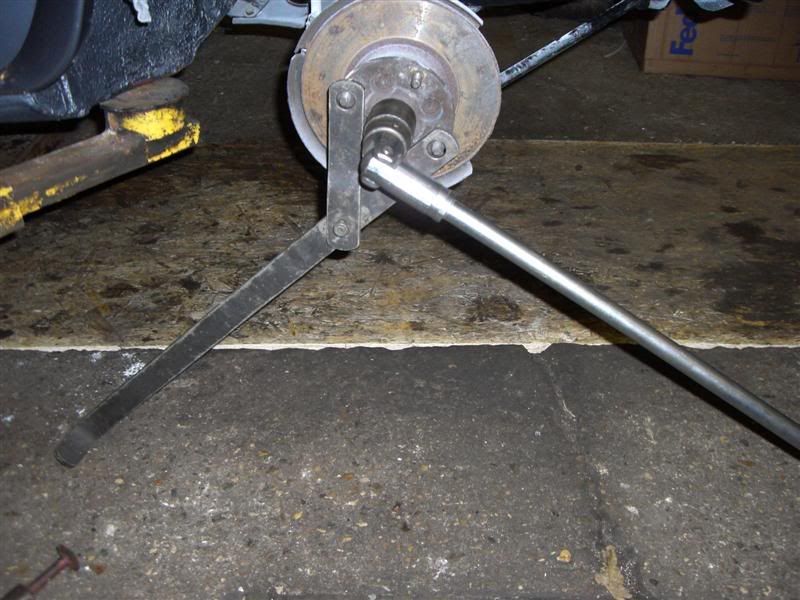
Hello peeps, I thought you might like to watch my progress with this little job. Having jacked up and removed the offside front wheel I was faced with the dreaded "hub nut". I tried a thing or two to free it with no luck so I got thinking. When I got back to the depot last night I had a good rummage through the hundreds of sockets to be found there. I finally located a 33 mm one that seamed to measure 1 5/16" and "borrowed" it (it will be returned). This morning, with fingers crossed, I tried the socket for size - it fitted like it had been made for the purpose, yay! Then I knocked up the device you see to hold the hub still while I tackled the nut. Slipped that in place, lowered Clubby gently onto it and then got my torque wrench to have a go at the nut. All I succeeded in doing was to tear a hole out of my gadget! Hey ho, I relocated it and tried again this time almost lifting Clubby off the ground, the nut just laughed at me! Covered him up again and went off to buy 2 feet of breaker bar. I tried that and still just lifted the Min up. Happy thought, swivelled the bar through 180 degrees and stood on the darned thing - crack! Me nut was loose, yay! Off with the calliper and disc, cleaned up what was left and fitted the new bits. More tomorrow.

Attached File  disc steady.jpg   66.88K   32 downloads

Attached File  new disc and calliper.jpg   62.37K   28 downloads


#2 alex-95

alex-95

    I am THE CLAMP MAKER

  • Members
  • PipPipPipPipPipPipPipPipPipPip
  • 6,078 posts
  • Location: l

Posted 05 August 2015 - 05:53 PM

I like the idea to stop it turning. I wouldn't use a torque wrench to try and undo any nuts/bolts especially on them so tight. Make's it much easier pushing the breaker bar down than lifting it ;D


#3 RedRuby

RedRuby

    One Carb Or Two?

  • Members
  • PipPipPipPipPipPipPip
  • 1,201 posts
  • Location: County Durham
  • Local Club: No

Posted 05 August 2015 - 06:04 PM

I use a piece of angle iron with a hole for the wheel stud and have attached a shorter piece of angle iron to it with a bolt also drilled for a wheel stud. It forms a sort of "y" with it slipped over 2 wheel studs and the longer leg resting on the floor. Works a treat in conjunction with a 2 ft breaker bar


Found a picture of something similar to mine


http://i67.photobuck...G0850Medium.jpg

Edited by RedRuby, 05 August 2015 - 06:31 PM.


#4 Mini-Hazel-Nut

Mini-Hazel-Nut

    Super Mini Mad

  • Members
  • PipPipPipPipPipPip
  • 607 posts
  • Location: West Midlands
  • Local Club: Birmingham Mini Owners

Posted 05 August 2015 - 07:50 PM

Thanks all. The torque wrench was just a starting point on account of it`s length. I very soon decided that apart from needing more leverage I would probably explode torquey before the nut shifted and that was not what I wanted, hee hee. My tool kit is growing all the time and that`s no bad thing.


#5 Mini-Hazel-Nut

Mini-Hazel-Nut

    Super Mini Mad

  • Members
  • PipPipPipPipPipPip
  • 607 posts
  • Location: West Midlands
  • Local Club: Birmingham Mini Owners

Posted 06 August 2015 - 03:17 PM

Finished off the o/s assembly this morning including the new braided hoses that I had just bought. I then put a wheel on so`s I could start the other side. It may be me but as I tighten up the wheel nuts on the new Cosmic wheel I got the impression that it was binding on something. Even in the air it never moved a bit as I nipped the nuts up yet I could turn the disc the other side by hand! Also I notice it sits a tad further in the arch than the Superlite it replaces. Any thoughts anyone? Doing the nearside was a doddle after what I learned yesterday and I was soon ready for a bleeding session. I connected up my new Vizibleed kit (Halfords), slackened the nipple and started pumping. If I pumped that pedal once I pumped it a thousand times but practically nowt out of that nipple. Think I`ll get the other kit that uses tyre pressure and blow the damned stuff through me pipes, lol. Here`s some pics.

Attached File  os calliper.jpg   63.18K   14 downloads

Attached File  ns calliper.jpg   66.25K   11 downloads


#6 evansisgreat

evansisgreat

    One Carb Or Two?

  • Members
  • PipPipPipPipPipPipPip
  • 1,128 posts
  • Local Club: Not yet

Posted 06 August 2015 - 05:15 PM

Impact gun. For every job.

#7 Mini-Hazel-Nut

Mini-Hazel-Nut

    Super Mini Mad

  • Members
  • PipPipPipPipPipPip
  • 607 posts
  • Location: West Midlands
  • Local Club: Birmingham Mini Owners

Posted 06 August 2015 - 05:34 PM

Come again?  :wacko:


#8 Mini-Hazel-Nut

Mini-Hazel-Nut

    Super Mini Mad

  • Members
  • PipPipPipPipPipPip
  • 607 posts
  • Location: West Midlands
  • Local Club: Birmingham Mini Owners

Posted 10 August 2015 - 12:41 PM

Finished the job today with the help of a Gunson Eezibleed kit. Had a lot of grinding to do on the bearing housings where they were fouling the inside of the new disc bosses but once that was done they turn ok. Now I gotta locate a microscopic spanner so`s I can bleed the back half of the system.


#9 Mini-Hazel-Nut

Mini-Hazel-Nut

    Super Mini Mad

  • Members
  • PipPipPipPipPipPip
  • 607 posts
  • Location: West Midlands
  • Local Club: Birmingham Mini Owners

Posted 12 August 2015 - 03:17 PM

Took Clubby out for a short run today after bleeding the hydraulics through to test the brakes and the new carb settings I have just applied. Well the brakes are there but not terrifically responsive at the moment as being brand new they doubtless need to bed-in. Due to a local road closure everyone is using my road at the moment so I didn`t want to push my luck and the spin was a short one. Clubby and I are both happy though.  :highfive:


1 user(s) are reading this topic

0 members, 1 guests, 0 anonymous users