Jump to content


Photo
- - - - -

Removing Rear Cones


  • Please log in to reply
8 replies to this topic

#1 Philcooper

Philcooper

    Stage One Kit Fitted

  • Noobies
  • PipPipPip
  • 71 posts
  • Location: Aberdeenshire

Posted 12 August 2015 - 05:40 PM

Hi guy's, went to renew Rear Rubber cones this p.m but following Haynes manual got as far as support weight of radius arm with jack and undo and move shock absorber. My problem is I can undo nut and washer but can't slide the shock absorber off radius thread! Please don't tell me I have to take shockers off altogether as that would involve petrol tank removal on one side:(

Cheers in advance

#2 A-Cell

A-Cell

    Camshaft & Stage Two Head

  • Members
  • PipPipPipPipPipPipPipPip
  • 1,610 posts
  • Location: Longbridge

Posted 12 August 2015 - 06:08 PM

You don't have to take them off completely but you do have to disconnect them from the body at the upper fixing to allow the radius arm to be lowered enough to get the trumpet and cone out. So yes you do need to swing the tank out of the way to access the upper fixing.

#3 cal844

cal844

    Crazy About Mini's

  • Members
  • PipPipPipPipPipPipPipPipPipPip
  • 9,623 posts
  • Location: Ballingry, Fife
  • Local Club: TFMOC

Posted 12 August 2015 - 07:14 PM

To be honest id be renewing the radius arms(exchange) along with new knuckles and cups

#4 AndyR

AndyR

    Speeding Along Now

  • Members
  • PipPipPipPipPip
  • 453 posts
  • Location: Norway
  • Local Club: None

Posted 12 August 2015 - 08:26 PM

You can do it without removing the top shock mounts, but then you will have to remove the whole radius arm and rotate it on the shock to allow you to remove the lower fixing.  Do you have adjustable trumpets? Otherwise this wont work!


#5 Cooperman

Cooperman

    Uncle Cooperman, Voted Mr TMF 2011

  • TMF+ Member
  • PipPipPipPipPipPipPipPipPipPipPip
  • 23,294 posts
  • Location: Cambs.
  • Local Club: MCR, HAMOC, Chelmsford M.C.

Posted 12 August 2015 - 08:33 PM

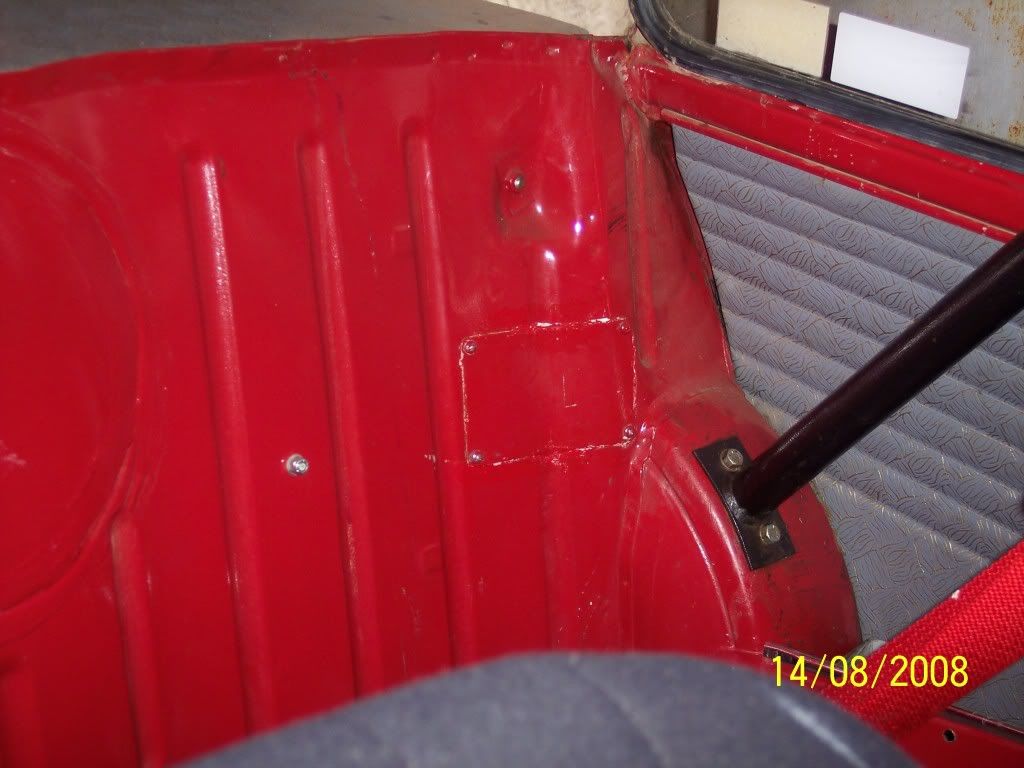
Or you can do the 'demon tweek' and cut a rectangular hole in the seat back panel to gain access to the top damper nut. That's what all the rally cars have to enable a damper to be changed in a few minutes.

Here is the location of the hole on my 'S'. You just make up a cover plate and screw it on with some bath sealer to finish the job. It's just so easy.


Bits035.jpg


#6 AVV IT

AVV IT

    I am a shed dragger.

  • TMF+ Member
  • PipPipPipPipPipPipPipPipPipPip
  • 6,122 posts
  • Name: Dave
  • Location: Cambridgeshire
  • Local Club: Nobody will have me!!

Posted 12 August 2015 - 08:37 PM

I've always done it by removing the tank, which really isn't a big job. So long as the tanks relatively empty, it's just a case of emptying the boot, taking off the petrol cap and undoing the bolt on the retaining strap. You can then just lift and slide the tank into towards the centre of the boot, refit the petrol cap and leave it there, no need to drain, or disconnect it, or anything. It's only a 15 minute or so job in my experience, the worst bit is undoing the retaining strap bolt, due it's really long thread!

#7 Spider

Spider

    Moved Into The Garage

  • Admin
  • PipPipPipPipPipPipPipPipPipPipPip
  • 14,899 posts
  • Location: NSW
  • Local Club: South Australian Moke Club

Posted 12 August 2015 - 09:00 PM

 It's just so easy.


That's cheating!  nice idea.


#8 Cooperman

Cooperman

    Uncle Cooperman, Voted Mr TMF 2011

  • TMF+ Member
  • PipPipPipPipPipPipPipPipPipPipPip
  • 23,294 posts
  • Location: Cambs.
  • Local Club: MCR, HAMOC, Chelmsford M.C.

Posted 12 August 2015 - 10:10 PM

We used to reckon it was possible for a service crew to change a rear damper in around 8 minutes per side with the access holes cut in the rear seat back panel. That was for a Mini with twin tanks of course. One mechanic would jack the car up and remove the wheel. Then use a 9/16" AF socket on a ratchet spanner to take off the bottom bolt.. Another mechanic would undo the 4 off self-tapping screws and undo the 1/2" AF nut on top of the damper using a ratchet spanner.

The arm was then dropped and the old damper removed, a new one slipped onto the rad arm pin and the arm raised to push the top through the mounting hole. The top rubber was re-fitted, the nut put on and a ratchet spanner used to tighten it. Wheel on, car lowered and it's ready to carry on rallying again.


#9 Aly-g

Aly-g

    Speeding Along Now

  • TMF+ Member
  • PipPipPipPipPip
  • 459 posts
  • Location: Walton On The Naze, Essex
  • Local Club: Still looking

Posted 15 November 2021 - 12:50 AM

Or you can do the 'demon tweek' and cut a rectangular hole in the seat back panel to gain access to the top damper nut. That's what all the rally cars have to enable a damper to be changed in a few minutes.

Here is the location of the hole on my 'S'. You just make up a cover plate and screw it on with some bath sealer to finish the job. It's just so easy.


Bits035.jpg

that's just how I remember doing it way back in the late sixties.....! when I used to rally a little 850.


Allan


1 user(s) are reading this topic

0 members, 1 guests, 0 anonymous users