Jump to content


Photo
- - - - -

One Rear Wheel Lower Than The Other


  • Please log in to reply
16 replies to this topic

#1 MikeRotherham

MikeRotherham

    One Carb Or Two?

  • TMF+ Member
  • PipPipPipPipPipPipPip
  • 983 posts
  • Location: Westwoodside North Lincs

Posted 30 January 2016 - 12:53 PM

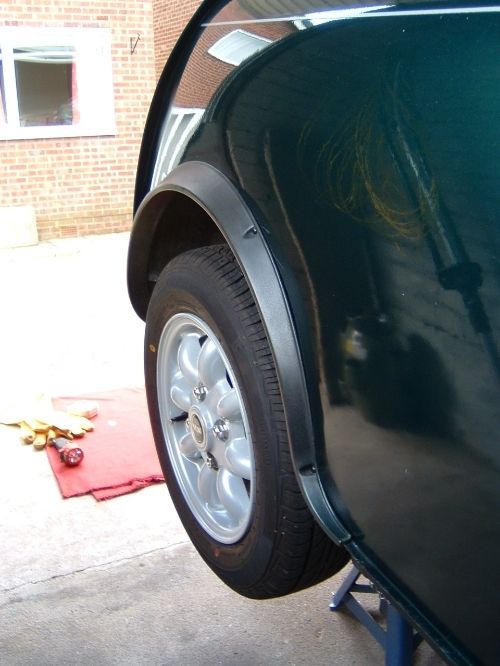
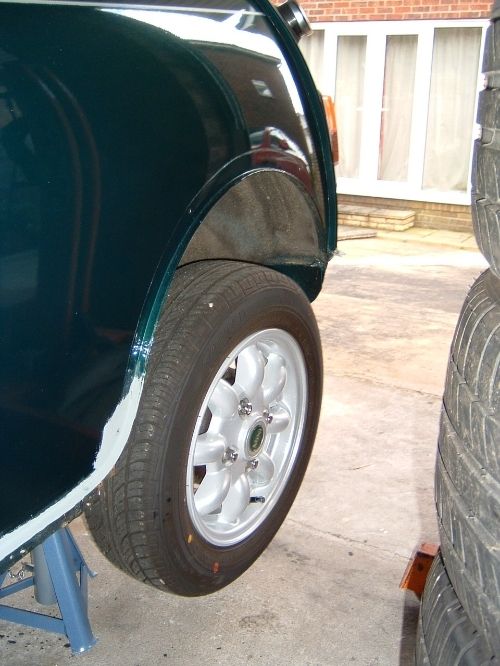
I jacked the car up to rectify the rear wheels handbrake binding which I sorted,  I noticed that when I jacked the car up one of the rear wheels didn't drop as much as the other. I'm assuming the offside wheel is the one that is wrong.


Any ideas which bit of the suspension could cause this?


I had planned on renewing the cones and dampers in the next few months as I suspect they could be originals


The car is a 1994 1275 Mayfair automatic and its done just over 19,500 miles.


57830de1-2e0a-433a-8f7b-9abc19b72d0a_zps


[/URL]


cad26a17-1b93-4543-acd0-2420a1cd5fe3_zps


[/URL]


Regards


Mike.


Edited by MikeRotherham, 30 January 2016 - 01:02 PM.


#2 Cooperman

Cooperman

    Uncle Cooperman, Voted Mr TMF 2011

  • TMF+ Member
  • PipPipPipPipPipPipPipPipPipPipPip
  • 23,319 posts
  • Location: Cambs.
  • Local Club: MCR, HAMOC, Chelmsford M.C.

Posted 30 January 2016 - 01:14 PM

The amount of drop on the wheels is controlled by the extended stroke of the dampers. So one damper has a longer down-stroke than the other. Can't say why without seeing the dampers, but it does seem a bit strange.

You could remove both dampers and compare them on the bench, possibly fitting new ones as a pair.


#3 MikeRotherham

MikeRotherham

    One Carb Or Two?

  • TMF+ Member
  • PipPipPipPipPipPipPip
  • 983 posts
  • Location: Westwoodside North Lincs

Posted 30 January 2016 - 01:55 PM

Thanks for the quick reply Cooperman.


Just to add I've just lowered the car to the floor and there was virtually no movement as that wheel took up the weight of the car. Does that sound correct?


Thinking about it though this is the first time I've jacked the back of the car up. Before I've just raised each side individually so probably wouldn't have noticed.


Edited by MikeRotherham, 30 January 2016 - 01:58 PM.


#4 Cooperman

Cooperman

    Uncle Cooperman, Voted Mr TMF 2011

  • TMF+ Member
  • PipPipPipPipPipPipPipPipPipPipPip
  • 23,319 posts
  • Location: Cambs.
  • Local Club: MCR, HAMOC, Chelmsford M.C.

Posted 30 January 2016 - 02:09 PM

There may be a problem with one of the dampers. It would be a good idea to remove them and check them for damping efficiency and total available travel. To remove the LH damper you are supposed to remove the petrol tank. However, there is a tweak. You cut a rectangular hole in the rear seat back panel about 5" x 3" which gives spanner access. Then after working on the damper you simply make up a cover plate in aluminium and seal/screw it in place. If you need a photo showing where to cut I'll post one. This little trick makes it so easy.


#5 OhDear

OhDear

    Super Mini Mad

  • Members
  • PipPipPipPipPipPip
  • 560 posts
  • Location: Middlesbrough

Posted 30 January 2016 - 02:35 PM

Great wisdom Mr cooperman.

#6 minifreek1

minifreek1

    One Carb Or Two?

  • Members
  • PipPipPipPipPipPipPip
  • 1,260 posts
  • Location: Wigan
  • Local Club: S.U.N.M.O.C

Posted 30 January 2016 - 05:23 PM

There may be a problem with one of the dampers. It would be a good idea to remove them and check them for damping efficiency and total available travel. To remove the LH damper you are supposed to remove the petrol tank. However, there is a tweak. You cut a rectangular hole in the rear seat back panel about 5" x 3" which gives spanner access. Then after working on the damper you simply make up a cover plate in aluminium and seal/screw it in place. If you need a photo showing where to cut I'll post one. This little trick makes it so easy.

Please post the picture anyway :)


#7 Spider

Spider

    Moved Into The Garage

  • Admin
  • PipPipPipPipPipPipPipPipPipPipPip
  • 15,048 posts
  • Location: NSW
  • Local Club: South Australian Moke Club

Posted 30 January 2016 - 06:10 PM

As Cooperman has suggested, it sounds like one Shocker (and to me it looks to the the LH one) is longer than the other.


Van Shockers were longer than Saloon, so it may have a Van Shocker in the LH side.


The other thing that happens at or near to extreme extension is the Trailing Arm 'rubs' against the lower side rail of the subframe, sometimes from a bend in the arm and sometimes from manufacturing tolerances. Have a look and see if the Arm is contacting the subframe.


#8 1968andyf

1968andyf

    Mini Mad

  • TMF+ Member
  • PipPipPipPip
  • 144 posts
  • Location: Derbyshire

Posted 30 January 2016 - 06:30 PM

Try the radius arm pivot pin it could be seized on the bearings have seen this before and the wheel did not drop

#9 GraemeC

GraemeC

    Crazy About Mini's

  • TMF+ Member
  • PipPipPipPipPipPipPipPipPipPip
  • 7,440 posts
  • Location: Carnforth

Posted 30 January 2016 - 06:55 PM

I would investigate 1968andyf's suggestion, more likely than siezed dampers.

#10 tiger99

tiger99

    Crazy About Mini's

  • Members
  • PipPipPipPipPipPipPipPipPipPip
  • 8,584 posts
  • Location: Hemel Hempstead

Posted 30 January 2016 - 11:36 PM

Or the knuckle joint has worn through the cup and is jamming. That leads to something breaking, usually the end of the trumpet, fairly soon. But I can't imagine it happening on such a low mileage car, assuming the mileage is genuine. But if you need to have the arms or cones and trumpets out, fit new knuckles anyway. A bit of cheap preventative maintenance can save you lots of money and aggro later.


You can run a simple test on the radius arm pivot pin. Just loosen the nuts on both ends of the pin, and see if the wheel can now be pulled down further. If so, you need a new pivot pin, bush and needle roller bearing, and as it involves line reaming you would be best advised to obtain an exchange reconditioned arm.


But check out Cooperman's suggestion first. Having odd (or sticking?) dampers is not inconceivable and easily fixed. If it is that, you may as well get some nice adjustables, unless money is very tight. Check too that the damper top mounts are at the same height. It is hard to imagine them being very different, but Mini build quality was sometimes rather poor, so you never know...


#11 MikeRotherham

MikeRotherham

    One Carb Or Two?

  • TMF+ Member
  • PipPipPipPipPipPipPip
  • 983 posts
  • Location: Westwoodside North Lincs

Posted 31 January 2016 - 06:14 PM

Thanks for all your replies.


I'll start by ordering new cones and dampers and then work through other things.


I assume it's not possible to safely unseize a seized radius arm if it turns out that is the cause of the problem


If comes to replacing the arm does the other side also need to be done at same time i.e matched pairs as you would if you were replacing dampers.


There have been numerous post about the plastic tapered tube splitting and allowing the arm to fill with grease. Is it ok to reuse the metal tube on the arm that you are removing?


With regard to your suggestion Cooperman about cutting a hole in the seat back. This time I will remove the petrol tank to inspect the area for rust and also replace the rear nearside lamp to body seal but your suggestion is a good one for the future.


Regards


Mike.


Edited by MikeRotherham, 31 January 2016 - 06:17 PM.


#12 cal844

cal844

    Crazy About Mini's

  • Members
  • PipPipPipPipPipPipPipPipPipPip
  • 9,636 posts
  • Location: Ballingry, Fife
  • Local Club: TFMOC

Posted 31 January 2016 - 08:57 PM

Thanks for all your replies.
 
I'll start by ordering new cones and dampers and then work through other things.
 
I assume it's not possible to safely unseize a seized radius arm if it turns out that is the cause of the problem
 
If comes to replacing the arm does the other side also need to be done at same time i.e matched pairs as you would if you were replacing dampers.
 
There have been numerous post about the plastic tapered tube splitting and allowing the arm to fill with grease. Is it ok to reuse the metal tube on the arm that you are removing?
 
With regard to your suggestion Cooperman about cutting a hole in the seat back. This time I will remove the petrol tank to inspect the area for rust and also replace the rear nearside lamp to body seal but your suggestion is a good one for the future.
 
Regards
 
Mike.


Send your radius arms in for refurb whilst it's in bits

#13 idlethumbs

idlethumbs

    Mini Mad

  • Members
  • PipPipPipPip
  • 272 posts
  • Location: Worcester

Posted 31 January 2016 - 09:17 PM

Mine did this. It hadn't been greased for a long time and the radius arm was knackered. When it's up in the air can you pull the wheel down so it's level with the other? I could which would say the radius arm needs replacing/or repairing.

#14 MikeRotherham

MikeRotherham

    One Carb Or Two?

  • TMF+ Member
  • PipPipPipPipPipPipPip
  • 983 posts
  • Location: Westwoodside North Lincs

Posted 10 February 2016 - 06:34 PM

Bit of an update.

The radius arm was seized.

It's now off the car. I was lucky with the end bracket bolts, all came out fairly easily. The bolts that were screwed the box section on the front end of the subframe were bright metal on the ends. Peering into the box section it appears the opening at front has been sealed with gaffer tape.

Struggled a bit getting the flexible hose off the arm.

The female union nut and the half nut holding the flexible hose on the arm appear to be different sizes can anybody tell me what sized spanners to use on these? I think the flexible hose half nut is 9/16"

Is there a sequence to removing the back plate?

There are 3 bolts on the arm end presumably these need removing. But do I need to remove the hub first then the back plate?

There doesn't seem to be any mention in the Haynes manual?

Sorry for the longish post.

Regards

Mike.

Edited by MikeRotherham, 11 February 2016 - 08:04 AM.


#15 GraemeC

GraemeC

    Crazy About Mini's

  • TMF+ Member
  • PipPipPipPipPipPipPipPipPipPip
  • 7,440 posts
  • Location: Carnforth

Posted 10 February 2016 - 08:16 PM

Yes you will need to remove the hub to remove the backplate.

Edited by GraemeC, 10 February 2016 - 08:19 PM.


1 user(s) are reading this topic

0 members, 1 guests, 0 anonymous users