Jump to content


Photo
- - - - -

C1.6Se Clubman


  • Please log in to reply
14 replies to this topic

#1 andrewmini67

andrewmini67

    Mini Mad

  • Noobies
  • PipPipPipPip
  • 144 posts
  • Location: Bristol
  • Local Club: West Country minis

Posted 21 March 2016 - 04:12 PM

Guess this a follow on from PURPLE TOMS thread and how its changed in my 5+ years of ownership. Mechanically the clubby has had no changes, its been spot on. If "it's not broke don't fix it" has never been more truthful and yes I would like more power as you very quickly get used to whatever BHP you have. The 100+ is plenty for a mini and I would be more than happy to have an A series pushing that out. Only covering on average, 1000 miles a year perhaps it hasn't had the chance for things to wear out or break so I just get in turn the key and go where ever I want to. The clubby has been driven all year round so unfortunately the body work has suffered a little but the front end alot (Paul Daniels R.I.P.) Always wanting my minis to look nice the decision was taken to give it a new front end and although I am more than happy with purple as a body colour, it was always my intention to change it at some point.

Money always being an issue, the panels were purchased over the years knowing that work needed to be done. These have included a full scuttle panel, both A panels, both wings, front lower panel, headlamp panels and anything else that was needed was purchased at the time.

Right from the start of the resto my intention was to keep the engine in situ as I did not want to upset any alignment or balance issues because of the spacers/washers on the engine mounts. Everthing on the engine and within the engine bay that was easily removed was taken off or out so it could be repainted as best I could. In the end it worked out quite well and if there is any purple left I cannot see it??

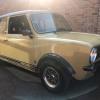
I will post pictures of the work soon but for now here is a picture of it in "Toms purple" when I purchased it back in 2010.

46ec4a8a-edfc-4eae-a3ee-a411f99845bb_zps


Edited by andrewmini67, 21 March 2016 - 04:57 PM.


#2 Anthony30

Anthony30

    One Carb Or Two?

  • Members
  • PipPipPipPipPipPipPip
  • 1,466 posts
  • Location: Rainhill,Merseyside
  • Local Club: N/A

Posted 21 March 2016 - 07:01 PM

Lovely car. :highfive:  :wub:


#3 andrewmini67

andrewmini67

    Mini Mad

  • Noobies
  • PipPipPipPip
  • 144 posts
  • Location: Bristol
  • Local Club: West Country minis

Posted 23 March 2016 - 06:20 PM

Right here goes, these photos have been taken over a period of 2+ years and the mini is now finished.This work would not of have been possible without the help of Roger, who has taught me so much in all the areas of bodywork. From the start it was a case of "I will show you and then you have a go", looked easy watching him but it wasn't .The mini was repaired with gas welding and using spot brazeing on outer most panel repairs, I tried mig but couldn't get on with it. Repair patches were made by Roger and he has to take most of the credit for this small resto. All the visable "iffy bits" are down to me working on my own, including the paint job. Perhaps most of us are critical of our own work but you must have a go, because of the massive costs involved if given to a body shop. I am very happy with the clubby and I now have more skills to mantain my cars but probably not well enough to do work for other people.


Front end Removed

MAY%202014%20080_zpspygtzyo0.jpg


Slam panel repair

APRIL%202014%20049_zpsqrsjwbb9.jpg


Roger scuttle fitting

MAY%202014%20092_zpstfshwlwx.jpg


Removing extra wiper holes

OCTOBER%202014%20003_zpsacuzwwyr.jpg


More to follow..... ;D


#4 andrewmini67

andrewmini67

    Mini Mad

  • Noobies
  • PipPipPipPip
  • 144 posts
  • Location: Bristol
  • Local Club: West Country minis

Posted 25 March 2016 - 05:20 PM

Slam panel repair patches,replaced on both sides and spot brazed.

MAY%202014%20164_zpsg1ftcitz.jpg


Both flitch panels were sound but had a few visable repairs, we could not justify taking them out so we put new ones over the top which look much better and add abit more strength to the car.The visable seam/gutter was tapped back into place prior to fitting as they could not be seen from the inside and were lost abit before.

JULY%202014%20041_zpsxf7mh4nf.jpg

JULY%202014%20059_zpsl8eb9to4.jpg

MAY%202014%20018_zpsc4kjkblf.jpg


Head lamp panels,spot brazed and replaced on both sides

MAY%202014%20157_zpshlwpcxds.jpg


Inner wing repair patch (was pretty pleased with my welding that day) 

MAY%202014%20148_zpsusl0cbyt.jpg

MAY%202014%20149_zpsoj0ezgqb.jpg


Edited by andrewmini67, 25 March 2016 - 05:39 PM.


#5 andrewmini67

andrewmini67

    Mini Mad

  • Noobies
  • PipPipPipPip
  • 144 posts
  • Location: Bristol
  • Local Club: West Country minis

Posted 30 March 2016 - 11:20 PM

Took the clubby for its MOT today and while they were aligning the headlamps it had a big water leak. The plastic coolant pipe from the water pump that connects to 3 separate hoses decided to break on the heater feed pipe. Garage said the pink antifreeze has a habit of corroding/weakening plastic and to use the older blue type. Ordered the new pipe along with a right angled hose to add less stress to the joint as it was straight before and putting abit of pressure on the connection. Wish I never commented on how reliable it was but it has been sat around for over 2 years. 

More pictures of the resto soon.


Edited by andrewmini67, 30 March 2016 - 11:20 PM.


#6 andrewmini67

andrewmini67

    Mini Mad

  • Noobies
  • PipPipPipPip
  • 144 posts
  • Location: Bristol
  • Local Club: West Country minis

Posted 04 April 2016 - 04:29 PM

Some of the repairs we found along the way. Pictures speak for themselves.

OCTOBER%202014%20015_zpsqqwl8tog.jpg

OCTOBER%202014%20013_zpstvmx6dwa.jpg

OCTOBER%202014%20018_zpsco7k3dhy.jpg

MAY%202014%20024_zpsohedg1fq.jpg

MAY%202014%20014_zpslxmneujx.jpg

MAY%202014%20017_zpsvkbbebvs.jpg

MAY%202014%20027_zpsdw7ya4xj.jpg

MAY%202014%20002_zpsfchodlkr.jpg

MAY%202014%20004_zpsah2d4jsm.jpg


#7 andrewmini67

andrewmini67

    Mini Mad

  • Noobies
  • PipPipPipPip
  • 144 posts
  • Location: Bristol
  • Local Club: West Country minis

Posted 04 April 2016 - 04:36 PM

Front end coming together

MAY%202014%20153_zpsjerb0kwc.jpg

JULY%202014%20039_zpsdb4qjuf3.jpg

JULY%202014%20040_zps8h4lotiu.jpg

JULY%202014%20056_zpslqm9cn8u.jpg

JULY%202014%20060_zpsdz1uasnh.jpg

OCTOBER%202014%20002_zpsojngszt9.jpg


#8 andrewmini67

andrewmini67

    Mini Mad

  • Noobies
  • PipPipPipPip
  • 144 posts
  • Location: Bristol
  • Local Club: West Country minis

Posted 04 April 2016 - 04:49 PM

Stone chip on lower front panel and wheel arches

OCTOBER%202014%20009_zpsnumxbxbo.jpg

OCTOBER%202014%20017_zpsuqzxttui.jpg

OCTOBER%202014%20018_zps4rvdbtek.jpg

Shultz applied under car and inner wings.

 OCTOBER%202014%20020_zpskpfeagpn.jpg

Rear subframe removed for a freshen up

MAY%202014%20116_zpswds9g2ud.jpg


#9 Purple Tom

Purple Tom

    Up Into Fourth

  • TMF+ Member
  • PipPipPipPipPipPipPipPipPip
  • 4,921 posts
  • Location: Derbyshire
  • Local Club: TMF

Posted 09 April 2016 - 07:38 AM

I've always wondered how you were getting on with it Andrew.  I'm glad (but also very sad as I miss it and wish it was me doing it!) to see that it's getting some TLC :-)


#10 andrewmini67

andrewmini67

    Mini Mad

  • Noobies
  • PipPipPipPip
  • 144 posts
  • Location: Bristol
  • Local Club: West Country minis

Posted 09 April 2016 - 03:07 PM

Hello Tom, so nice to hear from you. It was time for some attention on the bodywork and hopefully it is now good again for many years to come. Pretty pleased with the results but its not perfect. Can't wait to drive it again after over 2 years off the road, MOT booked for next week. Really struck lucky with this car and its excellent conversion.. :proud:  


Edited by andrewmini67, 09 April 2016 - 03:15 PM.


#11 andrewmini67

andrewmini67

    Mini Mad

  • Noobies
  • PipPipPipPip
  • 144 posts
  • Location: Bristol
  • Local Club: West Country minis

Posted 12 April 2016 - 09:37 PM

Clubby passed it's MOT today, just an advisory on some slight play on the steering rack. Sun was shining so I drove it to work, will stay local subjecting it to traffic and the odd power run to get an idea of its reliability. A few niggles to sort out, little blow on the manifold where it joins onto the exhaust, speedo not working, fuel gauge is eratic and will probably have to trim the new wings. A bit of rubbing on the tyres on full lock when taking the corners. Nothing that stops me from driving it so well chuffed... :highfive:


#12 andrewmini67

andrewmini67

    Mini Mad

  • Noobies
  • PipPipPipPip
  • 144 posts
  • Location: Bristol
  • Local Club: West Country minis

Posted 17 April 2016 - 02:24 PM

More pictures

Very minimal work to the rear of the car, only a small patch repair on nearside rear wing. Stonechip to interior. 

APRIL%202015%20008_zps7lhydphg.jpg


So onto the painting. Barcoat, primer and top coat, BMC Glen Green (colour match)

APRIL%202015%20011_zpsswgrd9kn.jpg

ROGERS%20YELLOW%20MINI%20002_zpseb9s8zxp

APRIL%202015%20018_zpsppymkyif.jpg

APRIL%202015%20015_zpsjtz7nece.jpg

ROGERS%20YELLOW%20MINI%20003_zpskf3brppq

OCTOBER%202015%20001_zpsfder6u8c.jpg


Flash on camera gives a false looking colour and looking at the order of the "paint" pictures now they seem to be jumbled up, it was a while ago.... :shy:


Edited by andrewmini67, 17 April 2016 - 03:34 PM.


#13 andrewmini67

andrewmini67

    Mini Mad

  • Noobies
  • PipPipPipPip
  • 144 posts
  • Location: Bristol
  • Local Club: West Country minis

Posted 17 April 2016 - 03:51 PM

Interior finished, abit of tidying to do. Top dash rail, binnacle(2 & 3 pod joined) and steering cowl all flocked. A new Momo steering. The fuse box has been relocated inside the car below the heater switches along with the brake, fuel lines and battery lead. Made a speaker from some fire extinguishers as I did not want a stereo on view. 

CLUBBY%20MARCH2016%20037_zpseb4szuth.jpg

CLUBBY%20MARCH2016%20038_zpsrypk7ylp.jpg

CLUBBY%20MARCH2016%20040_zps71pj3txf.jpg


Edited by andrewmini67, 17 April 2016 - 03:52 PM.


#14 miniBrain

miniBrain

    Mini Mad

  • Members
  • PipPipPipPip
  • 192 posts
  • Location: Preston

Posted 17 April 2016 - 07:46 PM

Looks like a very neat installation with the 8V engine. Seeing these photos makes me think 8V is a better solution rather than the larger head 16V - in terms of installation design & maintenance that is.


Look forward to seeing this progress


#15 Eagebragax

Eagebragax

    Starting My Mini Up

  • Noobies
  • Pip
  • 2 posts
  • Location: USA
  • Local Club: 115353

Posted 12 October 2017 - 04:32 PM

The subframes are the same but there is more room at the top part of the Clubman. Fairly sure its 100mm. Could be 4" though.... Ive seen Mini Clubmans with a radiator mounted in the front as there is so much room to spare.


1 user(s) are reading this topic

0 members, 1 guests, 0 anonymous users