Jump to content


Photo
- - - - -

Subframe Bolt Measurements


  • Please log in to reply
13 replies to this topic

#1 patto

patto

    Mini Mad

  • Members
  • PipPipPipPip
  • 199 posts

Posted 22 October 2016 - 09:28 PM

Hi guys,


Just wondering if anyone can do me a huge favour. I'm going to remake the two big front subframe bolts in titanium for my track mini project just because I can. unfortunately the mini is in storage at the moment so I can't easily get hold of one for the measurements, so I was hoping someone may have one laying about they could take some measurements from. I've done a little drawing of the measurements I need. Thanks guys.


s-l225_zpsel335pvb.jpg


subframe%20bolt_zpscqp0utmh.png


Edited by patto, 22 October 2016 - 09:37 PM.


#2 alex-95

alex-95

    I am THE CLAMP MAKER

  • Members
  • PipPipPipPipPipPipPipPipPipPip
  • 6,025 posts
  • Location: l

Posted 23 October 2016 - 07:28 PM

The one I measured was

A - 83.5

B - 39.5

C - 25.5


I'll double check tomorrow with my better vernier if I remember.


#3 tiger99

tiger99

    Crazy About Mini's

  • Members
  • PipPipPipPipPipPipPipPipPipPip
  • 8,584 posts
  • Location: Hemel Hempstead

Posted 23 October 2016 - 08:49 PM

You could make them lighter by drilling them rather than making them from titanium, which by the way is not as strong as people imagine and, depending on grade, may not be as good as a standard 8.8 bolt. Which is not to say that you can't use titanium. There is a good safety margin in these bolts and the diameter is due to the requirements of the rubber mounting. In a competition car you should be using only full solid mounts if you wish to be competitive, so that does not apply. Same on a road car if you want it to drive well.

The original design had two 3/8" UNF bolts or studs each side, and if you keep the bolt cross section at its worst point equal or greater than the root cross section of two of the original bolts you will definitely have adequate tensile strength. That means that you can drill quite a large hole down the centre as long as you stop it well above the shoulder and don't introduce any stress raisers.

But if you do your calculations very carefully you may be able to drill the titanium bolts...

Have fun machining the titanium. It isn't nice.

Why don't the various spares suppliers have ready made lightened bolts? Lack of imagination?

#4 nicklouse

nicklouse

    Moved Into The Garage

  • Members
  • PipPipPipPipPipPipPipPipPipPipPip
  • 18,589 posts
  • Location: Not Yorkshire
  • Local Club: Anonyme Miniholiker

Posted 23 October 2016 - 08:54 PM

They do.
http://www.dsnclassi...ist-components/

#5 patto

patto

    Mini Mad

  • Members
  • PipPipPipPip
  • 199 posts

Posted 24 October 2016 - 04:06 PM

Thanks for the replies guys especially the measurements. I do plan on milling out the sections like the DNS ones and I’m using grade 2 titanium which should do nicely. I’m not sure I’ll go as far as drilling the centre as you say tiger (not that I’m saying you can’t, it’s a good suggestion), I may do some calculations on it and see but it’s hard to tell exactly how much force the bolt is under.


And regarding actually turning it I’m using a 1951 myford ML7  :ohno:  which surprisingly copes with it remarkably well, just got to keep the work peace cool. I’ve only really decided to do it because I’ve got a boat load of scrap titanium from work so am desperate to make car parts out of it >_< .


#6 tiger99

tiger99

    Crazy About Mini's

  • Members
  • PipPipPipPipPipPipPipPipPipPip
  • 8,584 posts
  • Location: Hemel Hempstead

Posted 24 October 2016 - 05:16 PM

Well if you have good scrap material (of any sort) you really do need to use it! It is the most efficient form of recycling, and the most satisfying.

As to the stresses on these bolts, it is extremely difficult to get them into significant tension over and above that due to torquing them up. In shear, largely braking and cornering loads, which if we assume 600kg frontal weight on one of the later, heavier models, tyre coefficient of friction of 1 (not likely!) and ignorance factor of 5 to allow for impact loading and things we don't know, might give about 3 tonnes in any arbitrary direction, partly spread over both bolts. The vertical impact load on the crossmember if you hit a massive bump is taken directly by the crossmember and only relieves tension in the bolts.

We have no reason to think that the original double bolts, with shanks partially reduced in diameter, we're ever prone to breakage, so those modern monsters are simply ridiculously excessive for the actual loads. The only weak point is where the reduced diameter of the thread meets the main diameter, which is vulnerable to fatigue from large cyclic bending loads. But large, for that size of bolt, is beyond what it will ever see in a Mini, and can be relieved by using as large a root radius as possible.

The more I think about this, the more I am convinced that some weight reduction is long overdue, so I like what you are doing. Now if only personal weight reduction was so easy....

😠

#7 alex-95

alex-95

    I am THE CLAMP MAKER

  • Members
  • PipPipPipPipPipPipPipPipPipPip
  • 6,025 posts
  • Location: l

Posted 24 October 2016 - 05:52 PM

Thanks for the replies guys especially the measurements. I do plan on milling out the sections like the DNS ones and I’m using grade 2 titanium which should do nicely. I’m not sure I’ll go as far as drilling the centre as you say tiger (not that I’m saying you can’t, it’s a good suggestion), I may do some calculations on it and see but it’s hard to tell exactly how much force the bolt is under.


And regarding actually turning it I’m using a 1951 myford ML7  :ohno:  which surprisingly copes with it remarkably well, just got to keep the work peace cool. I’ve only really decided to do it because I’ve got a boat load of scrap titanium from work so am desperate to make car parts out of it >_< .

Double checked and they're as above.


#8 nicklouse

nicklouse

    Moved Into The Garage

  • Members
  • PipPipPipPipPipPipPipPipPipPipPip
  • 18,589 posts
  • Location: Not Yorkshire
  • Local Club: Anonyme Miniholiker

Posted 24 October 2016 - 07:01 PM

I am not a fan of the full cut outs on the DSN ones as you end up with the 4 edges pressing on the rolled sheet edges.

I would like more contact reducing the length of the cutouts so they are between the sheet.

#9 patto

patto

    Mini Mad

  • Members
  • PipPipPipPip
  • 199 posts

Posted 24 October 2016 - 10:59 PM

Excellent thanks guys. This is why I love this forum, so many helpful people. I’ll hopefully get started on them later this week and I’ll try and stick some photos up once there done.


#10 patto

patto

    Mini Mad

  • Members
  • PipPipPipPip
  • 199 posts

Posted 01 November 2016 - 09:26 PM

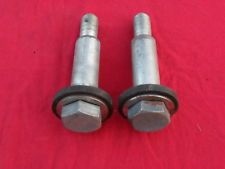
Hi guys. Well i think I can probably call this a success, it was a bit more hassle than I thought because the bolt I was planning on using wasn’t quite long enough. Any way I’ll let the photos do the talking.


IMG_20161025_171438_zpsmwktewd9.jpg


This is the bolt that’s too short so the first thing was to lop the head off it


IMG_20161025_171600_zps4pc4k8n8.jpg


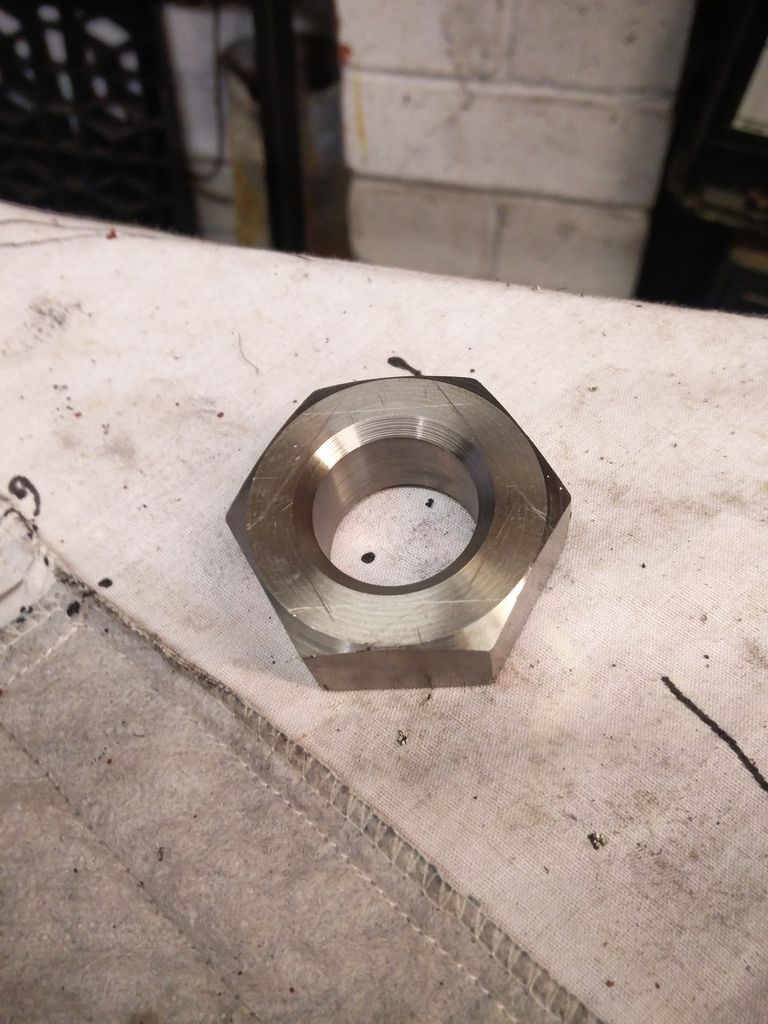
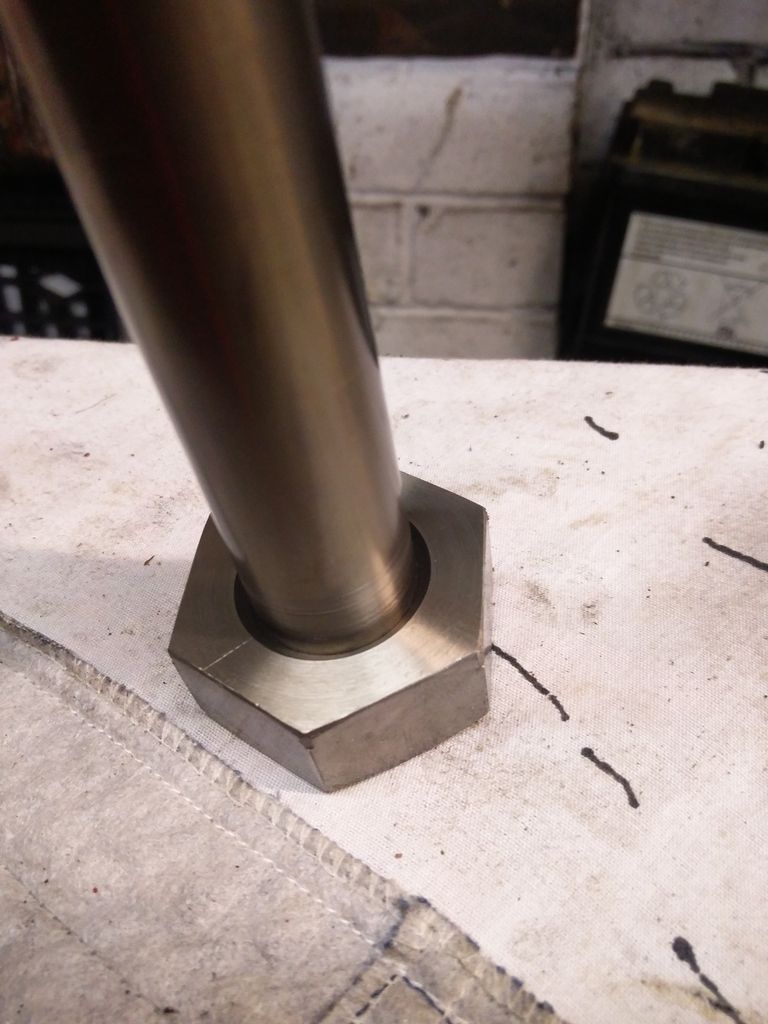
And then bore out the centre to 25.5mm and stick some chamfers on it


IMG_20161025_183156_zpsxtqrqrxt.jpg


IMG_20161025_201552_zps7owblkve.jpg


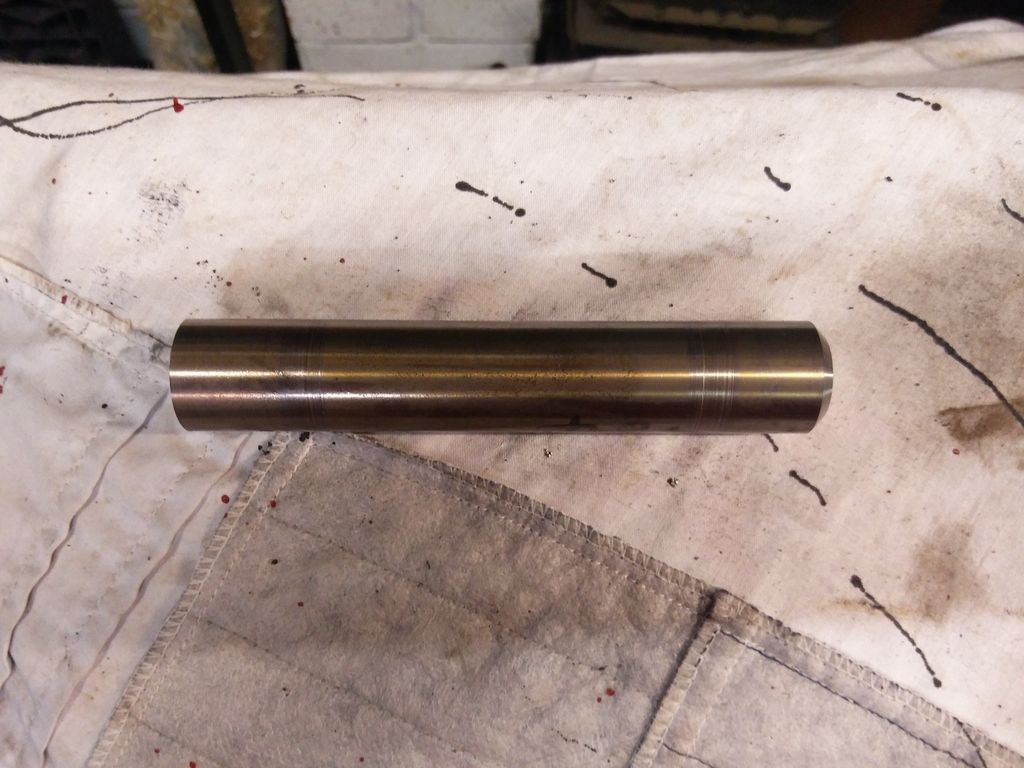
Then i used this titanium valve stem which was quite handily 25.5mm to start with, i lopped a bit off and put a chamfer on it


IMG_20161025_194935_zps7rzz0zww.jpg


And then fitted them together, they are a very tight fit and the head gets put in the oven and the bar/shank put in the freezer to get them to fit. A quick blast round the head with a blow torch gets them to separate again. Chamfered on the back to.


IMG_20161025_201838_zpsermdi5mp.jpg


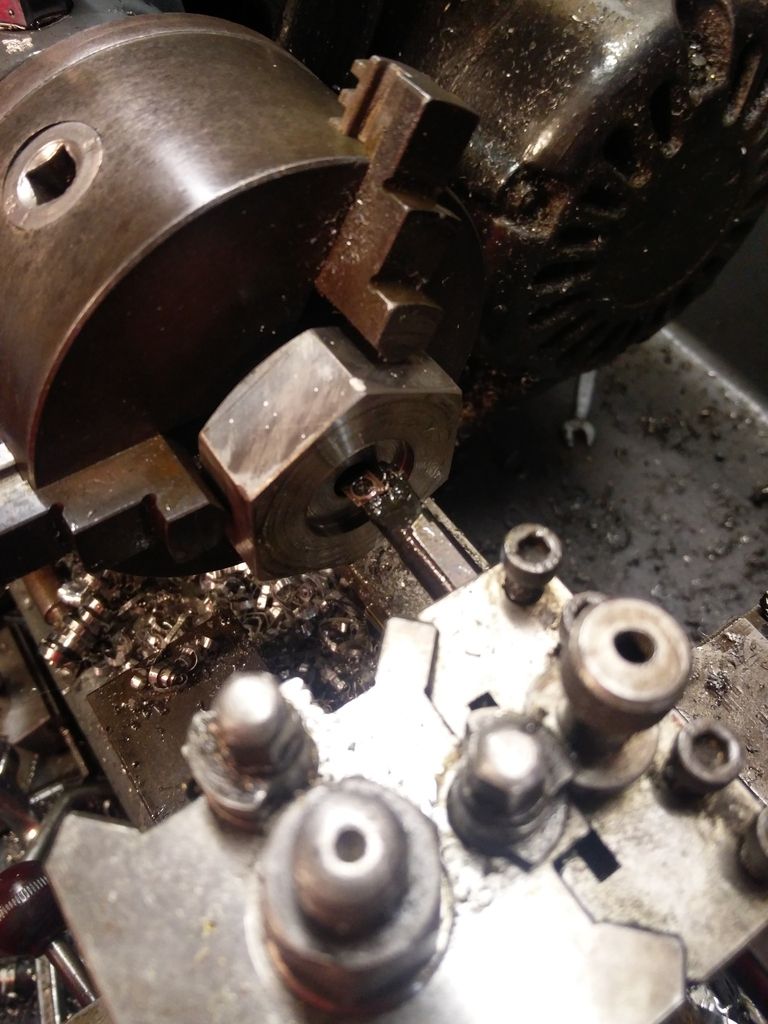
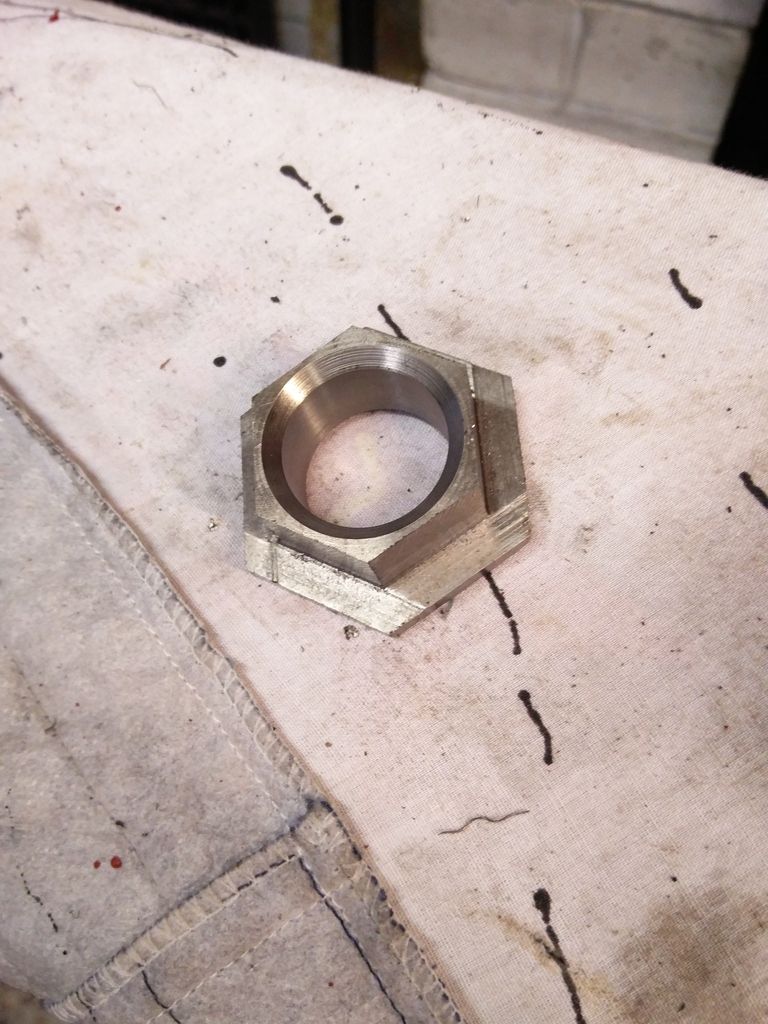
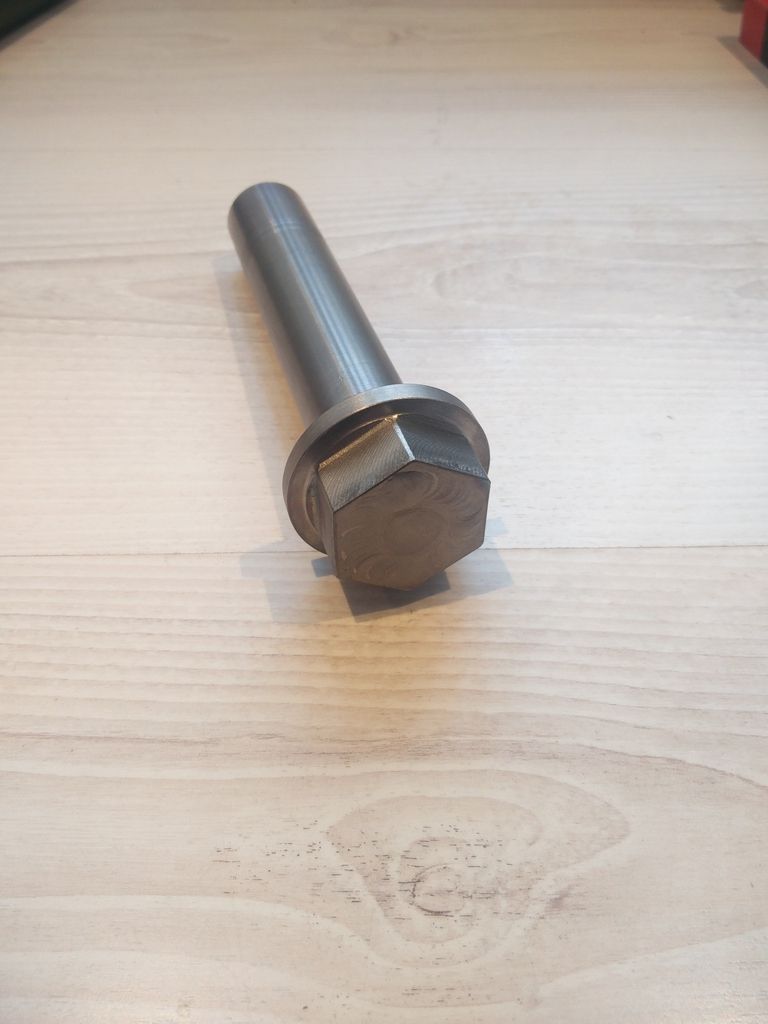
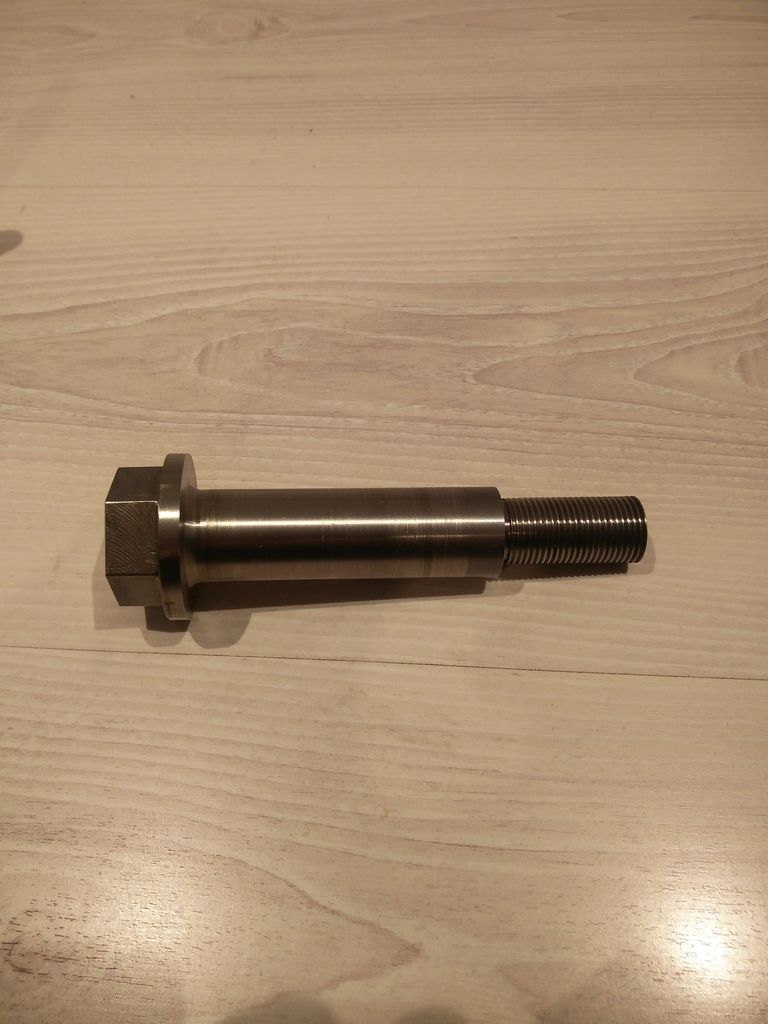
Next was to mill the head down to the correct size of 1 5/16 and put a flange on it


IMG_20161027_184512_zpsopz4vdgv.jpg


IMG_20161027_192330_zpsvkwrjrd6.jpg


Back together


IMG_20161027_212153_zpsvrbrlvnz.jpg


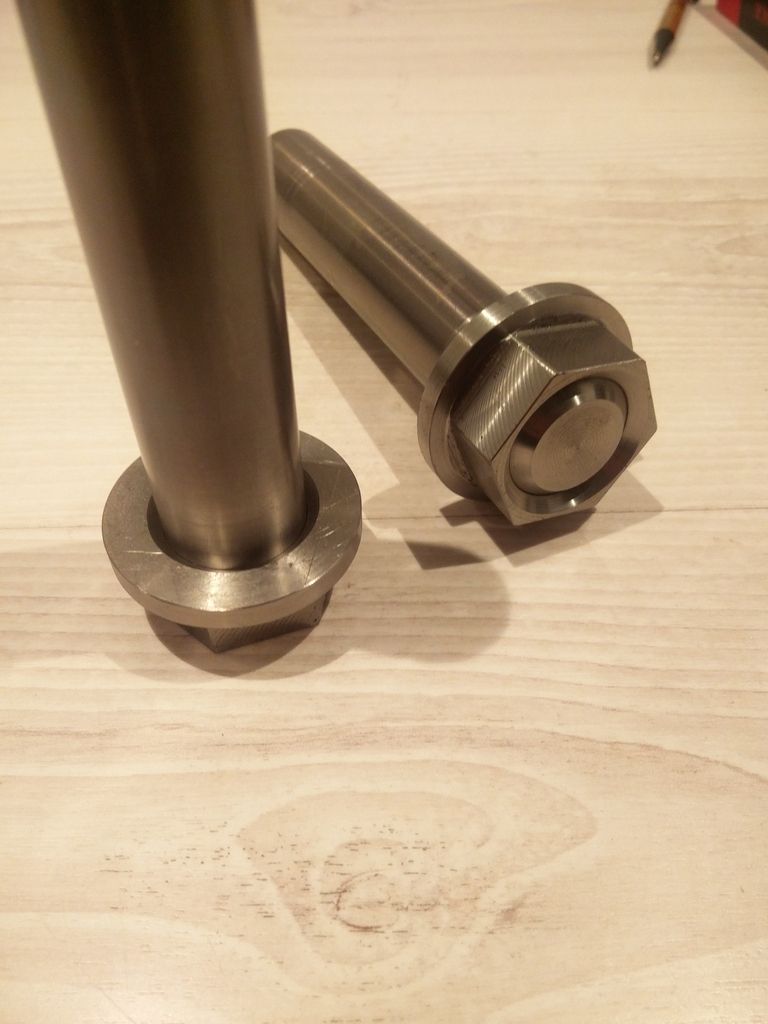
Then welded them up on both sides


IMG_20161028_160936_zpsrdcayixp.jpg


IMG_20161028_160949_zpsvlwrrbl8.jpg


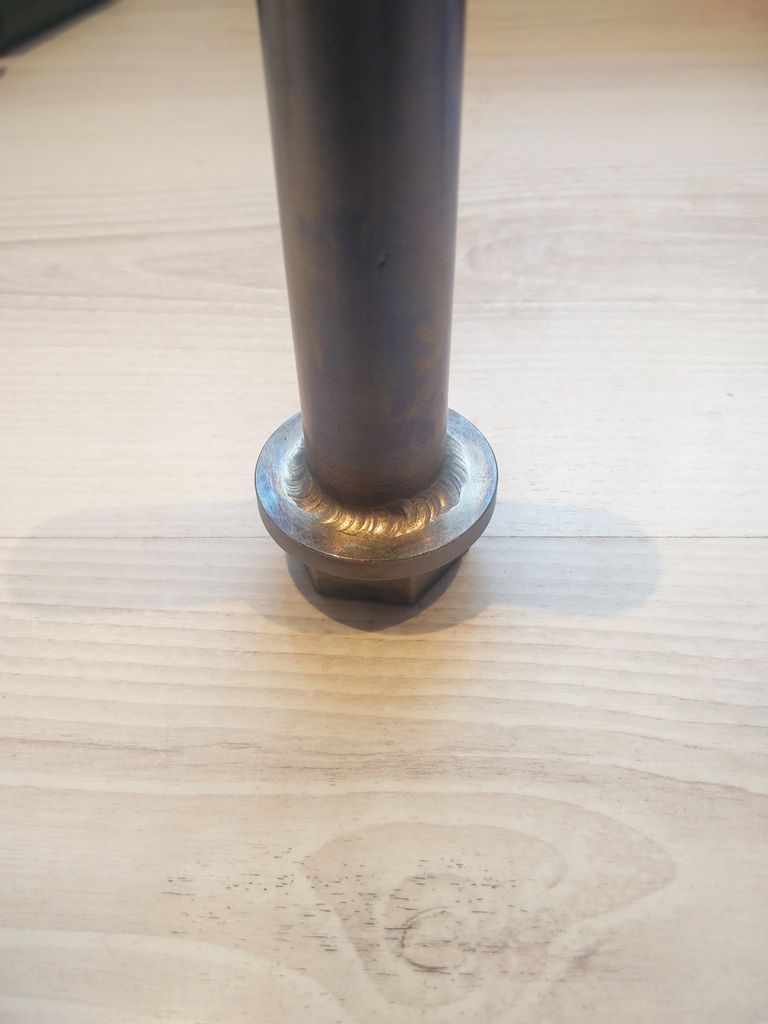
And skimmed them off


IMG_20161029_125117_zpsl93xfbkt.jpg


IMG_20161029_125126_zpsm3ltfffy.jpg


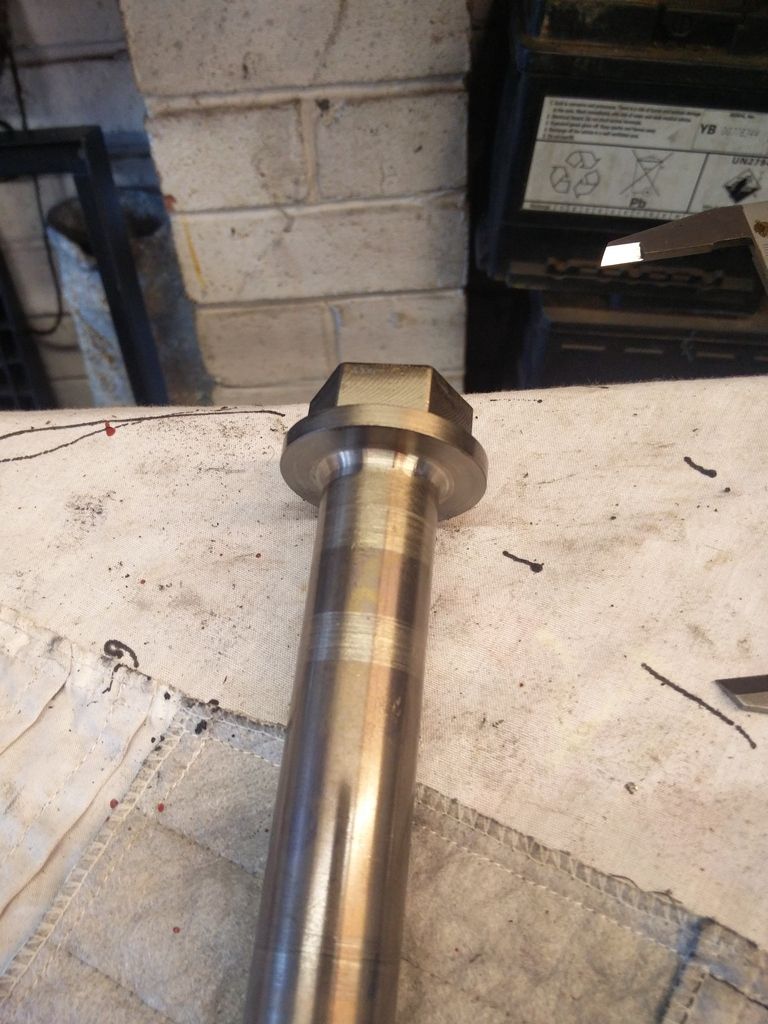
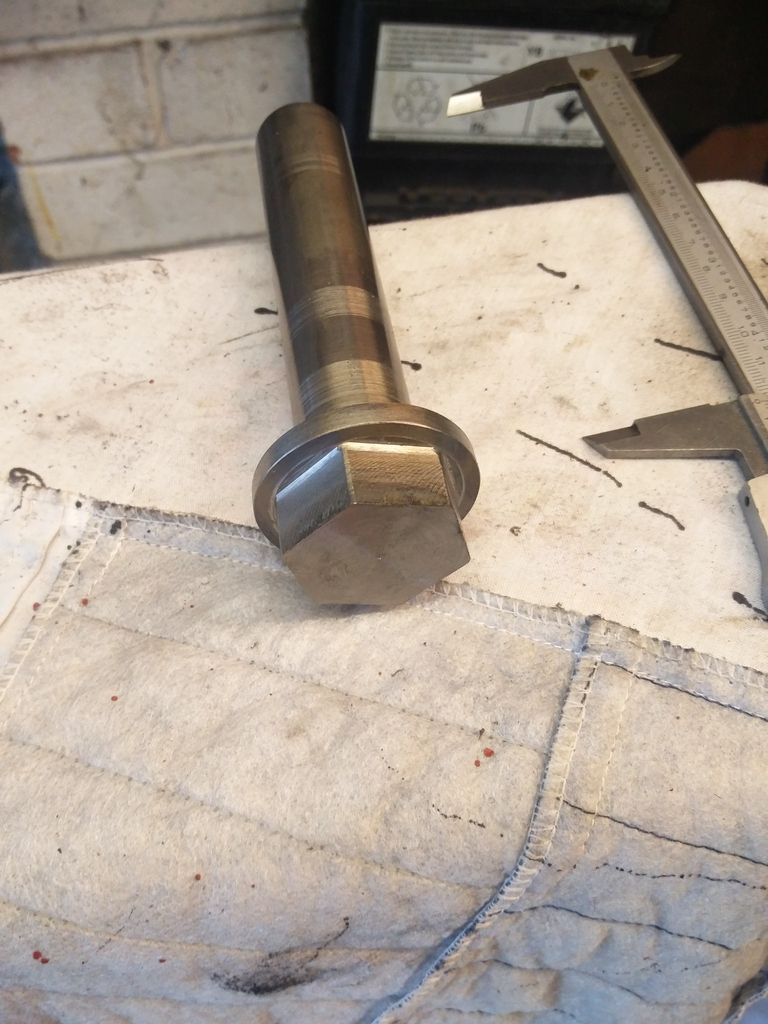
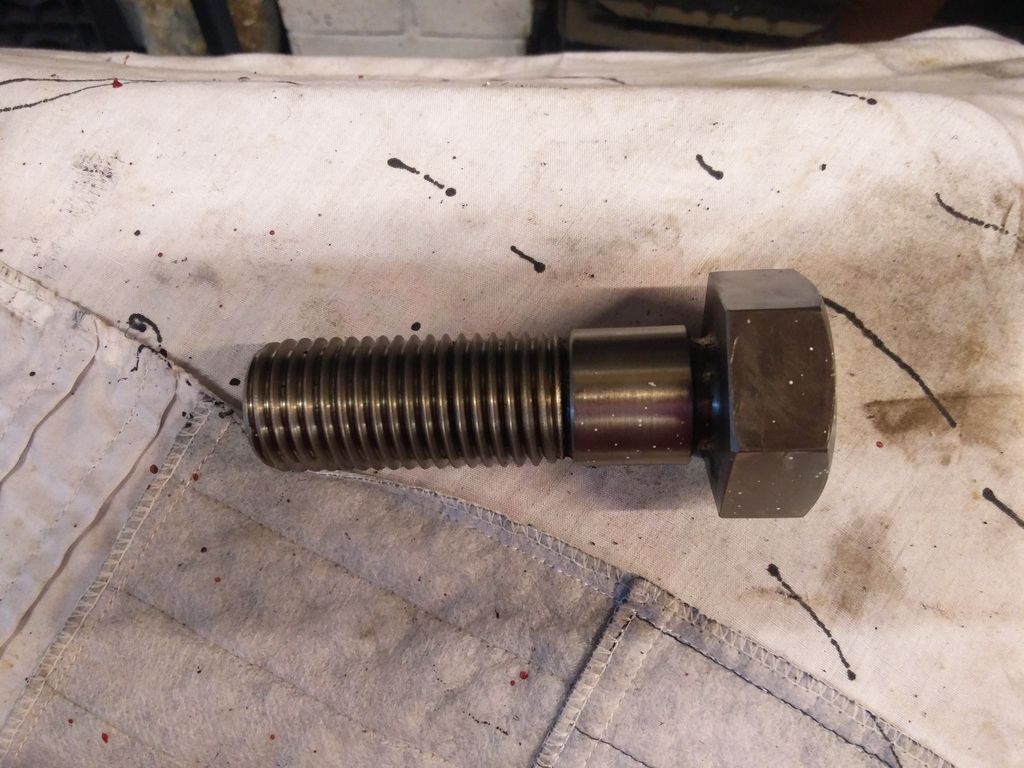
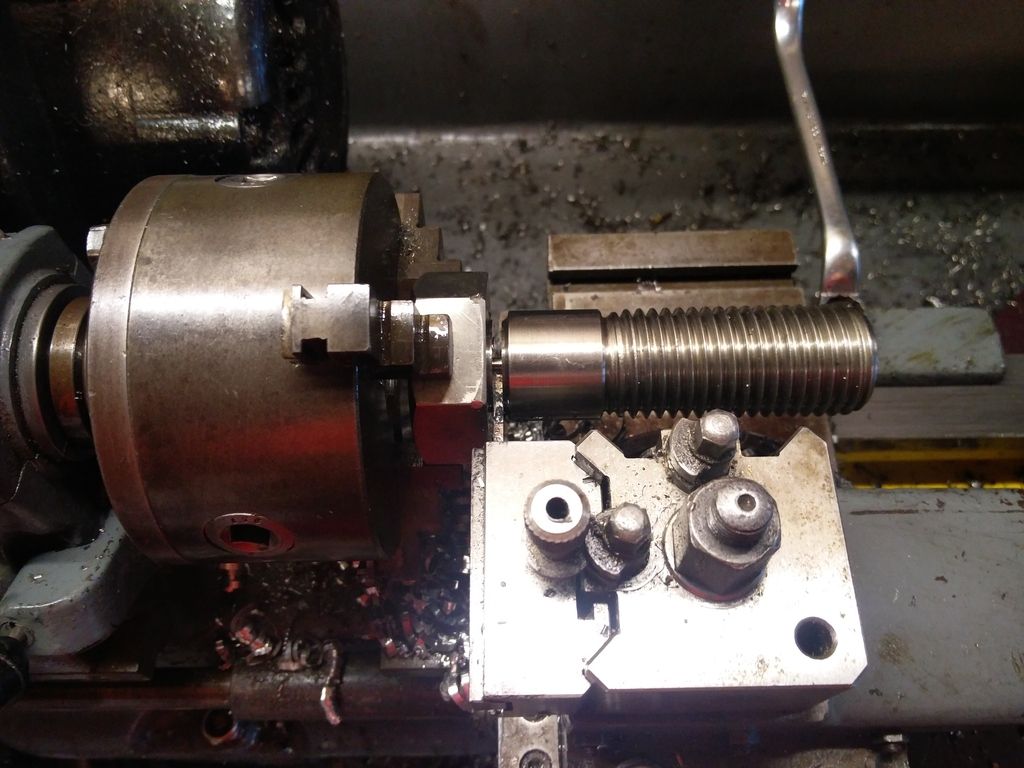
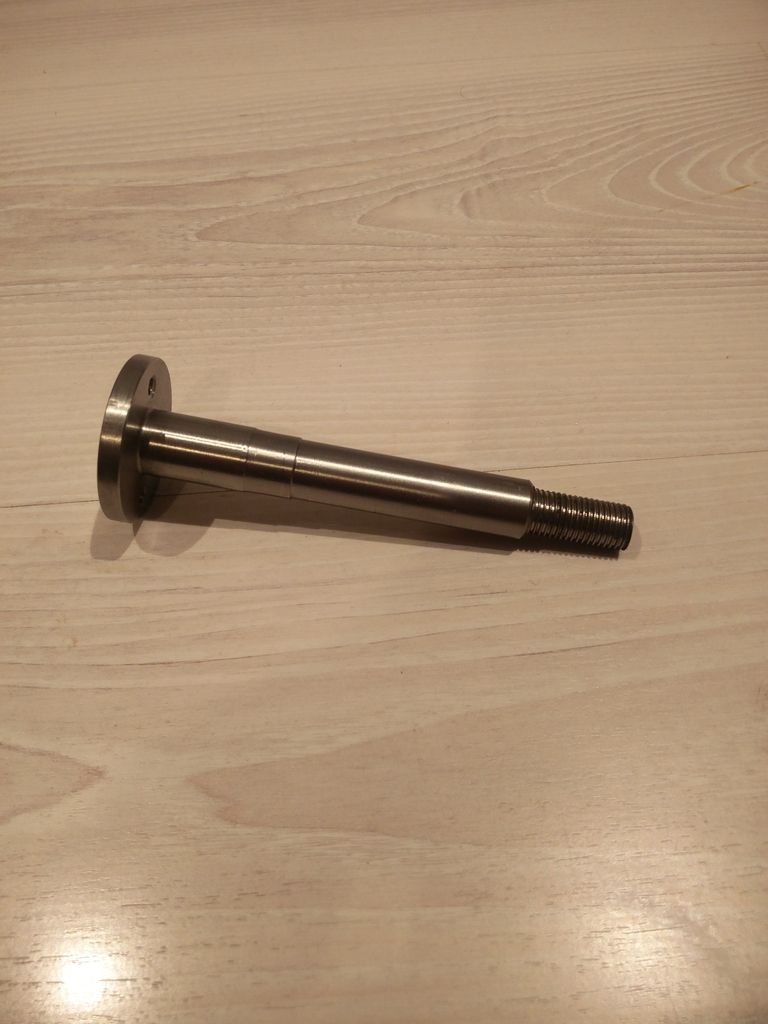
I then turned the end down and threaded it


IMG_20161101_202153_zpsyezgadhe.jpg


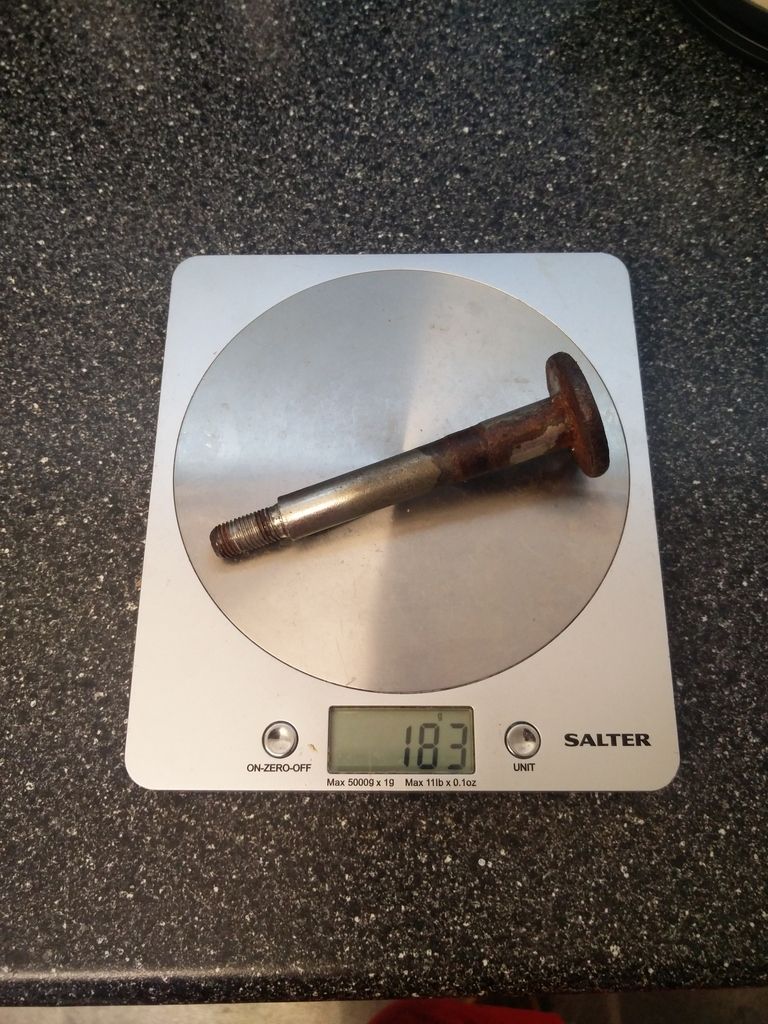
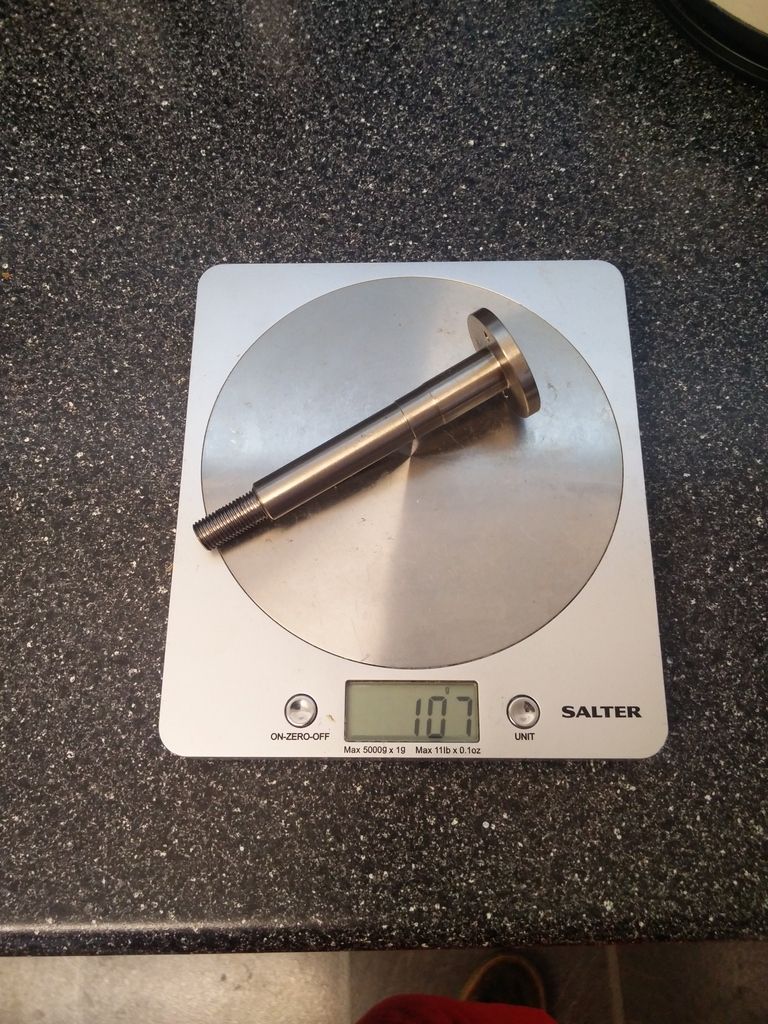
And that’s about it, the new ones come out at 310 grams. I’m not sure what sort of saving that is, i had a look on the weights thread but could only find the double tower bolt version. So if anyone knows what the original ones weigh that would be great.


I also made the bolts for the front mount on the rear subframe.


IMG_20161101_202047_zpsx4m7aqyi.jpg


IMG_20161101_202101_zpsapj64r6o.jpg


IMG_20161101_182901_zpsbnmxjxzq.jpg


IMG_20161101_182914_zpstmwfszeb.jpg


#11 morley

morley

    One Carb Or Two?

  • Members
  • PipPipPipPipPipPipPip
  • 903 posts
  • Location: Devon

Posted 01 November 2016 - 10:38 PM

They've turned out really well! Hats off to you :-)

#12 tiger99

tiger99

    Crazy About Mini's

  • Members
  • PipPipPipPipPipPipPipPipPipPip
  • 8,584 posts
  • Location: Hemel Hempstead

Posted 02 November 2016 - 01:03 PM

Nice! If those were mine I would be disinclined to put them in a real car in case they got dirty. I like the appearance of freshly machined parts.

#13 patto

patto

    Mini Mad

  • Members
  • PipPipPipPip
  • 199 posts

Posted 02 November 2016 - 04:34 PM

Well unfortunately it will be quite some time before they see any action, I’m desperately trying to buy my first house so I can get the mini out of storage and get started on it. I’m just trying to do some little bits to keep me entertained at the moment.


#14 Spider

Spider

    Moved Into The Garage

  • Admin
  • PipPipPipPipPipPipPipPipPipPipPip
  • 14,867 posts
  • Location: NSW
  • Local Club: South Australian Moke Club

Posted 02 November 2016 - 08:24 PM

Very nice indeed :shades:


1 user(s) are reading this topic

0 members, 1 guests, 0 anonymous users