

Now that it's complete, I thought I'd share the results of Phase 2 of my ongoing project and detail how it was achieved. Hopefully it'll be of interest to some of you :)
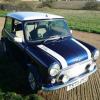
Phase 1 was just getting her cleaned up, rot free (mostly) and roadworthy in order to enjoy the show season last year. As with a lot of MPi's, she was a rot box. She started life as a demo car for John Cooper Garages and was loved and cared for with 50,000 miles of JCG service history to prove it. She was then used and abused with no records of service or maintenance, before finally ending up on a drive under a car cover for 18 months. Unfortunately, it was a crap car cover that trapped moisture rather than preventing its egress, so the ensuing rot was quite extensive. An entire front end from top dash rail forward was required, as were new outer sills, plus repairs to inner sills / floor, rear quarters, boot floor and rear valance. Here's a pic from the end of Phase 1, all fresh and shiny from the body shop, and restored back to standard spec :)
End Result of Phase 1

The purpose of Phase 2 was to add lots more additional quality features that were original factory or JCG options, or subtle changes that would enhance the pleasure of driving. So, the new changes are:
Webasto Hollandia 400 Deluxe Sunroof

Full Leather Interior Upgrade (nearly)

Right Hand Petrol Tank

Additional ICE

Below is a breakdown of how each component came together. All in all, it took about 9 months of planning in order to source all the parts and work out how it was all to come together, as each part was fully customised and enhanced. The results are extremely gratifying, so it’s well been worth it. :)
Incidentally, for a list of those people / companies who made all this possible, please go down to the bottom of this post.
Sunroof
Factory fitted Webasto sunroofs are notoriously crap in quality, whereas the aftermarket ones are far superior in build quality and durability. However, the cost of an aftermarket sunroof is in excess of £1200 new. So, a diligent search on eBay for 6 months eventually turned up a second-hand Webasto 400 Standard sunroof for a few hundred quid. I say ‘standard’ because there used to be a deluxe option available which sported a fully programmable soft-touch control panel, rather than just having a clunky open / close switch. For some weird American market reason, Webasto discontinued the deluxe version a number of years ago however, so in order to obtain a deluxe roof, I was going to have to make one.

So, my local Webasto dealer ordered a load of Deluxe spares so that I could attempt to convert my Standard one to a Deluxe version. Essentially, they’re the same thing, it’s just the motor, controls, cover and loom that are different. The main frame, canvas and workings are identical. However, there was a glitch. The motor mounting point was different meaning that the new motor couldn’t be mounted to the existing frame. Most fortunately, the motor mounting bracket was not available as a spare, as it came as part of the entire frame assembly (£££££) so my Webasto dealer spoke with them directly and they very kindly butchered an old knackered Deluxe sunroof and sent me the section I needed for a princely sum of £30 including postage from Holland! Bargain. Then all that was required was the drilling of a few rivets, switch out the relevant sections of frame and rivet it back together again. Voila! One discontinued Webasto Hollandia 400 Deluxe for approx. £650! And it’s bloody awesome :)
Incidentally, the Webasto dealer also provided me with cutting templates that I passed on to the body shop who fitted it for me. I would have had the dealer install it, but I needed a bit of cosmetic work doing to the roof anyway so had it fitted whilst it was in for that.
Full Leather Interior Upgrade (nearly)
Ok, so I say ‘nearly’, because I’ve not had the crappy vinyl door cards seen to yet. That’s on the list for this winter.
Right, so first off (and most obviously) I’ve fitted a set of John Cooper full black leather seats. These are generally quite hard to come by in decent condition. I paid a shade over what I consider the general value to be, because the covers were in superb condition, and had evidently been looked after. The frames, however, were buggered. If any of you suffer from saggy seats (and I mean in the car!) then it may not be the diaphragms that are to blame. Twice now I’ve seen that the holes in the seat frame that hold the diaphragm hooks, stretch into slots through years of arses bouncing up and down on the seat. The frames are made of a pretty thin metal so it’s not surprising.

So I stripped the seats down to bare frames and they went off with the rest of the car for a bit of MIG repair to the holes. Another issue was that the driver’s seat had been damaged in an accident at some point, resulting in the recliner mechanism becoming distorted. This was unfortunately irreparable, so I switched the back rest frame with my original one.
So with repaired frames, I set about prolonging the life of the covers. These MPi leather (and half-leather) seats very often suffer splitting to the seat base bolsters. Caused no doubt by the afore mentioned bouncing arses and a lack of leather treatment to keep it soft. So, I reinforced all of the seat cover from the inside, using a strong non-stretch material and copydex (which is great at bonding material together). With any luck, and proper treatment, they’ll last a good many years yet to come.

(Halfway through one seat. Bolsters done and a few ribs)
Next up was the top dash. I’d seen a leather top dash in a scrap Cooper 500 that caught my eye. Unfortunately, that particular example had been damaged in a major side-impact accident, however the same vehicle did provide me with a very good condition carpet. I say good condition because although there were a couple of nicks caused by the accident, the car itself had covered only about 20k, so the carpet as a whole was in very good condition with no fading or water damage. A bit of cosmetic repair to the nicks, a new set of seat rest protectors’ courtesy of Newton Commercial (plus a steam clean by my ol’ mum!) and it was as good as new! Anyway, I digress….
So, seeing as how my original top dash had suffered major corrosion owing to a windscreen leak of many years prior to Phase 1, I decided to source a new one and at the same time upgrade it to full leather. A local auto-trim specialist (and top bloke) here in Bedford took on the task. Not only did he replicate the look of the Sport 500 dash, but he also trimmed the lower rail to match and recovered my seriously worn beige leather gear knob as well. And at what I consider to be an absolute bargain of a price.
Here are some during and after pics. (ignore the holes in the top dash, I’ll come to that later)
During


After


The finished product is of a superb level of quality. I was extremely impressed. So much so that later in the year I’m going to have all door cards custom retrimmed in leather to match. There was one final piece missing from the new interior however, and that is something missing from nearly all Mini’s. A handbrake gaiter. I believe that only the last ever 500’s had them fitted (could be wrong) and it’s such a shame that a horrible hole in the carpet was deemed sufficient. Obviously a cost issue, but still….. Anyway, I took the car back into the auto-trim shop, and he fashioned me one there and then, in black leather, completely off the cuff. For little more than beer money. I honestly cannot praise the skills and cost efficiency of this bloke highly enough.

So, with new seats, leather trim all round (apart from door cards and steering wheel which was already in perfect condition), new headlining fitted with the sunroof, reconditioned carpet, it’s pretty much a new car inside :)
Right Hand Petrol Tank
Ok, so I’ve heard many arguments about this. How it’s unnecessary, how you lose valuable boot space, how it’s not possible with an injection Mini, etc, etc. But I’m pleased to say I can categorically counter argue all of those points! I absolutely love it, and I’ll tell you for why.
My aim is to gradually convert my MPi Cooper into my ideal of a Classic Copper S. It was a teenage dream to own one, and I’m gradually getting there. More observant of you might have noticed the genuine red enamel Cooper S bonnet and boot badges. Phase 3 will be the S conversion kit (plus a few other bits and bobs!) which will finally allow her to wear those badges honestly. So, having twin tanks in my opinion, is pinnacle to a Cooper S. Call it a nod to the past if you will, however a fake filler neck is not what I’m about. I wanted the real thing, but better! A many month-long search on eBay turned up a second-hand 1968 Cooper S right hand tank for £180. About half the price of a new one today. Catch being, it was leaking. A local welder sorted that out for a bit of cash in hand. Next issue was the balance pipe. The standard balance pipe is 5/16” which is absolutely fine when drawing fuel from both tanks, but crap when it comes to filling it up. It won’t cross flow fast enough meaning you have to fill up both tanks independently. A friend of mine who understands fluid dynamics calculated, that with the viscosity of petrol, the volume of the tanks and (most importantly) the flow rate of a UK unleaded pump known, a balance pipe of 3/4” would prove sufficient to allow simultaneous filling of both tanks from either side. And indeed it does, although the fuller the tanks get, the slower it cross flows and therefore a quick squirt in the opposite tank is sometimes required if I can’t be bothered to wait.
A racing car parts supplier over at Silverstone were able to provide me, not only with the components for the balance pipe, but also the return feed and most of the vent system. I had to order a few parts online though.
The body shop then modified the right-hand tank to accept a 3/4” connection and a 5/16” return feed, and the original left hand tank to accept just a 3/4” connection.
Left hand tank elbow connection
Right hand tank straight connection
Right hand tank return connection
The return feed is redirected to the right-hand tank in order to keep the system nicely balanced. It effectively turns the two tanks into one with constantly flowing and refreshed fuel. The left-hand tank return point is blanked off with a short length of pipe and a blanking plug.
Being a pressurised system, I had to modify the vent system as well. eBay once again came to the rescue and provided me with a left-hand tank vent pipe and safety valve arrangement. All I required was the valve and bracket as the pipes are moulded for left hand configuration and therefore useless. So, the bracket was adjusted to suit the right hand tank, the valve fitted and plumbed into the existing vent system. Here’s the finished install.


Now, some of you may be wondering where the washer bottle has gone. On a typical install it would be mounted to the back of the rear seat backrest panel, but I really didn’t like it. First off, the mounting of the washer bottle in the boot on injection Mini’s was a crap decision, as they’re a pain to get to, the pressure loss is naff as it has to pump fluid up and over the roof before it reaches the jets, and to make matters worse, they can leak and rot away the boot floor. Secondly, with the space loss caused by the twin tank, any unnecessary clutter had to go. And the only place it could go was…… nowhere. Not in its current form at least as it’s far too chunky. Only logical place for a new one to be located was under the bonnet, and fortunately the already cramped MPi engine bay had one gaping space left that was perfect for an OEM slimline washer bottle.


I made a new loom that plugged directly into the existing loom in the boot, and was then run up the C pillar, along the roof and down the A pillar and into the engine bay, where it connected to the new washer pump. The pressure is pretty impressive. It blasts more crap off the windscreen than the wipers would normally clear! Only mod needed was the relocation of the horn, which was moved down and back a bit within the extents of the existing loom.
Additional ICE
Finally, the minor amendments to the ICE. I say minor as it’s only a few tweeters, but they make a hell of a difference! I’d already upgraded the rear speakers to a pair of 6.5” Sony’s, plus fitted a pair 4” Sony’s into my Mk1 Metro door pockets and finished it all off with a Sony head unit that has an integrated 4x100W amp. However, when bombing along at 70 and someone rang on the Bluetooth hands-free, I’d end up driving along with one ear pointed at the door speaker to try and hear what they were saying! Not exactly safe or practical. So, I set about sourcing some tweeters that would boost the high end at the front and improve the all-round balance of sound. It then occurred to me that it would be nice for my kids (who often accompany me on jaunts, runs and camping weekends) if their ears bled less with the rear speaker bass, and they could actually hear a bit of mid to high range as well. So, I opted to fit tweeters in the rear as well. The amp could handle it so why not. And here’s the only place I could think to mount them.


And the only place I could find to mount the front tweeters, so that they projected sound at the front seat occupants, was in the top dash rail. The tweeters I bought (which were the most powerful yet compact I could find) were small enough in every dimension in that they could fit neatly in the depth of the top rail, plus no serious modification to the metal frame of the rail was required. I added holes through the frame for the mounting screw, wires, and a bit of air movement (not shown) and that was all that was required for what I consider to be a very neat and discreet install. The overall improvement in sound quality from the front and rear is impressive and as much as I could have hoped for.

So, there we have it. The conclusion of Phase 2. Although saying that, I’m forgetting one final finishing detail……. Personalised monogrammed car mats with ally heel plates. Perfect! :)

All that’s left for me to say, is a huge thank you to all those who’ve helped make this phase possible. And they are…!
Paul Maplethorpe at Fusion Bodywork & Restoration, for all the body mods including sunroof fitting, tank mods and fitting, headlining, and painting etc. Not to mention all of the Phase 1 restoration and putting up with my (probably highly annoying) OCD.
https://www.facebook.com/FusionBodyworkAndRetoration/
https://m.facebook.c...521308364584860
Maz at MJ Upholstery for his superb attention to detail and friendly, outgoing and all round accommodating service.
http://www.mjs-upholstery.co.uk/
Dave at Executive Autocare for tolerating my obsession for converting the sunroof to a Deluxe model and helping make it possible.
http://www.executiveautocare.co.uk/
Dave at Trident Racing Supplies for supplying me with all the necessary components for converting the right hand tank for injection purposes.
http://www.tridentracing.co.uk/
Lewis at Ambassador Group Ltd for customising my mats and putting a rush on the order.
http://www.ambassadorcarmats.co.uk
My mate Howard for all the plumbing help and sorting out the calculations for the twin tanks.
And finally, my extremely supportive and understanding girlfriend Nessa. New to the scene and already well on the path to enlightenment! :)
Edited by minicooper1.3i, 23 March 2024 - 10:46 AM.


 -I love it when owners do something they're told is impossible.


