Hi all, so I’m currently working my way through getting a 94 Mayfair back on the road now iv got her running nicely, now I need to get the front suspension sorted as it’s dropped both sides and is rubbing the arches with the slightest bump in the road and when I turn full lock so I’m wondering how big a job is changing out the front suspension any help greatly appreciated


Front Suspension Dropped
Started by
Sanders123
, Feb 01 2019 06:36 PM
12 replies to this topic
#1

Sanders123
-
- Noobies
-

- 7 posts
Just On Tickover
- Location: Birmingham
Posted 01 February 2019 - 06:36 PM
#2
nicklouse
-

- Members
-
- 18,724 posts
Moved Into The Garage
- Location: Not Yorkshire
- Local Club: Anonyme Miniholiker
Posted 01 February 2019 - 06:39 PM
you need some special tools but if you follow the info in your Haynes manual it is simple enough.
#3
Sanders123
-
- Noobies
-
- 7 posts
Just On Tickover
- Location: Birmingham
Posted 01 February 2019 - 07:06 PM
Iv got the manual just wanted to make sure it’s doable at home I don’t mind getting the right tools
#4
nicklouse
-
- Members
-
- 18,724 posts
Moved Into The Garage
- Location: Not Yorkshire
- Local Club: Anonyme Miniholiker
Posted 01 February 2019 - 07:19 PM
very much a home job nothing too hard. if you have issues just ask.
#5
Cooperman
-

- TMF+ Member
-
- 23,340 posts
Uncle Cooperman, Voted Mr TMF 2011
- Location: Cambs.
- Local Club: MCR, HAMOC, Chelmsford M.C.
Posted 02 February 2019 - 12:13 AM
Basically you need a suspension compression tool (known as the 'Tower Tool'), a ball-pin splitter, ideally the scissor-type plus a good imperial tool kit.
You undo the top ball joint and split the top arm from the hub.
Then compress the rubber cone spring with the tower tool. Remove top arm down-stop rubber buffer then remove the aluminium trumpet.
Take off the top arm.
This allows the tower tool to be slowly released and when it is free the spring cone can be removed (you might need a lever to get it out.
Clean up the cone spring seating and put the new cone in place. Engage the tower tool into the new cone and compress it.
It is a good idea to fit a new ball and ball-cup. The ball goes into the aluminium trumpet and the cup into the top arm.
Check the top arm pin/bushes at this time in case they are worn.
Then re-fit the trumpet and top arm. Re-fit the arm to the hub, checking the ball joint for wear and changing it if necessary.
It may take a while to do the first time, but after that it's about a 2 to 3 hour job per side.
Be aware that there is a lot of energy stored in the spring when it is fully compressed, so be careful. Make absolutely certain that the tower tool spindle is fully engaged into the thread in the spring cone centre before compressing it and when de-compressing it, be careful to ensure that the trumpet is correctly seated. If the trumpet slips during de-compression and does not seat correctly, it can prevent the tower tool from being used to correct this and th trumpet has to be destroyed to get the spring located correctly (been there, done that!).
Come back if you need further help and get the Haynes Manual first.
#6
Sanders123
-
- Noobies
-
- 7 posts
Just On Tickover
- Location: Birmingham
Posted 02 February 2019 - 12:37 AM
Thanks for such a detailed guide will be tackling in in the next few weeks iv ordered the cone kit to swap it all out while it apart just need the compression tool now and couple of dry days.
Cheers guys
Cheers guys
#7
Rorf
-

- Members
-
- 866 posts
One Carb Or Two?
- Location: Cape Town
Posted 02 February 2019 - 05:44 AM
For your model make sure you get the metric cone compressor tool.
#8
Cooperman
-
- TMF+ Member
-
- 23,340 posts
Uncle Cooperman, Voted Mr TMF 2011
- Location: Cambs.
- Local Club: MCR, HAMOC, Chelmsford M.C.
Posted 02 February 2019 - 11:02 AM
Whilst it is apart it is easy to fit Hi-Lo suspension trumpets which enable the ride height to be easily adjusted and they are easier to put in than standard trumpets when wound fully in. Then, once fitted, you just set the ride height to standard and as the cones settle in you can re-adjust the height.
Make sure you change the ball and cup at the base of the trumpet as the cup often splits and makes one side go very low. They are not expensive, but well-worth doing whilst it's in bits.
The only fiddly part can be prising the old trumpets out from the sub-frame towers. Get a decent pry-bar ready. When fitting the new spring cones, use a lot of Waxoyl inside the towers where the cones sit and thoroughly clean the seating area before putting the new ones in.
Come back on here for more help.
Good luck with this job.
#9
sonikk4
-

- Admin
-
- 16,089 posts
Twisted Paint Polisher!!!
- Name: Neil
- Location: Oxfordshire
Posted 02 February 2019 - 06:41 PM
For your model make sure you get the metric cone compressor tool.
The minispares one has both Metric and Imperial. You never know who has been playing in the past.
#10
Hugh Jass
-

- Noobies
-
- 64 posts
Stage One Kit Fitted
- Location: Leeds
Posted 04 February 2019 - 12:48 PM
.
Edited by Hugh Jass, 05 February 2019 - 10:04 AM.
#11
DeadSquare
-

- Members
-
- 3,205 posts
Up Into Fourth
- Location: Herefordshire
- Local Club: Unipower GT Owners Club
Posted 04 February 2019 - 03:35 PM
I am new to all this. Mechanically incompetent, but enthusiastic.
I have just about managed it.
Used the metric tool from Mini Spares to compress the rubber.
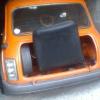
(left side picture) I needed a ball joint separator for the bottom ball joint as I couldn't get in the right position to whack it with 2 hammers at the same time. I managed the top one OK without.
My spring rubber was not coming out with the suspension top arm still in so that had to go.
(Middle top) I couldn't get both nuts loose without wrapping the thread in a cloth and holding with mole grips. Then I took the cover of the front side and slid it out.
I originally thought my rubbers were OK until I put a picture on here then I got some advice.
The inside of the column looked OK but I have still covered it in Waxoly stuff.
WELL DONE !!
Treat yourself to a Wine Gum.
#12
mini_matt_106
-
- Members
-
- 592 posts
Super Mini Mad
- Location: Andover
Posted 04 February 2019 - 04:26 PM
My cones were that squashed that I didn’t need a cone compressor and just removed the top arm bolt.
With a hi-low adjustable kit you can normally fit the new cones without the compressor also.
With a hi-low adjustable kit you can normally fit the new cones without the compressor also.
#13
cal844
-

- Members
-
- 9,660 posts
Crazy About Mini's
- Location: Ballingry, Fife
- Local Club: TFMOC
Posted 06 February 2019 - 06:39 PM
Now now gents let's just chill and perhaps admin can lock the thread for a couple hours?


1 user(s) are reading this topic
0 members, 1 guests, 0 anonymous users


