Jump to content


Photo
- - - - -

Repairing Knuckle Joints/top Arm With Aladite/epoxy?

suspension

  • Please log in to reply
9 replies to this topic

#1 Tallguysmallcar

Tallguysmallcar

    Passed Test

  • Noobies
  • PipPip
  • 27 posts
  • Location: Klagenfurt

Posted 07 August 2019 - 10:16 AM

Hey Mini Enthusiasts,


First of all, very glad to be part of this community, this is my first question/forum post.


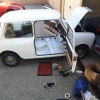
1973 MkIII 850 Saloon


The car has done about 120.000km, and I suspect the elements in question are still the original ones. Bought the car from an elderly man (first owner) who had had it in a shed for 10 years plus. It's got new paint, sealed underbody, seats refurbed... a few nice bits added like petrol cap... New carpet (came with vinyl mats in its original state), Dynamo serviced, new regulator, brakes bled, new carb, new airfilter... anyhow... Currently in the state of renewing Knuckle Joints, Rubber cones, Dampers/Shocks and installing HI Los.


Just ripped out the old knuckle joints from the top arm yesterday, which was a bit of a pain. Blow torch came in very handy, hope the fumes of burnt plastic didn't cause too much damage to my braincells (I suspect not more than the garage beers :-) ).


Anyhow, I noticed that the nylon cup on the front drivers side wore through in the bottom section, alas bare metal at the bottom.

So I cleaned and checked the top arm for wear and compared to the passenger side (nylon cup fully intact there). Whilst I have not been able to measure the difference yet, it seems that the driver side top arm is worn ever so slightly, i.e. the passenger side still shows visible stripes from the milling, whereas the driver side doesn't.


Visually it doesn't look terribly worn, i.e. rounded. Will try and post some pics tonight.


Anyhow did a bit of research on the web and found this article:


http://www.dsnclassi...nt-replacement/


Where it is suggested to fill up the bottom of the joint with Aladite or similar epoxy, then insert the nylon cup. It seems plausible but not sure whether it is 


a.) a good idea? (sceptical about enforcing metal with epoxy)

b.) necessary considering the very light wear (at least from my Judgement)?

c.) something where I could do greater damage, I.E. damage the top arm


I would like to avoid replacing the top arm, at least for now. I am aware that knuckle joints like to eat into the top arms, and that using worn top arms will result in increased wear on the top arm.


Any suggestions are welcome! Many thanks in advance.


By the way, I forgot to mention that the Trumpet had seized to the Knuckle joint so badly that I had to cut through the knuckle joint in order to remove the elements.


Edited by Tallguysmallcar, 07 August 2019 - 12:38 PM.


#2 Spider

Spider

    Moved Into The Garage

  • Admin
  • PipPipPipPipPipPipPipPipPipPipPip
  • 13,904 posts
  • Location: NSW
  • Local Club: South Australian Moke Club

Posted 07 August 2019 - 10:39 AM

Hi and Welcome.


Congratulations on your project :D


I've actually found best success with these by building up with one of the Liquid Metals. I have tried epoxies, including Araldite and found it didn't last too long.


Get the socket in the arm really clean, super duper clean, put a little Liquid Metal in the socket, then grease the new knuckle joint on the outside and fit. The grease will stop the Liquid Metal bonding to the cup and in years to come, you'll likely find the cup will come out with your fingers,


#3 Chris1275gt

Chris1275gt

    One Carb Or Two?

  • TMF+ Member
  • PipPipPipPipPipPipPip
  • 796 posts
  • Location: Reading

Posted 07 August 2019 - 11:23 AM

Hi
I'd say that your spending a fair amount renewing the front suspension, so for another £50 or so for a new top arm it would be false economy. With the temporary repair with epoxy or chemical metal i would say is not the same as the steel on steel with the cup as a small buffer. Your probably going to have to replace it long term anyway especially if it's a keeper.

#4 DeadSquare

DeadSquare

    Up Into Fourth

  • Members
  • PipPipPipPipPipPipPipPipPip
  • 2,760 posts
  • Location: Herefordshire
  • Local Club: Unipower GT Owners Club

Posted 07 August 2019 - 11:45 AM

ANOTHER BODGE !


I was fortunate to have a lathe with which to cut a metal profile of the outside of the nylon cup, as a punch.


The "knock-out 'holes' in a pattress box" (the metal box in the wall that the light switch screws to), are just the correct size to fit in the worn top arm.


Two or three wallops with a 4 lb hammer settles the knock-out in the bottom of the top arm, and the slight increase in ride height compensates for a saggy old doughnut.


#5 Tallguysmallcar

Tallguysmallcar

    Passed Test

  • Noobies
  • PipPip
  • 27 posts
  • Location: Klagenfurt

Posted 07 August 2019 - 12:12 PM

Thanks for the suggestions so far. 


Hi
I'd say that your spending a fair amount renewing the front suspension, so for another £50 or so for a new top arm it would be false economy. With the temporary repair with epoxy or chemical metal i would say is not the same as the steel on steel with the cup as a small buffer. Your probably going to have to replace it long term anyway especially if it's a keeper.


Totally get it. However, Money is one issue, time the other. It usually takes about 10 days to get new parts here in Austria from the day of ordering them... car is stationary at the moment, and the summer is getting shorter by the day, and I am desperate to drive the car a little before it goes into hibernation (climate conditions here call for loads of road salt, and the Mini won't see any of that).


As I said I'll measure it tonight and see how much wear has occured, and then decide what to do.


Hi and Welcome.


Congratulations on your project :D


I've actually found best success with these by building up with one of the Liquid Metals. I have tried epoxies, including Araldite and found it didn't last too long.


Get the socket in the arm really clean, super duper clean, put a little Liquid Metal in the socket, then grease the new knuckle joint on the outside and fit. The grease will stop the Liquid Metal bonding to the cup and in years to come, you'll likely find the cup will come out with your fingers,


Will defo consider that! Thanks for the tip!


#6 DeadSquare

DeadSquare

    Up Into Fourth

  • Members
  • PipPipPipPipPipPipPipPipPip
  • 2,760 posts
  • Location: Herefordshire
  • Local Club: Unipower GT Owners Club

Posted 07 August 2019 - 03:45 PM

Stick the new one in and enjoy 3 months motoring.


Order another and replace it, doing what ever you decide to do, during hibernation.


#7 Spider

Spider

    Moved Into The Garage

  • Admin
  • PipPipPipPipPipPipPipPipPipPipPip
  • 13,904 posts
  • Location: NSW
  • Local Club: South Australian Moke Club

Posted 07 August 2019 - 06:45 PM

Thanks for the suggestions so far. 


Hi and Welcome.


Congratulations on your project :D


I've actually found best success with these by building up with one of the Liquid Metals. I have tried epoxies, including Araldite and found it didn't last too long.


Get the socket in the arm really clean, super duper clean, put a little Liquid Metal in the socket, then grease the new knuckle joint on the outside and fit. The grease will stop the Liquid Metal bonding to the cup and in years to come, you'll likely find the cup will come out with your fingers,


Will defo consider that! Thanks for the tip!


If there's only a small amount of wear, the liquid metal is as good as permanent. By small, if you can measure the width of the wear and it's less than 0.030" that's small.


There's well enough original steel either side of that wear to provide adequate load support for the cup.


Though, if you were to be taking the car on regular rallies and the like, a new arm would be best.


#8 Tallguysmallcar

Tallguysmallcar

    Passed Test

  • Noobies
  • PipPip
  • 27 posts
  • Location: Klagenfurt

Posted 07 August 2019 - 10:20 PM

Regular Rallyes? I wish... Just measured the top arm with my neighbour (beyond 70, but just sold a 1943 BSA motorcycle he restored that looked like it's never been used... shocking thing is he bought it off the Danish army...) Great neighbour to NB have for sure!

Overall width is the same left and right, depth as well (lowest point). Edges are not perfectly straight though.


Ordered some liquid metal, just in case, and see how I get on. Will check next spring just out of curiosity. If it really needs a new top arm then, so be it.


Weirdly enough I enjoy the spannering and hammering and ratcheting.

#9 Magneto

Magneto

    One Carb Or Two?

  • Members
  • PipPipPipPipPipPipPip
  • 889 posts
  • Location: Kansas City, USA
  • Local Club: KC MINI Club

Posted 08 August 2019 - 12:46 AM

If there's no wear difference between them just put a new nylon cup in and go on - it's fine. The top edge don't matter, all the force is on the bottom of the cup and insides.


#10 Tallguysmallcar

Tallguysmallcar

    Passed Test

  • Noobies
  • PipPip
  • 27 posts
  • Location: Klagenfurt

Posted 08 August 2019 - 08:27 AM

Thanks... I will go ahead with the liquid Metal method. Thoroughly cleaned the arm yesterday, and there is indeed visible wear, not too bad though. Will try and post pictures and keep you updated. Thanks for all your help.


Also tagged with one or more of these keywords: suspension

0 user(s) are reading this topic

0 members, 0 guests, 0 anonymous users