Jump to content


Photo
- - - - -

My 93 Sprite Restoration


  • Please log in to reply
5 replies to this topic

#1 hallett

hallett

    Stage One Kit Fitted

  • Just Joined
  • PipPipPip
  • 62 posts
  • Location: Bognor Regis

Posted 06 April 2020 - 01:41 PM

Hi everyone, long time lurker on these forums but have been doing a lot of reading on the bodywork side of things! Have had this mini stripped down in the garage for about 2 years now and with the sudden addition of some free time thanks to the unfortunate global events I thought I would try and take a positive out of it and finally start some work on the mini! I plan on keeping this one forever after regretting selling my last one and then purchasing this one from my future father in law who made me promise never to sell it!


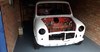
This is how its sat for the last few years


49727072142_01181711be_k.jpgA23DE3C9-9D93-4C00-8B62-EBFD162405A3 by Daniel Hallett, on Flickr


And a few of the general condition (not the best haha)


49727073437_90e89938ed_k.jpgF32F3AF6-878A-4D09-BDCC-F15D77620AA7 by Daniel Hallett, on Flickr

49726211998_68f12331f8_k.jpgF51DA114-E9F6-44C0-B91E-92EFC979CAD3 by Daniel Hallett, on Flickr

49726211488_df552dd4d6_k.jpgBC4A233E-F09D-4F23-A04C-FF6CA081020E by Daniel Hallett, on Flickr

49727072357_1bccb4db99_k.jpgE2728D30-E119-422C-A56C-28AF5B4F1CE1 by Daniel Hallett, on Flickr

49726760216_60715a0cc6_k.jpg32FD7D99-DAF8-4A81-A1E7-6CC499C1BA10 by Daniel Hallett, on Flickr


As you can see, rusty in all the normal places and probably a few more! I wanted to start this thread to keep a document of the work I'm doing for the future when its hopefully back on the road but also for the wealth of information on this forum when it comes to advice. Although I have done a decent amount of mechanical work myself over the years this is the first panel work and welding so I'm sure it will be a steep learning curve! 


Dan


#2 hallett

hallett

    Stage One Kit Fitted

  • Just Joined
  • PipPipPip
  • 62 posts
  • Location: Bognor Regis

Posted 06 April 2020 - 02:12 PM

Got a bit done over the weekend with some of the panels I already have but I think I have already nearly got to the point of having to commit to buying the big panels necessary! First job was to get a bit of bracing in across the drivers door and start to remove the doorstep that was well past repair


49742790632_21a3d04c60_k.jpgCF3071B3-D654-4EF1-BAFE-86BC61C5A637 by Daniel Hallett, on Flickr


Got the doorstep out after a lot of swearing at drilling spotwelds! Also cut the bottom of the rear quarter off above where the new doorstep will fit to make it easier. Going to have a complete new rear quarter because it's rusty in several places and is also slightly dented at the rear where someone has previously reversed into it!


49742789942_758f2f53ca_k.jpgED8F78A1-BE58-459C-BFA2-6D21193C38FF by Daniel Hallett, on Flickr


This picture shows where its slightly dented and started to rust


49741917898_ad01c29f52_k.jpg8B7E4595-6FC9-4D7E-A455-839F54E293FF by Daniel Hallett, on Flickr


Got the new doorstep roughly cut into place and then decided to remove the complete quarter panel so I could get that lined up in the correct place and make sure it meets the doorstep neatly. Also briefly got the door bolted on to check the gap across the bottom, its about 4mm out towards the rear of the door which was then confirmed when I got the new rear quarter clamped into the gap.


49742791157_fcbce100ae_k.jpg0A001669-EC8D-46A6-A162-F87105C94EED by Daniel Hallett, on Flickr

49742467396_20b394c304_k.jpg003EBD5A-14BC-40C2-BED0-1BC8891397AD by Daniel Hallett, on Flickr

49742466636_cfd232fd5c_k.jpgB6A4D91A-0D84-4A5C-9F57-6BF9BB995EF9 by Daniel Hallett, on Flickr

49742789582_decac57539_k.jpg927B485F-DA05-4F64-8B9C-3C5DC3BB71DB by Daniel Hallett, on Flickr


Thats as far as I got with it but next step will be to raise the rear of the doorstep to line up nicely with the rear quarter and then get that welded into place. Going to clean up the door check panel behind the a pillar part of the doorstep as well, it looks like surface rust so I'm hoping a wire wheel, bit of rust treatment and some zinc primer will be all thats needed there.


Dan


Edited by hallett, 06 April 2020 - 02:14 PM.


#3 Bdshim

Bdshim

    Mini Mad

  • Just Joined
  • PipPipPipPip
  • 196 posts
  • Location: Suffolk

Posted 06 April 2020 - 04:00 PM

Great project you have there, look forward to the progress ?

#4 hallett

hallett

    Stage One Kit Fitted

  • Just Joined
  • PipPipPip
  • 62 posts
  • Location: Bognor Regis

Posted 07 April 2020 - 02:57 PM

Thanks  Did a bit more today, had to do quite a lot of fettling to get the rear quarter sitting in the right place, double checked the measurements for the window opening and it all seems in the right place, this allowed me to then cut the doorstep panel down so they lined up nicely together


49746539412_6b74ac4a9c_k.jpg37206DBF-D02A-4A3C-8B04-92832C6174E5 by Daniel Hallett, on Flickr

49745669978_77ea451cb1_k.jpgAA7F760C-0CBB-4892-BABD-E80013FA9C41 by Daniel Hallett, on Flickr


That looked good pretty good to me so I pulled it out the garage and put the door back on to double check gaps again, it follows the curve of the quarter panel really nicely and tucks in well at the bottom which didn't happen on my last mini so fingers crossed this stays like it


49745669663_b5f89ad793_k.jpg47DC4FA1-71E5-46B0-8DF1-701C9928D772 by Daniel Hallett, on Flickr

49745669588_7ad8c8077e_k.jpg0630E3FD-1EC7-497B-8D3E-6AF14C79BEDD by Daniel Hallett, on Flickr


Then I fired the welder up but bottled doing the first weld on the car and decided to get a bit more practise, done ok on previous practice before but struggled getting good penetration. I decided to turn the power up to 3 which should be far too much but its the best I've welded and I got the 'frying bacon' sound straight away whereas on power 2 no matter where i had the wire speed it went from the wire burning back to too much wire with the smallest of movements. This metal is 1.1mm which i measured the new doorstep and quarter panel to be the same.


Clamped up


49746538962_bf641d3da3_k.jpg83F6E9BB-4F36-4594-98FC-E94E4B63E248 by Daniel Hallett, on Flickr


Tacked


49745669363_2856b8bcf2_k.jpgA4ABF8A6-0324-4345-AD95-2FDAB321BBCC by Daniel Hallett, on Flickr


Some welding, the one in the middle is on power 3 and the 2 outside on power 2, the one in the middle and right look ok from above


49746538582_eab88e4315_k.jpg224B974D-2817-4349-A584-76C50D063428 by Daniel Hallett, on Flickr


But as you can see from the underneath the middle weld has some decent penetration and the 2 outside don't have enough


49746208436_bf926e54cd_k.jpgCB470849-E731-46D6-93B3-ED4766889CFC by Daniel Hallett, on Flickr


Kept the power on 3 and done some more welding


49746538322_91e1700298_k.jpg86D49E54-5475-478F-A73C-23CEC3020416 by Daniel Hallett, on Flickr


And this is the penetration of that one


49746538212_3cfcec4302_k.jpgB26C6801-68E7-4B39-BD43-4524A97B0109 by Daniel Hallett, on Flickr


This is the welder I'm using and according to the mig-welding.co.uk i should definitely not be using power 3 but it where I feel im getting the best welding so would be interested to here from a few of you much more experienced welders!


49746538122_953e8bf038_k.jpgBAB966D6-2B78-411B-920F-57DBB4FADEE8 by Daniel Hallett, on Flickr


#5 sonscar

sonscar

    Up Into Fourth

  • Members
  • PipPipPipPipPipPipPipPipPip
  • 3,197 posts
  • Location: crowle
  • Local Club: none

Posted 08 April 2020 - 08:56 AM

Don't get fixated on the settings,Use what works as you have done.Welds look good to me.Steve..


#6 GT Jimmy

GT Jimmy

    Camshaft & Stage Two Head

  • TMF+ Member
  • PipPipPipPipPipPipPipPip
  • 1,664 posts
  • Location: manchester
  • Local Club: S.U.N.M.C

Posted 10 April 2020 - 08:30 AM

I used a different model of a Wolf mig welder, as a rule I used setting 3 for butt welding, and 4 for plug welding, then just adjust the wire speed to suit. Those welds look fine to me


0 user(s) are reading this topic

0 members, 0 guests, 0 anonymous users