I purchased my 1979 Austin Morris Mini back in January 2019. Due to the fact I've been in college the last year or so i haven't done an awful lot. But now that my second college year has been cut short I've decided it's time to get a shift on.
 Side View.JPG 37.33K
0 downloads
Side View.JPG 37.33K
0 downloads
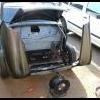
Rear View.JPG 37.94K
1 downloads
(Apologies for the poor quality of photo cracked my phone lens at the time)
So the first thing me and my dad decided to do is to remove the enormous amount of under sealer that the previous owner had plastered the belly of the car. We got all of it off by scraping it off with old chisels and flat head screwdrivers. Was a pain to take off but saved the floor of the car.
Before and After.jpeg 92.87K
2 downloads
After that we decided to remove both A panels and the whole front end due to the fact once again the previous owner tried welding the wings to the crash bar and kept on blowing through with his welder.
A Panel Chop.jpg 65.36K
1 downloads
Front End Chop.jpg 58.19K
0 downloads
Now it was time to inspect and remove the dreaded sills! And to tackle it I kinda tipped it 
UpsideDown.jpg 133.4K
0 downloads
All and all the sills were terrible but the inner sills were okay so I'm thankful for that. The process for removing the sills themselves wasn't too bad I drilled out the spot welds on the actual floor pan of the car then used a cutting disk to cut away from the doorstep. I then used a sanding disk to remove the rest of the material.
Sill removal 1.jpg 47.08K
0 downloads
Jacking point removal.jpg 53.26K
0 downloads
Front heelboard.jpg 37.4K
0 downloads
This was the passenger side
Sill removal finished.jpg 64.05K
0 downloads
Then the drivers side
Sill removal finished 2.jpg 70.33K
0 downloads
After all that cutting Dad decided to teach me a little about painting and so we prepared and painted the old font subframe and the new rear subframe I had to buy because the old one was rusted through.
Subframes being painted.JPG 45.67K
0 downloads
We turned our attention to the engine after this. I don't have any photos of this process but I bought new:
Inlet valves
Exhaust valves
Valve stem seals
Head gasket
Rocker cover gasket
carburetor gasket
rear brake piston seals
I lapped all the valves in by hand taken me ages to get that done to a good standard. I also cleaned both cylinder head and the block surfaces to make sure they were completely flat. After that i placed the valve stem seams. I wire brushed the rear brake cylinders to remove all the surface rust. I then placed them in some brake cleaner for about half an hour because the piston was seized stuck. After hitting the pistons with a rubber mallet they soon moved and and in about 5 minutes replaced the seals and re assembled the rear brake back plate.
Nothing much has happened since really I did a couple of odd jobs on the car like remove rust patches in the engine bay and removed the mixture of filler and paint in the roof rain gutter.
I've recently fixed my welder and have gas so hopefully the next update i have will be a welding one.
Hope you enjoyed my experience so far and I'll be back soon.