Jump to content


Photo
- - - - -

998 Turbo_Engine Build


  • Please log in to reply
80 replies to this topic

#16 Project_1275_GT

Project_1275_GT

    Speeding Along Now

  • Just Joined
  • PipPipPipPipPip
  • 341 posts
  • Location: Northants

Posted 26 November 2020 - 12:57 PM

HIF44 E - Conversion to manual choke


This may or may not work.. I have an old Maestro Turbo HIF44 E [electronic choke] that I intend to use on the 998 Turbo build. It was cheap.. The biggest problem with the carb is obviously it is intended for electronic choke. This is no use for a mini, also was missing. I have a few old carbs that have some bits i will use. Main part the manual choke. I have a selection of leavers from the other old carbs and hope to be able to use some or modify them to suit the carb. Luckily I have a genuine HIF44 Turbo carb that i can use as a reference. I hope this all works out and i am able to make the 44E usable for this project. 


Attached File  IMG_2401.JPG   56.83K   5 downloads


Attached File  IMG_2406.JPG   48.74K   2 downloads


Attached File  IMG_2404.JPG   50.12K   0 downloads


Attached File  IMG_2408.JPG   49.3K   0 downloads


#17 Project_1275_GT

Project_1275_GT

    Speeding Along Now

  • Just Joined
  • PipPipPipPipPip
  • 341 posts
  • Location: Northants

Posted 26 November 2020 - 01:09 PM

Metro Turbo inlet manifold [removing old rusted heater pipe] 


I have an old Turbo inlet manifold that already had the heater pipe connections cut back to the ally manifold section. Looks crap and I intend to connect this to allow heating of the inlet. The biggest problem is how to remove the two cut off sections of rusted old tube. I did this using a standard hacksaw blade removed from and held in my hand. Blade only. This fits perfect into the internal diameter of the tube. Slowly sawed through the steel tube. Used a piece of round bar to knock out the rusted tube. I did try heat before this but no good. There is not enough material on the inner tapered tube end to get a good hit. I wont be replacing it with the original looking 90 deg bend and radiused tubes. I will use two strait tubes. Wont be original but will do the job. 


Attached File  IMG_2391.JPG   35.63K   0 downloads


Attached File  IMG_2393.JPG   36.92K   0 downloads


Attached File  IMG_2399.JPG   42.18K   2 downloads


Attached File  IMG_2400.JPG   42.02K   0 downloads


#18 Project_1275_GT

Project_1275_GT

    Speeding Along Now

  • Just Joined
  • PipPipPipPipPip
  • 341 posts
  • Location: Northants

Posted 26 November 2020 - 05:26 PM

Gearbox build 


Managed to get organised enough to find all parts for the gearbox and engine build. The gearbox was in good order when stripped and I intend to reuse all parts. 


Attached File  IMG_2410.JPG   57.75K   1 downloads


Attached File  IMG_2412.JPG   60.45K   2 downloads


Somehow I managed to forget to blast these parts when i did the rest. Another little job to get done in the next week 


Attached File  IMG_2402.JPG   54.72K   1 downloads


The block has now been bored and honed + painted and on the stand ready for building


Attached File  IMG_2411.JPG   50.38K   1 downloads


#19 Project_1275_GT

Project_1275_GT

    Speeding Along Now

  • Just Joined
  • PipPipPipPipPip
  • 341 posts
  • Location: Northants

Posted 30 November 2020 - 09:32 AM

Detail of engine build 


Maybe it would be good to explain this build as best possible. Nearly all components being used are spares from my 1310 build or old parts that were laying around. As parts become more difficult to find and more expensive I have made sure I kept spares for the 1310 just in case..


I intended to rebuild an old 998 engine and sell it on but after calculating costs and asking a few opinions it was deemed to be too expensive. That leaves me with a 998 short block and lots of spares for a Turbo engine. Mix the two together and 998+20 Turbo... It gets more complex. I dont want to modify things like the 12G940 head intended as a spare for the 1310. Small mods ok. Unusable for the 1310. NO. Spare worn out T3 turbo. Being kept just in case. Buy a new turbo better matched to the 998. NO. 


Hopefully you will see my complication here. I want all spares kept for the 1310 engine to remain spares without heavily modifying them to suit a 998. But i want to build a 998 turbo.. 


Gearbox 


3.44 FD 

Rebuilt with mainly original parts.

New bearings where required.

Original Baulk rings

Improved diff pin 

Central oil pick up pipe 

Original Turbo pressure plate [Verto]

Original flywheel 


Block 


998+20 A plus

New flat top pistons [Hepolite]

New cam bearings 

New Evo 1 mini spares cam

Duplex solid timing setup

Iwis chain

New standard cam followers 

New main bearings

New big end bearings

STD crank 


Head


12G940 with minimal mods

New double springs

Already has hardened seats

Valves are [inlet 35.7 - exhaust 29.35] 

Decompression plate 

STD rockers 


Turbo 


Garret T3

HIF44 E - Turbo type

STD plenum


That covers mainly what i will build, I know decompression plates are not favoured but this will allow me to reuse the 12G940 on both engines if required. I also know the T3 is too big for a 998.. But i have one. I am also going to rebuild this myself to see just how good or bad the ebay service kits are. I know this is a very odd, crazy and stupid plan. Finally to go just 1 step more crazy Im going to attempt a home made water injection system to cool the charge, or destroy everything. 


#20 Project_1275_GT

Project_1275_GT

    Speeding Along Now

  • Just Joined
  • PipPipPipPipPip
  • 341 posts
  • Location: Northants

Posted 30 November 2020 - 03:22 PM

Garret T3 Turbo strip down


Stripped the old T3 and generally happy with the condition of turbine, compressor wheels and shaft. Lots of burnt oil in the cover plate at the turbine end and seals look to have completely disappeared.. Not removed the centre bushes yet but will give it all a good clean and get a repair kit. Only sheered 1 bolt in the waste gate housing. Also 1 sheared for the exhaust elbow. I will repair these and hopefully it will be good for use again. 


Attached File  IMG_2433.JPG   48.26K   1 downloads


Attached File  IMG_2434.JPG   39.13K   0 downloads


Attached File  IMG_2441.JPG   58.35K   0 downloads


#21 Project_1275_GT

Project_1275_GT

    Speeding Along Now

  • Just Joined
  • PipPipPipPipPip
  • 341 posts
  • Location: Northants

Posted 30 November 2020 - 03:26 PM

HIF44 E manual choke conversion 


Stripped the carb today and drilled and tapped the new holes required to fit manual type choke. Test fitted it and looks ok so far. I suspect getting the correct leavers will be the hardest part.


Attached File  IMG_2426.JPG   46.84K   0 downloads


Attached File  IMG_2427.JPG   54.07K   0 downloads


Attached File  IMG_2428.JPG   52.62K   0 downloads


#22 GraemeC

GraemeC

    Crazy About Mini's

  • TMF+ Member
  • PipPipPipPipPipPipPipPipPipPip
  • 7,313 posts
  • Location: Carnforth

Posted 30 November 2020 - 03:27 PM

I have a couple of HIF44s that I cannibalise for parts - let me know if you need anything


#23 Project_1275_GT

Project_1275_GT

    Speeding Along Now

  • Just Joined
  • PipPipPipPipPip
  • 341 posts
  • Location: Northants

Posted 02 December 2020 - 04:17 PM

Metro Turbo Inlet Manifold [Replacing water heater tubes]


Continued from previous posts - I managed to remove the old water connection tubes that had been cut off. Drilled and tapped an extra hole in the reinforced area for an additional sensor, Shot blast and fitted new strait heater tubes. The tubes were a very good hammer fit, also used bearing fit. Hopefully they will not leak, knocked in by 20 + mm and very tight. 


Attached File  IMG_2392.JPG   39.38K   0 downloads


Attached File  IMG_2393.JPG   36.92K   0 downloads


Attached File  IMG_2399.JPG   42.18K   0 downloads


Attached File  IMG_2452.JPG   39.8K   0 downloads


Attached File  IMG_2455.JPG   44.21K   0 downloads


Attached File  IMG_2454.JPG   33.62K   0 downloads


#24 Project_1275_GT

Project_1275_GT

    Speeding Along Now

  • Just Joined
  • PipPipPipPipPip
  • 341 posts
  • Location: Northants

Posted 02 December 2020 - 04:30 PM

Garret T3 Turbo Rebuild


Continued from previous posts - Managed to strip the Turbo and condition is not as bad as i thought it would be. Drilling out the broken stud was no fun, but is now removed and thread as good as new. Still have 1 more to drill out in the wastegate housing for the exhaust elbow. Shot blast nearly all parts, apart from the steel housings as these have been wire wheeled. Waiting for the repair kit to arrive and will rebuild it all. 


Attached File  IMG_2447.JPG   34.32K   0 downloads


Attached File  IMG_2449.JPG   29.57K   1 downloads


Attached File  IMG_2451.JPG   62.54K   1 downloads


#25 Retro_10s

Retro_10s

    Moderator

  • Members
  • PipPipPipPipPipPipPipPipPipPipPip
  • 10,129 posts
  • Location: Bromsgrove

Posted 02 December 2020 - 06:40 PM

enjoying seeing the turbo and carb work you're doing :-)


#26 Project_1275_GT

Project_1275_GT

    Speeding Along Now

  • Just Joined
  • PipPipPipPipPip
  • 341 posts
  • Location: Northants

Posted 02 December 2020 - 06:48 PM

enjoying seeing the turbo and carb work you're doing :-)


Thanks,


delivery of parts arrived today. More work to get done tomorrow. Carb service kit is also in the box.. Probably wont get the carb done until January now though


#27 Project_1275_GT

Project_1275_GT

    Speeding Along Now

  • Just Joined
  • PipPipPipPipPip
  • 341 posts
  • Location: Northants

Posted 03 December 2020 - 12:54 PM

Turbo Ready For Rebuild


All cleaned and ready for the rebuild when parts arrive. Certainly looks better and no more burnt black oil charred inside 


Attached File  IMG_2465.JPG   44.57K   1 downloads


Attached File  IMG_2466.JPG   49.87K   0 downloads


Attached File  IMG_2467.JPG   35.01K   0 downloads


Attached File  IMG_2469.JPG   44.18K   0 downloads


Attached File  IMG_2470.JPG   49.97K   0 downloads


Attached File  IMG_2472.JPG   44.15K   0 downloads


#28 Project_1275_GT

Project_1275_GT

    Speeding Along Now

  • Just Joined
  • PipPipPipPipPip
  • 341 posts
  • Location: Northants

Posted 04 December 2020 - 11:37 AM

Water Injection System [Home made version]


I have been researching this for a long time now. From all research this type of system seems perfect for this build. The main reason i want to use water cooling is it cools the air temp allowing higher boost without detonation. Normally most sensible people would lower the CR and retard timing to avoid issues. Whilst this seems the most obvious option I am building a 998 Turbo with a T3. This has been proven to be slow off the line, then insanely fast when the Turbo kicks in [from what i have researched]. All advice is to get a smaller more suited Turbo to the engine. Slow spool of the Turbo seems to be caused by 2 main factors - low compression engine not spinning the Turbo fast enough - Intercooler results in more turbo lag whilst pressure builds in a longer inlet setup. 


I am going to use a higher CR to hopefully get the large Turbo spinning more easily, not use an intercooler but water cool to reduce the temp. If it works i hope the 998 Turbo works better with the T3. I am not expecting this to be a perfect setup. Any improvement would be good 


How I Will Control It 


I have got all the original Metro Turbo parts that most people discard as they are not really needed. Turbo ECU that controls only the boost pressure modulation, this senses the pressure of the system and uses a solenoid operated valve to bleed off some pressure. This is set to trigger around 4 PSI [also 4500 RPM]. The waste gate actuator is also set to operate at around 4PSI. So the original system allows the PCR valve to bleed off pressure keeping the wastegate closed up to the max 7.5 PSI [This is oscillated at 12 Hz setting]. Result is a slower more controlled boost. Knowing how this system works I intend to use the same ECU control but rather than the output from it direct to PCR valve i will operate a relay. The relay will then operate 1 - the bleed valve for pressure. 2 - The opening of the water valve. This should result in the engine running without water cooling up to 4 PSI, Then the bleed valve and water valve will open. 


I will setup a test rig for this just to test water flow through the nozzle and pressure required to get good atomization, I intend to place the water nozzle in the inlet to the Turbo as some benefits have been noted to lower the Turbo temperature. There is some concerns regarding water droplets damaging the compressor wheel. But no confirmed detail. So i will test it. I intend to install two very basic temperature sensors - 1. at the inlet area to the turbo. 2 - in the inlet manifold. This will give me some info on actual temps before and after. Test the engine without water and with. 


The reservoir for the water will be an old mini expansion tank, the pressure for the system i hope to use from the boost pressure. This is my main challenge to get a atomized spray of water at low pressure. If more pressure is required I will add a pump. Really hope i can do it without. The solenoid operated valve from the ECU will prevent syphon of water. The expansion tank is only small but i hope enough. It should only be used over 4500 RPM and 4 PSI boost. 


I will also install a sensor to check water level in the expansion tank. If the level runs low the relay operating both PCR valve and the water feed valve will be disabled. This will result in the boost being limited to 4 PSI. Hopefully this will prevent problems with running out of water and running high boost. 


If all of the above works I hope to be able to run slightly higher boost than normally possible on a higher compression engine. 


BASIC LAYOUT OF THE SYSTEM


Attached File  WATER COOLING ELECTRICAL.png   70.02K   1 downloads


Attached File  WATER COOLING.png   69.21K   1 downloads


This is not showing water level sensor. I have yet to work out the best sensor type. It will simply involve another relay preventing the live feed from the ECU to the valve control relay.


Edited by Project_1275_GT, 06 December 2020 - 02:27 PM.


#29 Project_1275_GT

Project_1275_GT

    Speeding Along Now

  • Just Joined
  • PipPipPipPipPip
  • 341 posts
  • Location: Northants

Posted 04 December 2020 - 04:46 PM

Garret T3 Rebuild [continued]


Well I am impressed by the eBay seller for delivering the kit quickly. After opening the kit it looked mainly correct. Then when assembling many things were found to be incorrect. I will send the supplier some info regarding the incorrect parts but it cost £32 and I have managed to rebuild the Turbo. I never expected it to all be correct.


Things that could be used - 


Rings for sealing the shafts before compressor and turbine wheels.

Bolts for compressor housing.

Centre bearings.

Circlips.

Compressor housing seal to main body.


What could NOT be used - 


Main large compressor housing seal ring.

Brass oil guide and wear plate. 

Centre bearing located in brass oil guide

Bolts for compressor housing to main body.

Heat shield at turbine end [could have been used but was a different shape]


less than 50% of the kit is usable. 


The good news is nearly all components that were removed from the old Turbo were in very good condition. Other than a huge amount of charred cooked oil in there it really didn't look that bad when stripped. 


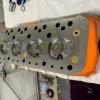
Im actually pretty happy with the end result. I have used compressed air blown on the compressor wheel and ran it as fast as possible. No issues noted. Is it balanced. Probably not. I took great care marking the compressor wheel nut before removal. The lines scribed on the nut were perfectly inline with the ground section on the compressor wheel. I did not remove the turbine wheel from the shaft. I aligned the scribed marks with the flat on the compressor wheel when rebuilding so should all be back as original. 


Attached File  IMG_2474.JPG   34.8K   1 downloads


Attached File  IMG_2476.JPG   30.59K   0 downloads


Attached File  IMG_2477.JPG   57.74K   0 downloads


Attached File  IMG_2478.JPG   36.22K   0 downloads


Attached File  IMG_2483.JPG   50.47K   0 downloads


Attached File  IMG_2485.JPG   53.89K   0 downloads


Attached File  IMG_2486.JPG   41.16K   0 downloads


Attached File  IMG_2487.JPG   37.52K   0 downloads


Attached File  IMG_2489.JPG   34.5K   0 downloads


Attached File  IMG_2490.JPG   35.59K   0 downloads


It will be interesting to see how well it works. Would I recommend home rebuild using eBay kits.. Not really. As i said I am actually happy with the end result. I honestly think it will work ok. For how long is another big question.. 


ADDED NOTE: I contacted the eBay seller and explained the issues. They instantly responded and have apologized for the inconvenience and offered a 50% refund. Total cost to rebuild T3 was less than £20. That includes ordering all new fixings and the service kit after refund. 


Edited by Project_1275_GT, 06 December 2020 - 10:48 AM.


#30 Project_1275_GT

Project_1275_GT

    Speeding Along Now

  • Just Joined
  • PipPipPipPipPip
  • 341 posts
  • Location: Northants

Posted 05 January 2021 - 07:06 PM

HIF44e - Converted to manual choke 


Finally managed to get back to some small jobs in the garage. The carb is now converted from electronic to manual choke and rebuilt with correct Turbo service kit. Managed to find all parts apart from the throttle leaver and a small spring holding leaver used behind the throttle leaver. Managed to modify some old bits I had laying around to make the missing bits. I have also completed the plenum rebuild. Still have to test the pressure relief spring assembly, the spring and plastic relief valve were missing originally. I have replaced this with new spring and a steel type piston for sealing pressure [may require a rubber sealing face]. I will test this for pressure relief setting by blanking it off and applying compressed air. Also completed the inlet manifold, didn't have the banjo bolt for the centre vacuum or servo connection pipe. I have managed to make this using the old oil feed pipe from filter housing to the block. I do have a fiberglass heat shield but its an eBay item that is a very poor fit. Looks like i will have to rework some areas to make it fit better. Ambulant plate is a mini spares one bent to use with the heat shield. Last piece will be the extra bracket to connect accelerator cable. 


Attached File  IMG_2525.JPG   36.49K   1 downloads


Attached File  IMG_2526.JPG   38.94K   0 downloads


Attached File  IMG_2527.JPG   35.85K   0 downloads


Attached File  IMG_2530.JPG   55.8K   0 downloads


Attached File  IMG_2534.JPG   41.39K   1 downloads


Attached File  IMG_2535.JPG   43.78K   0 downloads


Attached File  IMG_2536.JPG   37.21K   0 downloads


Attached File  IMG_2537.JPG   52.14K   0 downloads


Attached File  IMG_2539.JPG   47.04K   0 downloads


Attached File  IMG_2541.JPG   40.87K   0 downloads


Attached File  IMG_2548.JPG   47.57K   0 downloads


Attached File  IMG_2552.JPG   39.51K   1 downloads


Attached File  IMG_2550.JPG   50.65K   0 downloads


Attached File  IMG_2557.JPG   39.77K   0 downloads


Attached File  IMG_2564.JPG   42.58K   1 downloads


Attached Files


0 user(s) are reading this topic

0 members, 0 guests, 0 anonymous users