Jump to content


Photo
- - - - -

998 Turbo_Engine Build


  • Please log in to reply
80 replies to this topic

#31 Project_1275_GT

Project_1275_GT

    Speeding Along Now

  • Just Joined
  • PipPipPipPipPip
  • 341 posts
  • Location: Northants

Posted 05 January 2021 - 07:42 PM

Cylinder head - 12G940 


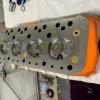
Time to clean and assemble the cylinder head, cleaned off all the surface rust and tidied up in the valve chambers / ports. Tomorrow i will paint it and lap in the valves. Need to drill out the water take off port and tapp the holes. Will be using standard rockers and new double springs. 


Attached File  IMG_2559.JPG   40.39K   3 downloads


Attached File  IMG_2560.JPG   42.65K   2 downloads


Attached File  IMG_2561.JPG   47.07K   1 downloads


Attached File  IMG_2562.JPG   46.69K   2 downloads


#32 Project_1275_GT

Project_1275_GT

    Speeding Along Now

  • Just Joined
  • PipPipPipPipPip
  • 341 posts
  • Location: Northants

Posted 06 January 2021 - 07:02 PM

Cylinder Head - 12G940 


Lapped all valves, Cleaned again, Drilled hole for water take off, Stripped and rebuilt rocker set, Checked CC @ 21.4 then painted 


Attached File  IMG_2570.JPG   46.48K   0 downloads


Attached File  IMG_2571.JPG   40.88K   0 downloads


Attached File  IMG_2572.JPG   49.15K   1 downloads


Attached File  IMG_2580.JPG   39.75K   0 downloads


Attached File  IMG_2583.JPG   41.12K   0 downloads


Attached File  IMG_2585.JPG   45.01K   0 downloads


#33 Project_1275_GT

Project_1275_GT

    Speeding Along Now

  • Just Joined
  • PipPipPipPipPip
  • 341 posts
  • Location: Northants

Posted 07 January 2021 - 03:21 PM

Cylinder Head - 12G940 [Complete with T3 and HIF44e]


Another cold but productive day, completed the head and found all necessary nuts, bolts and studs to bolt it all together. 


Attached File  IMG_2590.JPG   51.01K   0 downloads


Attached File  IMG_2591.JPG   52.86K   0 downloads


Needed to bolt it all together as the T3 had been taken apart. I have aligned the oil feed and drain and the turbo outlet. Looks to be correct. 


Attached File  IMG_2592.JPG   47.06K   0 downloads


Attached File  IMG_2596.JPG   55.64K   0 downloads


Attached File  IMG_2595.JPG   53.97K   0 downloads


#34 GraemeC

GraemeC

    Crazy About Mini's

  • TMF+ Member
  • PipPipPipPipPipPipPipPipPipPip
  • 7,313 posts
  • Location: Carnforth

Posted 07 January 2021 - 03:30 PM

Looks tidy. Rockers 4 and 5 look like they'd benefit from some spacer between them and the posts though - just to get them onto the valve tips better.


#35 Project_1275_GT

Project_1275_GT

    Speeding Along Now

  • Just Joined
  • PipPipPipPipPip
  • 341 posts
  • Location: Northants

Posted 07 January 2021 - 03:33 PM

998 + 20 rebuild 


Managed to get some work done on the block, fitted the new oil pump, EVO 001 cam and new cam followers [put new cam bearings in previously]. Also put in the new core plugs, new main bearings and installed the crank to check end float. All looks good. Wish id remembered to order the piston insertion tool... Should be here soon so i can then install new pistons and check deck height for CR calculations. 


Attached File  IMG_2600.JPG   57.97K   1 downloads


I did drill and tapp the water way on the block front next to No4 cylinder as this seems to be advised when fitting a 12G940 head to a 998 block. M12 grub screw fitted and locktited in.


Attached File  IMG_2602.JPG   44.53K   2 downloads


Attached File  IMG_2603.JPG   44.43K   0 downloads


Attached File  IMG_2606.JPG   39.35K   0 downloads


Attached File  IMG_2607.JPG   40.43K   1 downloads


Edited by Project_1275_GT, 07 January 2021 - 03:48 PM.


#36 Project_1275_GT

Project_1275_GT

    Speeding Along Now

  • Just Joined
  • PipPipPipPipPip
  • 341 posts
  • Location: Northants

Posted 07 January 2021 - 03:38 PM

Looks tidy. Rockers 4 and 5 look like they'd benefit from some spacer between them and the posts though - just to get them onto the valve tips better.


I did look at the alignment of the rockers to valves and was a little concerned. I have only fitted them finger tight at the moment as its all got to be put together with push rods etc. Is it ok to space the rockers without upsetting the push rod alignment and oil way holes? 


#37 GraemeC

GraemeC

    Crazy About Mini's

  • TMF+ Member
  • PipPipPipPipPipPipPipPipPipPip
  • 7,313 posts
  • Location: Carnforth

Posted 07 January 2021 - 03:52 PM

The pushrod holes usually have plenty of free space (as long as you don't go daft). 

Its fairly common to adjust with spacers to get better alignment. AEG168 and AEG169 are 40thou and 10thou shims available just for this.


#38 Project_1275_GT

Project_1275_GT

    Speeding Along Now

  • Just Joined
  • PipPipPipPipPip
  • 341 posts
  • Location: Northants

Posted 07 January 2021 - 04:01 PM

The pushrod holes usually have plenty of free space (as long as you don't go daft). 

Its fairly common to adjust with spacers to get better alignment. AEG168 and AEG169 are 40thou and 10thou shims available just for this.


Thanks for the info. Will space out with feeler gauges and see how it looks. Then order some spacers with the next order of mini spares parts required to finish it all. 


Cheers Rob


#39 Project_1275_GT

Project_1275_GT

    Speeding Along Now

  • Just Joined
  • PipPipPipPipPip
  • 341 posts
  • Location: Northants

Posted 12 January 2021 - 07:39 PM

Water pump modified to allow 12G940 head to fit 998 block


Cut down the top of the new water pump to allow the fitting of the 12G940 head. Looks like it should all work ok 


Attached File  IMG_2611.JPG   36.03K   0 downloads


Attached File  IMG_2612.JPG   34.49K   0 downloads


#40 Project_1275_GT

Project_1275_GT

    Speeding Along Now

  • Just Joined
  • PipPipPipPipPip
  • 341 posts
  • Location: Northants

Posted 12 January 2021 - 07:43 PM

Cleaned and polished the top face of the pistons. 


Attached File  IMG_2613.JPG   25.91K   0 downloads


Attached File  IMG_2614.JPG   38.26K   0 downloads


Attached File  IMG_2615.JPG   34.63K   0 downloads


Attached File  IMG_2617.JPG   41.67K   0 downloads


#41 Project_1275_GT

Project_1275_GT

    Speeding Along Now

  • Just Joined
  • PipPipPipPipPip
  • 341 posts
  • Location: Northants

Posted 12 January 2021 - 07:51 PM

12G940 chamber polishing 


Well i decided after roughly assembling the head last week to get new valves, then new guides and finally thought why not have a go at polishing the chambers to slightly increase CC and get the best finish i can. WHAT WAS I THINKING ... 


BEFORE 


Attached File  IMG_2619.JPG   63.11K   1 downloads


Attached File  IMG_2620.JPG   50.3K   1 downloads


HALF WAY 


Attached File  IMG_2623.JPG   49.65K   0 downloads


Attached File  IMG_2625.JPG   44.47K   0 downloads


Attached File  IMG_2626.JPG   39.38K   1 downloads


#42 Project_1275_GT

Project_1275_GT

    Speeding Along Now

  • Just Joined
  • PipPipPipPipPip
  • 341 posts
  • Location: Northants

Posted 13 January 2021 - 05:44 PM

Bit more grinding and polishing 


Getting the feel for in now. Going very slowly as this is my first ever chamber work. 


Attached File  IMG_2633.JPG   50.63K   0 downloads


Attached File  IMG_2636.JPG   52.33K   0 downloads


#43 MiNiKiN

MiNiKiN

    Mini Mad

  • Just Joined
  • PipPipPipPip
  • 180 posts
  • Location: Graz

Posted 15 January 2021 - 09:33 AM

Nicely done. What die grinders do you use, as I struggled to get my chambers as even as yours?


#44 Project_1275_GT

Project_1275_GT

    Speeding Along Now

  • Just Joined
  • PipPipPipPipPip
  • 341 posts
  • Location: Northants

Posted 15 January 2021 - 08:16 PM

Nicely done. What die grinders do you use, as I struggled to get my chambers as even as yours?


Thanks. Will take a picture of what I used


#45 Project_1275_GT

Project_1275_GT

    Speeding Along Now

  • Just Joined
  • PipPipPipPipPip
  • 341 posts
  • Location: Northants

Posted 15 January 2021 - 08:23 PM

More grinding 


Attached File  IMG_2648.JPG   55.31K   0 downloads


Attached File  IMG_2650.JPG   40.25K   1 downloads


Attached File  IMG_2651.JPG   43.38K   4 downloads


Attached File  IMG_2664.JPG   47.59K   3 downloads


After fitting the valves in the new guides the seat alignment on No1 exhaust is not quite centred. Looks like it will be a slow grind in by hand job 


Attached File  IMG_2671.JPG   37.83K   1 downloads


Attached File  IMG_2675.JPG   54.72K   1 downloads

Attached Files


0 user(s) are reading this topic

0 members, 0 guests, 0 anonymous users