Looks brill pal. Turbo looks ideal been looking for a decent one myself with no success. Why no intercooler just for ease of pipework? I found an intercooler from a smart roadster with the correct sized inlets and outlets and it’s tiny with a fan assist if required. I suppose the metro never had one and if you are being conservative with boost then no problem. Will be a lovely motor with 7 psi I would imagine.

998 Turbo_Engine Build
Started by
Project_1275_GT
, Sep 27 2020 06:00 PM
80 replies to this topic
#62

Project_1275_GT
-
- Just Joined
-

- 341 posts
Speeding Along Now
- Location: Northants
Posted 19 February 2021 - 02:28 PM
Even I question my own decision about no intercooler.. I set my self the challenge at the beginning of the build to try and only use Austin / Rover parts. The engine intended for the car is the 1310 already completed. Very standard build. So I planned to copy the ERA engine bay setup, this has no intercooler. Im not looking for stupid performance from it, so no intercooler should be needed. I have decided to install water cooling to help prevent detonation, this may allow some extra boost but its more for protection than performance. I want my engine bay to look as standard as possible. If i have any issues its always easy to fit later.
#63
dyshipfakta
-

- Members
-
- 1,696 posts
Camshaft & Stage Two Head
Posted 19 February 2021 - 06:20 PM
Yeah I understand pipe work and intercooler can make engine bay look very busy and cramped. Otherwise metro setup looks essentially standard.
#64
Project_1275_GT
-
- Just Joined
-
- 341 posts
Speeding Along Now
- Location: Northants
Posted 23 February 2021 - 02:43 PM
Distributor
I have finally made a decision on distributor and setup. I want to keep originality of the engine bay and use a distributor. I have a Turbo 59DM4 + all parts needed, also have a Turbo 65DM4 + all parts needed, also have a 65DM4 non turbo from a Maestro 1.3 HLE. The biggest problem is none are correct for either engine I'm building. I've been trying to work out how this all works so I could achieve the correct advance curves for each engine. This is where the problems start, none of the distributors would have the correct curve. Recurving involves dyno then setup, then dyno to be sure its all correct. As I have 2 engines this will prove very time consuming and costly. I know most people have opted for Mega jolt or similar but this would not look genuine. After many hours of searching I have decided to use the Aldon Amethyst system. This is Turbo compatible and should work with my existing distributor [Non turbo 65DM4]. This system is discreet and has much better control than standard dizzy. I will also be able to use it with either engine by loading a different curve. This seems the best option for me, better control but still genuine components.
65DM4 now boxed to be sent to Aldon to ensure it can work with the unit
 aldonamethyst.jpg 101.68K
0 downloads
aldonamethyst.jpg 101.68K
0 downloads
This is the 65DM4 Non Turbo [not bad for 99p from eBay]
IMG_2900.JPG 34.95K
0 downloads
IMG_2901.JPG 37.22K
0 downloads
IMG_2903.JPG 50.51K
0 downloads
IMG_2904.JPG 44.39K
0 downloads
#65
Project_1275_GT
-
- Just Joined
-
- 341 posts
Speeding Along Now
- Location: Northants
Posted 24 February 2021 - 03:46 PM
Timing Chain Cover
This is the original cover removed from my 1310 engine after it was supposedly rebuilt. I got a new one as this was in very poor condition. On closer inspection I found no baffell material in the breather canister.. Did some researching on baffle material, some people saying use wire wool. Really not happy with that idea. Wire wool has small particles that always break off. I am going to use stainless steel pot cleaning / scrubbing pads. These are much heavier material but should do the job. I have cut off the dented and damaged section so i can fill the canister properly and will weld a flat on like the later covers use. Hopefully it all works out ok
IMG_2886.JPG 56.49K
1 downloads
IMG_2888.JPG 57.46K
1 downloads
#66
Project_1275_GT
-
- Just Joined
-
- 341 posts
Speeding Along Now
- Location: Northants
Posted 24 February 2021 - 03:55 PM
Engine Update
The extra machining work is now done and engine ready for collection tomorrow.
Block pocketed
Head modified for dry deck and light skim
Flywheel lightened
IMG_2957.JPG 39.67K
5 downloads
Nice clean skimmed surface and machined for dry deck fitting. Need to check CC again now and get final chamber size correct. Only had about 3 thou machined off so hopefully not too much difference.
IMG_2959.JPG 51.39K
8 downloads
Block pocketed. Need to assemble again and check valve clearance, then install a piston to check CC increase for pocket and ring land.
IMG_2960.JPG 44.15K
6 downloads
Original flywheel has been slightly lightened.
Already got the heater assembly and loads of brackets and bits that need to be refurbed all over the bench. I will complete these first and then get back on the engine build.
IMG_2946.JPG 53.93K
1 downloads
Edited by Project_1275_GT, 28 February 2021 - 01:24 PM.
#67
Project_1275_GT
-
- Just Joined
-
- 341 posts
Speeding Along Now
- Location: Northants
Posted 06 March 2021 - 12:07 PM
Block pocketing check
Always like to check alignment of parts before final build. good job I did. Three of the four exhaust valves move into the machined pocket in the block. valve 1 does not. That could have been a nasty bent valve if I hadn't checked
IMG_3014.JPG 37.67K
0 downloads
IMG_3017.JPG 32.41K
0 downloads
IMG_3018.JPG 30.21K
0 downloads
#68
Magneto
-

- Members
-
- 889 posts
One Carb Or Two?
- Location: Kansas City, USA
- Local Club: KC MINI Club
Posted 10 March 2021 - 03:30 AM
How do you pocket the top of the deck, and how deep? Is it done on a mill or freehand?
#69
Project_1275_GT
-
- Just Joined
-
- 341 posts
Speeding Along Now
- Location: Northants
Posted 12 March 2021 - 07:25 AM
How do you pocket the top of the deck, and how deep? Is it done on a mill or freehand?
I have seen videos of people grinding by hand but I took mine to be machined. The machine shop used and old head with sharp faced valves to scribe the top of the block. The depth was calculated by valve opening, I assembled the engine to check the travel distance + clearance required. I only required 2mm depth, machine shop normally do 3mm depth. The deeper the pocket the closer to piston ring. I have attached a drawing I found when researching pocketing. I did not use this, but it looks correct apart from 5mm depth seems a lot..
 485966-1.pdf 9.66K
17 downloads
485966-1.pdf 9.66K
17 downloads
#70
Magneto
-
- Members
-
- 889 posts
One Carb Or Two?
- Location: Kansas City, USA
- Local Club: KC MINI Club
Posted 13 March 2021 - 01:45 AM
Thanks, that's the first comprehensive explanation I've seen on this - I knew how do do it in general terms, but not the specifics....
#71
dyshipfakta
-
- Members
-
- 1,696 posts
Camshaft & Stage Two Head
Posted 13 March 2021 - 07:25 PM
The other thing is bigger the pocket lower your compression ratio goes. Not a bad thing with boost though
#72
Project_1275_GT
-
- Just Joined
-
- 341 posts
Speeding Along Now
- Location: Northants
Posted 14 March 2021 - 10:19 AM
Thanks, that's the first comprehensive explanation I've seen on this - I knew how do do it in general terms, but not the specifics....
Glad you found it useful, I did a huge amount of searching for info on this before getting it done. I can not guarantee the attached PDF is correct. Looks very similar to the cut-outs done on my block. I personally like the way the machine shop said they do it. Use the head with old valves with sharp edge to scribe the block. I did assemble again after the machine work to check the valves moved into the recess without issues. But 1 valve does not.. So the block will be going back this week for re machining. This did also let me check that my valve clearance was good as calculated. No springs, lightly bolt head on, Vernier calliper depth gauge on valve stem.
#73
Project_1275_GT
-
- Just Joined
-
- 341 posts
Speeding Along Now
- Location: Northants
Posted 14 March 2021 - 10:24 AM
The other thing is bigger the pocket lower your compression ratio goes. Not a bad thing with boost though
I may get a little extra cut out from my block to further reduce the compression ratio. Don't really want to grind the head any more now.. Just a little wider on the pockets. They also look to be almost the size of the valve. I personally feel the flow may be better if they were a little wider.
#74
Project_1275_GT
-
- Just Joined
-
- 341 posts
Speeding Along Now
- Location: Northants
Posted 21 March 2021 - 06:41 PM
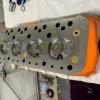
Almost built
Block pockets re done and ok now, assembled most of the parts today. Rockers on but coming off again for new shaft and some spacing out to align better to valve tip. CR checked and at target 9.4
Decided on a change of colour for the engine
IMG_3112.JPG 44.12K
0 downloads
IMG_3117.JPG 49.03K
0 downloads
IMG_3122.JPG 48.55K
0 downloads
IMG_3126.JPG 40.05K
0 downloads
IMG_3129.JPG 52.4K
0 downloads
IMG_3130.JPG 53.34K
0 downloads
IMG_3133.JPG 54.03K
0 downloads
Dry deck fittings all connected.
IMG_3139.JPG 39.9K
1 downloads
IMG_3142.JPG 48.52K
2 downloads
#75
johnR
-

- Members
-
- 2,244 posts
Up Into Fourth
- Location: Dorset
Posted 21 March 2021 - 08:00 PM
Great colour - looks more powerful already!


0 user(s) are reading this topic
0 members, 0 guests, 0 anonymous users


