Morning All,
I am new to this so please bare with me.
I am looking to restore a mini I have recently got hold off in a few years time, But want to try and protect it as best possible for now.
Where should I be looking to put cavity wax for the time being? I know the sills are a good spot to start but I’m not to sure where else?
Cheers in advance for the help.

Cavity Wax Locations
Started by
Dutchy1990
, Nov 10 2020 05:49 AM
7 replies to this topic
#1

Dutchy1990
-
- Noobies
-

- 15 posts
Learner Driver
- Location: Worcester park
Posted 10 November 2020 - 05:49 AM
#2
pete l
-
- Members
-
- 1,415 posts
One Carb Or Two?
- Location: East of France
Posted 10 November 2020 - 09:32 AM
Everywhere you can
#3
sonscar
-

- Members
-
- 3,081 posts
Up Into Fourth
- Location: crowle
- Local Club: none
Posted 10 November 2020 - 12:27 PM
My view is that if you really are determined to restore it in the near future then do not treat it at all as it may hinder your later efforts to repair it.However if you think you may restore it but have no definitive timeframe give all of it as much as you can.Steve..
#4
KTS
-

- TMF+ Member
-
- 2,483 posts
Up Into Fourth
- Location: Herts
Posted 10 November 2020 - 12:39 PM
a lot depends on what condition the car is in at the moment - if it's starting to show signs of obvious corrosion now, cavity wax won't probably do much to slow it down further, but will make restoration a lot messier
i've just treated my newly rebuilt shell by doing:
Sills
scuttle end closure panels
windscreen pillars
A-posts
bottom of the B-posts
all around the edge of the boot floor (..on the inside..) and where the wheel tubs meet the quarter panels
rear valence
rear subframe cavities and crevices
in the front wheel wells; where the A-panels meet the door posts from top to bottom
bottoms of the doors (..but don't block the drain holes if they're there..)
any cavity water can get into, and anywhere that body panels overlap or join and water can collect is where you need to focus
#5
Dutchy1990
-
- Noobies
-
- 15 posts
Learner Driver
- Location: Worcester park
Posted 10 November 2020 - 02:17 PM
Appreciate the advice guys.
The car isn’t in that bad of a condition so I think I’ll just wait until I fully restore her. Just try and keep the car as dry as possible I guess.
The car isn’t in that bad of a condition so I think I’ll just wait until I fully restore her. Just try and keep the car as dry as possible I guess.
#6
KTS
-
- TMF+ Member
-
- 2,483 posts
Up Into Fourth
- Location: Herts
Posted 10 November 2020 - 03:18 PM
..maybe worth considering something like Dinitrol ML as a temporary measure - it's designed to penetrate into small gaps and crevices so only produces a thin surface coating unlike the heavier cavity waxes
#7
MikeRotherham
-

- TMF+ Member
-
- 994 posts
One Carb Or Two?
- Location: Westwoodside North Lincs
Posted 10 November 2020 - 04:43 PM
Here a couple of things that may help:
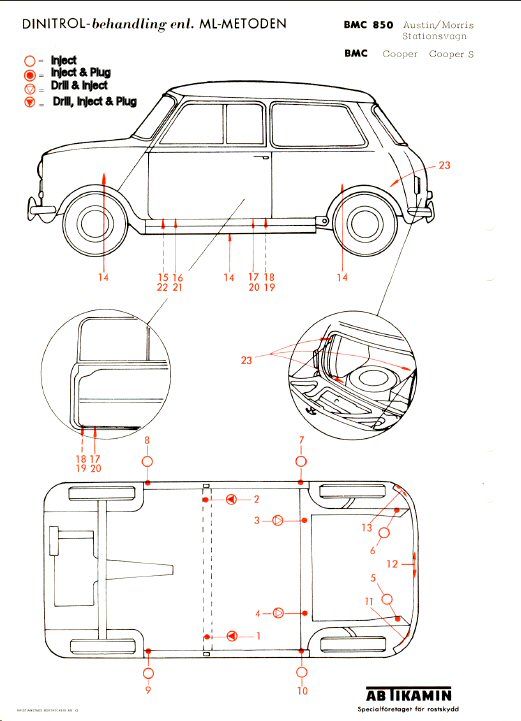
Whilst you are at it here is the diagram of all the cavities that need protecting
http://i1310.photobu...injection-1.jpg
1. There is the forward bulkhead cross member, the floor cross member,
2. the, scuttle corners accessed at the top of the bulkhead near the bonnet hinges,
3 the rear valance closure panels
4. there are 6 coming down from the roof - the door posts which you can do through the hole where the check strap goes
5. the rear subframe, in between/ below where the trumpet sits as this can collect water
6. All of the underneath,
7. battery box, and
8. all the subframe mounting points!
9. Inside the doors especially at the bottom.
Doors - There should be three holes in the bottom of the doors about 1/4" diameter. One in the middle and then one at each end by the curved section Try and drill as close to the radius of the internal door frame flange as possible but don't drill into the door skin. Then paint and then waxoyl (or whatever your choice is) inside the door but make sure your new drain holes are clear.
You can inject Sills through the vents or through the seatbelt holes with an extension probe.You can also stick the tube into the sill from the rear companion bin, take out the liner and you will see the inner sill splits and there is a gap where you can get the lance into.
The vulnerable areas at the front (including the rear of the front wheel arch), at the rear and around the jacking points.
The rear subframe needs protecting all around the radius arm mounting areas and in the trough and webs that run behind the arm.
The A-panels are difficult, being a three layer metal sandwich which is not accessible. Make sure seam sealer is intact where the A-panel joins the inner wing under the car and keep well waxed. Also wax the inner part of the A-panel in the door opening.
Anyone can learn by their own mistakes, a wise man let's the snake bite the other fellow!
Edited by MikeRotherham, 10 November 2020 - 04:45 PM.
#8
Dutchy1990
-
- Noobies
-
- 15 posts
Learner Driver
- Location: Worcester park
Posted 10 November 2020 - 05:23 PM
Again, appreciate the advice and help.
Starting to learn a lot already.
Starting to learn a lot already.


1 user(s) are reading this topic
0 members, 1 guests, 0 anonymous users


