

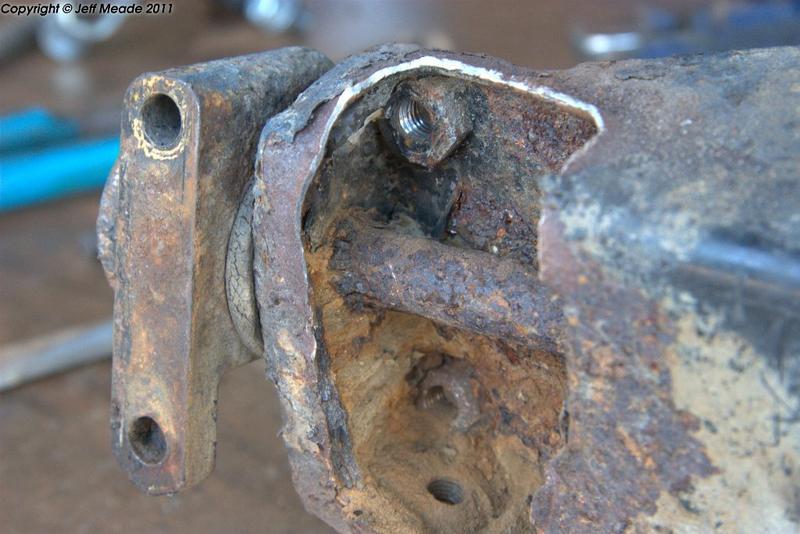
I have these two holes with the thread passed. If I put the screws, they are not tight, so if I brake hard, the car is out of square. The best solution?
Regards, Luis


Super Mini Mad

Posted 27 November 2020 - 07:56 PM
One Carb Or Two?

Posted 27 November 2020 - 08:01 PM
Subframe out for that repair I am afraid, or... you could cut a hole in the panel infrontt of the rear wheel and put a nut and bolt in it, then repair the panel you just cut a hole in and repaint it, but it would be a bugger to replace the subframe in the future..
One Carb Or Two?
Posted 27 November 2020 - 08:02 PM
And as a side issue, I would not be trusting that jack on its own, I hope you have axle stands under that motor
Speeding Along Now

Posted 27 November 2020 - 08:40 PM
The repair will depend on what skills you have to hand.
Option 1 drill out with the next size up tapping size, thread the fixing then carefully drill only the bracket with the clearance size drill. Fit the new over size bolts.
Option 2 drill out and fit a helicoil of the same diameter/thread as the origonal fixing.
Option 3 Cut out the bottom of the subframe to give access, then either using longer bolts and nuts or a piece of bar drilled and tapped at the correct centres, fit it and tack weld in place. Weld a patch to the subframe .
Hope this gives you some ideas to make the repair.
Uncle Cooperman, Voted Mr TMF 2011

Posted 27 November 2020 - 08:45 PM
The threads are in trapped nuts in the sub-frame face, not in the heel board.
The way to repair that is to remove the radius arm which will expose the bolt holes with the stripped nuts on the inside.
Cut a rectangular hole so that both the holes/trapped nuts are removed.
Make up a rectangulr plate with two 5/16" UNF nuts welded on the inside to sit in the rectangular hole with and weld all around the edge to secure it. When I had to do this, I added a doubler at each end which located the plate and added strength.
Linish back paint and re-fit the radius arm.
If you need a drawing of how to do this, PM me your email address and I'll do a drawing.
It sounds more difficult than it is.
You can't do this by cutting a hole in the sill as that is only for access to the trapped nuts for the sub-frame trunnions, not the radius arm brackets.
Uncle Cooperman, Voted Mr TMF 2011
Posted 27 November 2020 - 08:45 PM
The threads are in trapped nuts in the sub-frame face, not in the heel board.
The way to repair that is to remove the radius arm which will expose the bolt holes with the stripped nuts on the inside.
Cut a rectangular hole so that both the holes/trapped nuts are removed.
Make up a rectangulr plate with two 5/16" UNF nuts welded on the inside to sit in the rectangular hole with and weld all around the edge to secure it. When I had to do this, I added a doubler at each end which located the plate and added strength.
Linish back paint and re-fit the radius arm.
If you need a drawing of how to do this, PM me your email address and I'll do a drawing.
It sounds more difficult than it is.
You can't do this by cutting a hole in the sill as that is only for access to the trapped nuts for the sub-frame trunnions, not the radius arm brackets.
Camshaft & Stage Two Head

Posted 27 November 2020 - 11:31 PM
Uncle Cooperman, Voted Mr TMF 2011
Posted 27 November 2020 - 11:45 PM
Camshaft & Stage Two Head
Posted 28 November 2020 - 04:40 AM
That works for the sub-frame trunnion bolts, but not for the radius arm bolts because the rad arm brackets bolt to trapped nuts inside the sub-frame box section rather than the heelboard.
Super Mini Mad
Posted 28 November 2020 - 04:51 AM
And as a side issue, I would not be trusting that jack on its own, I hope you have axle stands under that motor
Super Mini Mad
Posted 28 November 2020 - 05:07 AM
..is NOT a girl!

Posted 28 November 2020 - 01:15 PM
You could take the subframe off so you could access the back and take it somewhere to get it welded, but you'd run the risk of hitting similar problems with the bolts holding the subframe to the car!
I wouldn't be very happy to helicoil that as there's not that much metal on the other side.
Super Mini Mad
Posted 28 November 2020 - 05:37 PM
One Carb Or Two?
Posted 28 November 2020 - 07:25 PM
You are right Cooperman, I was looking at the wrong nuts.....forget my post / comments they are wrong
Uncle Cooperman, Voted Mr TMF 2011
Posted 28 November 2020 - 08:29 PM
The old threads are 5/16" UNF. You could take the rad arm bracket off and drill and tap the stripped nut(s) to M8 Fine thread, then just drill out the holes in the bracket to 8.5 mm or even 9 mm and fit some short socket head cap screws. That is what I would try first as I think it would work fine. That is only about 1 hour's work once you have your tools ready. I would use a socket head cap screw as it might be difficult to get a 14mm AF socket onto those oversize bolts plus a socket head screw will remind you that these are the oversize threads. Make sure it's an M8 FINE thread, as the coarser thread might not give sufficient strength.
Last year I had a rear trunnion trapped nut strip and I did cut a rectangular hole in the sill just forward of the heel board. The hole was about 2" x 2.5" and it was then easy to fit a new not and get the welding torch in to trap it permanently.
Then I just flush fitted a patch back into the sill and re-painted it.


0 members, 0 guests, 0 anonymous users


