Jump to content


Photo
- - - - -

1969 Mk2 850 Super Deluxe Gentle Enhancement Project


  • Please log in to reply
22 replies to this topic

#1 LoftyMK2

LoftyMK2

    Passed Test

  • Noobies
  • PipPip
  • 31 posts
  • Location: West Midlands

Posted 12 May 2021 - 02:58 PM

Hello folks.
 
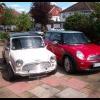
I have recently become the proud custodian of a rather special little car. Registered in Jan 1969 in Dudley (West Midlands don't ya know...) and having had only 4 previous owners in the last 52 years, it's come home to the Black Country to hopefully live a peaceful and pampered retirement with me.
 
With it being a 1969 model that places it in the last year of Mini Mk2 production, (running from 67 - 69) so it retains a lot of the Mk1 Mini looks, sliding front windows, external door hinges, swing mounted rear numberplate, along with some features that were on the Mk3, namely larger rear window, larger rear lights etc.
 
My car is an 850 Super Deluxe, meaning a whole 34BHP, but it at least had some better standard kit than the basic Mini Saloon.
 
The previous owners purchased it in 2012 and had the vehicle restored professionally in 2015 at eye watering cost. Having done very limited mileage since then it's pretty much how it left the restorers.
 
So what am i to do with it? In short the plan was absolutely nothing, but having got the car home, certain things stood out as needing doing.
 
I'll get to the wish list of what's needed in a moment, in the meantime here's some pics of it as it arrived.
 
001(45).jpg?width=960&height=720&fit=bou
001(43).jpg?width=960&height=720&fit=bou
001(42).jpg?width=960&height=720&fit=bou
001(40).jpg?width=960&height=720&fit=bou
001(28).jpg?width=960&height=720&fit=bou
001(22).jpg?width=960&height=720&fit=bou
 
Now at home, the other half loves it!
 
001(56).JPG?width=960&height=720&fit=bou
001(50).jpg?width=960&height=720&fit=bou
 
The plans.....
 
Looking at the paint, it's obviously had a complete repaint inside and out, but was suffering with a number of swirled panels, and looked a little jaded in places.
 
Full wash and decontamintaion saw it back to bare bones, I then clayed the car with Bilt Hamber Auto Clay medium which removed very little. 
 
I quickly established that the paint was rock hard, imaging 2000's VAG paint plus 20% so i decided to correct the paint using initially the Rotary and 3M Fast Cut Plus, then switching to the DA with Lake country orange pad, followed by the Megs DA correction system. I had to use the 3" shine mate DA for the tighter areas as despite being a small car, these Mini's are fiddly!!
 
Initial results were good. I'm not looking for a glass smooth mirror finish, more a respectable depth of shine, with limited defects. Bearing in mind the finish on these cars when new wasn't the greatest!
 
001(44).JPG?width=960&height=720&fit=bou
001(46).jpg?width=960&height=720&fit=bou
 
I continued round the car, and decided to remove the rear badging as they had reused the 52 yr old original badges and they have aged badly. I also removed the rear number plate swinging hanger, and have sent that off to be blasted and powder coated. Rear bumper also came off and it was much easier then to get the rear paintwork corrected as well.
 
001(64).JPG?width=960&height=720&fit=bou
001(62).JPG?width=960&height=720&fit=bou
 
Correct supplying dealer rear window sticker sourced and fitted..
 
001(49).JPG?width=960&height=720&fit=bou
 
The rear bumper was showing signs of pitting and was missing the overriders, so i have ordered new front and rear bumpers, new badges, set of overriders and some correct font number plates from Framptons.
 
I'll have more pictures soon.
 
Cheers
 
Matt


#2 LoftyMK2

LoftyMK2

    Passed Test

  • Noobies
  • PipPip
  • 31 posts
  • Location: West Midlands

Posted 12 May 2021 - 02:59 PM

Number plates arrived from Framptons, the correct raised 3d plastic letters / numbers rivited onto the black aluminium backing.
 
001(66).JPG?width=960&height=720&fit=bou
001(65).JPG?width=960&height=720&fit=bou
 
Much happier with them as i've never been a fan of the pressed aluminium plates and the white letters/numbers are in period.
 
Stripped the front bumper off, 3 x 10mm bolts, literally a one minute job.
 
001(60).JPG?width=960&height=720&fit=bou
 
Cleaned all of the front panel, grille will be coming off next to get behind it to clean.
 
I did jack the car up, put a stand under and pulled the osf wheel off to see into the arches. They had been painted and clearcoated when the shell was painted but then brown Waxoyl had been sloshed about. While i appreciate the rust proofing natures of said Waxoyl, ive decided to clean it off with AS Tardis, clean the paintwork then re-coat the vulnerable areas with Bilt Hamber products, namely the Dynax UC clear, and then Dynax S50 for the cavities etc.
 
Quick before and during - this was only 5 mins work so is nowhere near complete!
 
001(68).JPG?width=960&height=720&fit=bou
001(67).JPG?width=960&height=720&fit=bou
 
The whole floorpan is like this so i've got some nice evenings ahead of me!
 
More soon
 
Matt


#3 LoftyMK2

LoftyMK2

    Passed Test

  • Noobies
  • PipPip
  • 31 posts
  • Location: West Midlands

Posted 12 May 2021 - 03:00 PM

Another hour or so on the car last night. The new bumpers came yesterday so i wasted no time in getting them bolted back to the car.
 
At some point since the resto in 2015 (when it was featured in a Mini magazine) it had lost it's front and rear bumper over riders and these were a standard fitment on the Super Deluxe to help differentiate from the standard Mini saloon, so i bought a new set from Mini Sport and fitted those at the same time.
 
I even splashed out on a 32mm diameter chrome tailpipe to finish the exhaust off. Interesting fact number 458, the Mini exhaust is the same diameter as a Morris Minor....:tumbleweed:
 
001(74).JPG?width=960&height=720&fit=bou
001(73).JPG?width=960&height=720&fit=bou
001(72).JPG?width=960&height=720&fit=bou
 
I have more goodies arriving today / tomorrow so i'll update as I go


#4 LoftyMK2

LoftyMK2

    Passed Test

  • Noobies
  • PipPip
  • 31 posts
  • Location: West Midlands

Posted 12 May 2021 - 03:01 PM

Amazing that people still have New Old Stock (NOS) items for these cars after all these years, i guess the modern Auto Jumble is the electronic interweb version these days, anyhow, i found someone selling an original unused "850" badge for the bootlid.
 
New & old..
 
001(77).JPG?width=960&height=720&fit=bou
001(76).JPG?width=960&height=720&fit=bou
 
Not 100% perfect but a significant improvement and plenty good enough for the old girl.
 
Neatly popped into place..
 
001(75).JPG?width=960&height=720&fit=bou
 
It's the little things. So i'm told.


#5 LoftyMK2

LoftyMK2

    Passed Test

  • Noobies
  • PipPip
  • 31 posts
  • Location: West Midlands

Posted 12 May 2021 - 03:01 PM

I collected the powdercoated rear numberplate plinth/hanger from my local powder people on Saturday morning. Went for a gloss finish which i suspect may not have been BMC/BL oe spec as i think it was dusted in a flat black/matt black from new, but i like shiny....
 
001(85).JPG?width=960&height=720&fit=bou
 
Got it back home, fitted two M6 Riv-nuts into it to hold the plate in the OE positions, then fitted the Frampton number plate.
 
I stripped and cleaned the rear number plate holder, fitted new Lucas OE bulbs as the old ones were well past it...
 
001(80).JPG?width=960&height=720&fit=bou
 
Cleaned up the chrome with the trusty Peek metal polish, and the glass with some glass cleaner in and out
 
001(79).JPG?width=960&height=720&fit=bou
001(78).JPG?width=960&height=720&fit=bou
 
And here is the plate set up fitted to the car, I'm made up with how it is all coming together...
 
001(84).JPG?width=960&height=720&fit=bou
001(83).JPG?width=960&height=720&fit=bou
001(82).JPG?width=960&height=720&fit=bou
 
One thing you can't see in the pics is the rubber buffers under the numberplate to prevent it banging into the boot lid.
 
The ones on the left is what a "Pro" restoration gets you - trust me they billed for the replacement of these, and on the right is the OE style from Somerford Mini Spares, litterally pennies each...:wall:
 
001(100).JPG?width=960&height=720&fit=bo
 
And fitted into the bootlid..
 
001(99).JPG?width=960&height=720&fit=bou
001(97).JPG?width=960&height=720&fit=bou
 
Also in the delivery box from Somerford was the rear boot lid model badge infil. Still available from them new, on the shelf, after 50 + years. Dusty mind you but i can forgive that.
 
Old original badge..
 
001(98).JPG?width=960&height=720&fit=bou
001(96).JPG?width=960&height=720&fit=bou
001(93).JPG?width=960&height=720&fit=bou
001(91).JPG?width=960&height=720&fit=bou
 
And new one..
 
001(95).JPG?width=960&height=720&fit=bou
001(94).JPG?width=960&height=720&fit=bou
001(92).JPG?width=960&height=720&fit=bou
 
The chrome surround is on its way, also on the shelf at Somerford. Reason it's not here now is i ordered the wrong surround...:lol:
 
They also supplied a brand new chrome bezel for the front Austin bonnet badge.
 
Old & New together..
 
001(90).JPG?width=960&height=720&fit=bou
001(89).JPG?width=960&height=720&fit=bou
001(88).JPG?width=960&height=720&fit=bou
 
Which when fitted with the Austin circular badge looks like this...
 
001(87).JPG?width=960&height=720&fit=bou
001(86).JPG?width=960&height=720&fit=bou
 
Now the only badge i cannot find new is that circular Austin badge from the bonnet, simply not available new or repro anywhere. There is one for sale in Australia but i refuse to pay £300 for one. So i'm on the hunt for a better used one as the red colours in mine are faded. One will turn up somewhere, prob an Autojumble etc.
 
More soon. Probably


#6 LoftyMK2

LoftyMK2

    Passed Test

  • Noobies
  • PipPip
  • 31 posts
  • Location: West Midlands

Posted 12 May 2021 - 03:02 PM

The drivers door mirror had got a crack in the glass, not unusual and something i thought could be replaced cheaply. What i didn't realise it that it was almost as cheap to buy a replacement complete mirror instead of just the glass. Something that my brain decides as a "no brainer".
 
Old mirror, with cracked glass and pitting round the base..
 
001(104).JPG?width=960&height=720&fit=bo
001(103).JPG?width=960&height=720&fit=bo
 
New "Tex" mirror, exactly the same as the old one, but new obviously!
 
001(102).JPG?width=960&height=720&fit=bo
001(101).JPG?width=960&height=720&fit=bo
 
Getting there slowly. Of course this now means that i'll have to order a passenger mirror as there is pitting on the base of that as well


#7 LoftyMK2

LoftyMK2

    Passed Test

  • Noobies
  • PipPip
  • 31 posts
  • Location: West Midlands

Posted 12 May 2021 - 03:02 PM

Postman delivered the new rear badge chrome bezel/surround so that was speedily fitted at lunchtime. Again I'm amazed that these parts are still around after all these years, glad though!
 
001(106).JPG?width=960&height=720&fit=bo
001(105).JPG?width=960&height=720&fit=bo
 
That's the bootlid finished now.
 
I'm turning my attention to the front end tonight, i need to get the front number plate plinth solidly mounted then i can get the new number plate mounted to that, plus I want to fit my late 60's/early 70's AA Grill badge


#8 Spherix

Spherix

    Speeding Along Now

  • TMF+ Member
  • PipPipPipPipPip
  • 479 posts
  • Location: The Netherlands
  • Local Club: Mini Seven Club Netherlands

Posted 12 May 2021 - 05:14 PM

That's a beautiful specimen!

#9 b_artman

b_artman

    Learner Driver

  • Noobies
  • PipPip
  • 16 posts

Posted 12 May 2021 - 06:45 PM

Wow... what a beaut! Congrats


#10 mab01uk

mab01uk

    Moved Into The Garage

  • Members
  • PipPipPipPipPipPipPipPipPipPipPip
  • 11,795 posts
  • Local Club: Mini Cooper Register

Posted 12 May 2021 - 06:46 PM


Again I'm amazed that these parts are still around after all these years, glad though!


Looking good ! Great rare project Mk2 and photos, which are also worth posting in the Our Cars & Projects section of the Mk1 Forum (MK 2 are also very welcome!) if you have time.


Be careful with some of the repro Mini parts available as the quality and fit of some items sourced overseas is very poor. Minispares do their best to offer quality remanufactured parts to original UK spec. Replacement rubber parts are a common problem as much of the modern stuff degrades very quickly, (sometimes cracking/crumbling inside a year) so if an original rubber item is undamaged and can be restored it will often last many more years than a modern replacement item. Modern chrome plated replacement parts also seem to pit with rust in a short time which is why stainless steel is often now offered as an alternative although it is not as bright or shiny unfortunately.


Edited by mab01uk, 12 May 2021 - 06:52 PM.


#11 mab01uk

mab01uk

    Moved Into The Garage

  • Members
  • PipPipPipPipPipPipPipPipPipPipPip
  • 11,795 posts
  • Local Club: Mini Cooper Register

Posted 12 May 2021 - 06:48 PM

Double post deleted


Edited by mab01uk, 12 May 2021 - 06:51 PM.


#12 Gilles1000

Gilles1000

    Speeding Along Now

  • TMF+ Member
  • PipPipPipPipPip
  • 438 posts
  • Location: Karlsruhe

Posted 12 May 2021 - 07:09 PM

wow, that's a great looking car that you are getting  even better!

Respect for that!


Gilles


#13 LoftyMK2

LoftyMK2

    Passed Test

  • Noobies
  • PipPip
  • 31 posts
  • Location: West Midlands

Posted 13 May 2021 - 08:23 AM

Thanks for the kind words folks, much appreciated.


Had a couple of hours tinkering in the garage last night, managed to get the front number plate support fitted and the plate fitted to that using rivnuts and m6 plastic screws, and fitted my later 1970's AA Badge and repro AA Relay stickers. 


001(108).JPG?width=960&height=720&fit=bo
001(59).jpg?width=960&height=720&fit=bou
001(58).jpg?width=960&height=720&fit=bou
001(57).jpg?width=960&height=720&fit=bou


Next jobs will be under the bonnet, get a plan for getting the engine up to minty fresh standard, in fairness i may well pull the engine/box out over the winter and do it properly, not that it's bad now, just could be better...


001(23).jpg?width=960&height=720&fit=bou


Cheers


Matt


#14 surfblue

surfblue

    Camshaft & Stage Two Head

  • Members
  • PipPipPipPipPipPipPipPip
  • 1,826 posts
  • Location: Stuck in the 1980's

Posted 13 May 2021 - 05:42 PM

Looking great, your attention to detail is fantastic, Mk2's are thin on the ground and its nice to see one being cherished.


#15 LoftyMK2

LoftyMK2

    Passed Test

  • Noobies
  • PipPip
  • 31 posts
  • Location: West Midlands

Posted 14 June 2021 - 04:22 PM

I've recently bought an excellent reference book for Mk1 and Mk2 Minis which shows the underneath of the bonnet in greater detail and this has highlighted the missing Super Deluxe soundproofing pad.


I spent some time looking at the various on line suppliers to find a pad that included the vinyl (or Hardura) covering and i sourced one from Mini Spares.


Here it is.


001(122).JPG?width=960&height=720&fit=bo
001(121).JPG?width=960&height=720&fit=bo
001(120).JPG?width=960&height=720&fit=bo


I've not fitted it yet as i'm still trying to establish how (or if) it's held down against the bulkhead. I suspect it's only held in place in a couple of places and not glued down fully as you'd still need access to the back of the speedo etc??


Matt


0 user(s) are reading this topic

0 members, 0 guests, 0 anonymous users