Jump to content


Photo

Rust Probelms


  • Please log in to reply
46 replies to this topic

#1 mvahora

mvahora

    Mini Mad

  • Members
  • PipPipPipPip
  • 158 posts

Posted 17 January 2022 - 12:14 AM

Hi everyone!


My mini had rust neutralizer applied and then rust rubber mastic applied almost everywhere on the car about 10 years ago. It sat for some time indoors. 


I'm wanting advice on how I should move forward with rust that I have found. See pics below.


- I don't have over sills thankfully! Have the vented sill.

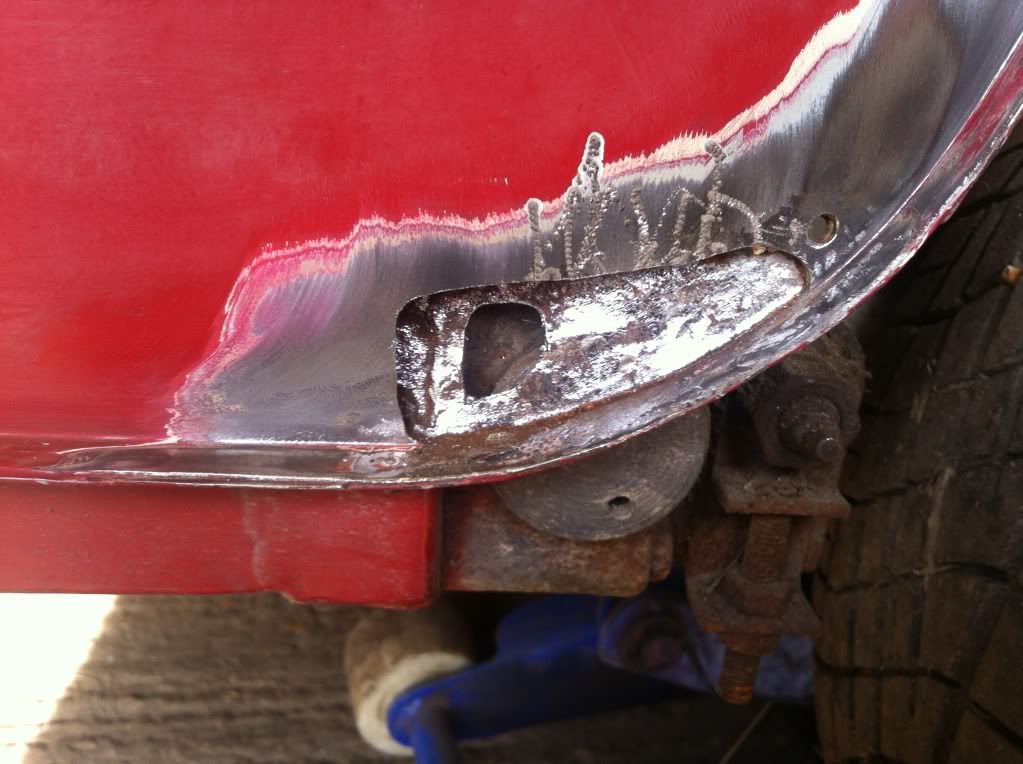
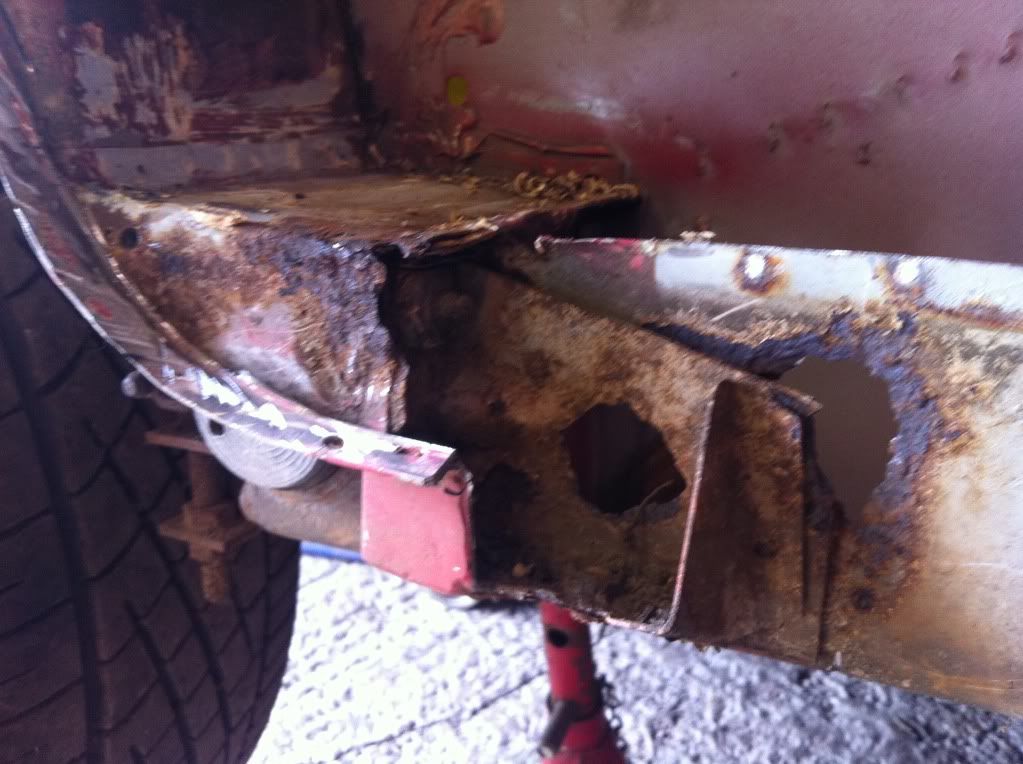
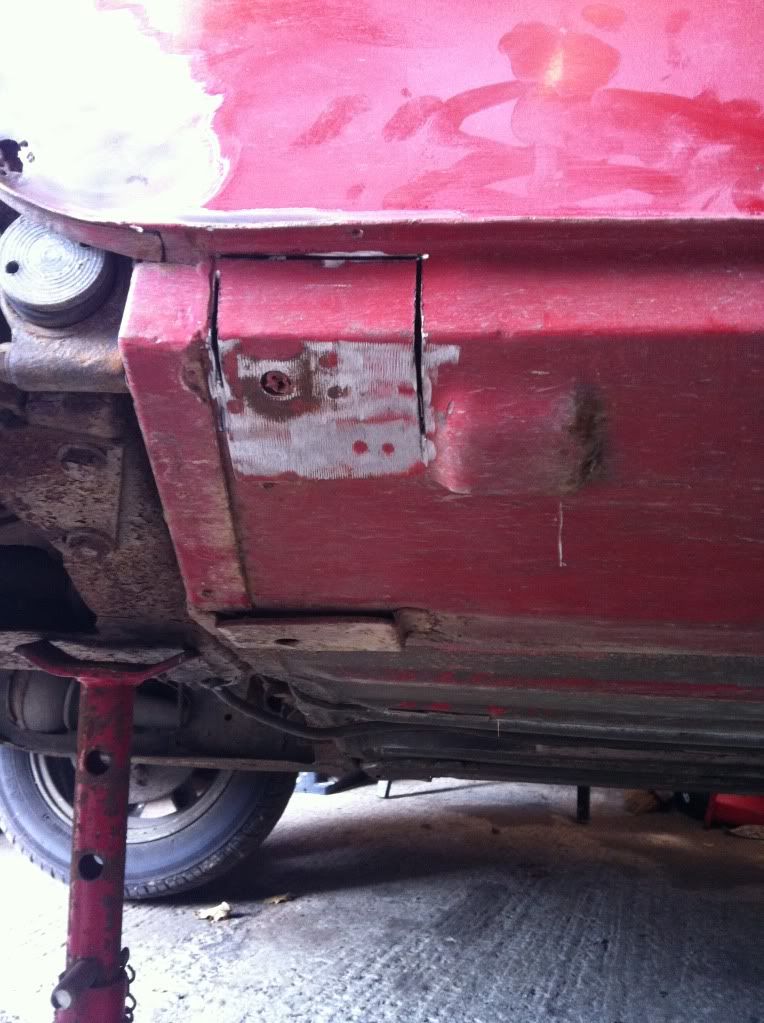
- rust on the right hand rear quarter panel. Has rusted from next to the trunnion mounting location through the quarter panel. If I push it with a finger itll pop right through. Appears to be a small amount in the bottom corner. The companion bin from the inside looks fine. 

- The mounting screw that was in the bottom hole of the heel board mounting trunnion (rh side) was almost entirely corroded.

- The threads in the heel board look okay and all other screws on the heel board had little to minimal rust.  Heel board feels solid and there appear to be no rust on either end. It

- Corner of the sill where the rear quarter panel meet is rusty. its soft and im sure will flake away if pushed

- hole on the passenger side (lh side) pillar where it meets the roof. 

- the boot floor also has corroded through but only on the right hand side. other areas of the boot seem okay. 

- some rust on door window trim area. 

- some rust on my rear subframe. would it be okay if I had the subframe re welded in that location. 


I'm new to rust so not sure on how to proceed. Don't want to open a can of worms but then also want it tidy at the same time lol


Attached Files


#2 sonscar

sonscar

    Up Into Fourth

  • Members
  • PipPipPipPipPipPipPipPipPip
  • 2,720 posts
  • Location: crowle
  • Local Club: none

Posted 17 January 2022 - 08:24 AM

Can you weld?If yes then cut out the rust to sound metal and replace with new.If no then take it to someone who can and be prepared to spend until your wallet is empty.Welcome to rusty old minis.
The ability to perform repairs yourself is almost a requirement of mini ownership.The rust does not appear too extensive(we all hope that is true)and sensitive repair should be possible.Have fun,Steve..

#3 sonikk4

sonikk4

    Twisted Paint Polisher!!!

  • Admin
  • PipPipPipPipPipPipPipPipPipPipPip
  • 15,885 posts
  • Name: Neil
  • Location: Oxfordshire

Posted 17 January 2022 - 12:23 PM

Everything i see there is repairable but as mentioned can you weld??


Most of that is localised rust other than the door (ill get to that in a minute) and the arch closeouts.


Picture 1 and two (top row starting from the left) That looks localised but check underneath to see where it is in relation to the rear subframe mount reinforcing plate / rear valance close panel is mounted https://www.minispar...|Back to search

If that rust is basically over the reinforcement plate that form part of the assy linked then that rust will be in the layers, something to think about there.


Top right:- the crack in the door skin where the window frame is attached to the skin (big spot weld you cannot see without striping the paint off) so not the end of the word and would need that area taking back to bare metal and a small section fabricating to replace that rusted out section. Now again from experience the rust will have tracked down and so the window frame should be fine but will need to taken back to bare metal there for the repair to take. BUT and its a big BUT what is the rest of the door like?? have a very good along the bottom of the door skin especially where it folds around the bottom section of the door. If that is corroded at all then rather than waste time trying to do localised repairs consider re skinning the door. It looks daunting but its not. Plenty of advice on here and i have done a lot of them including all of the common repairs that may need to be done on the frame etc.


Ok middle row left to right. Ignoring the hole in the sill you have ringed the corner of the quarter panel. That will have rusted from the inside and that will also be why the middle far right and bottom center picture shows a hole in the close out panel there.

https://www.minispar...|Back to search


So there is a couple of ways of tackling this, first thing is to take out the lining from the r/h companion bin and further assess what is going on in there. You will also see the top of the close out where it attaches to the rear arch, companion bin and spot welded to the top of the heelboard.


You can buy separately the small curved section of the closeout and this is available from M machine. (just looked on their website and they do sell them , you will need to ring them to confirm both parts come under this number. 11.37.02.04 Plate, Companion Box Closing, RH £7.50 £9.00)


so when you take out the corner of the quarter panel to clear the rust there you can get a better view of that section. Something like this

f2abffe10beddd41e115dc95d77899dcd9e2d740


This picture shows what could be lurking there in a worst case scenario.

95627bbf6a25d152d9e2209ddaed242af2cf058e


So the hole in the outer sill. That will get bigger but you can do a localised repair there, something like this but you may be able to keep it a lot smaller.

c164c9b298260a2868a3bd4665f027ec02ca37de


The hole in the A pillar. That needs the trim strip removing first, then clean out the hole with dremmel or rotary carbide burr. Then depending on how good you are with welding you can fill the hole with weld. NOW FOR THE WARNING. Running up the post will be the rear wiring harness and its a bit of a sod to get to as you will need to peel back the roof lining. If you do not do this you will damage the wiring harness.


#4 mvahora

mvahora

    Mini Mad

  • Members
  • PipPipPipPip
  • 158 posts

Posted 18 January 2022 - 11:49 AM

Everything i see there is repairable but as mentioned can you weld??


Most of that is localised rust other than the door (ill get to that in a minute) and the arch closeouts.


Picture 1 and two (top row starting from the left) That looks localised but check underneath to see where it is in relation to the rear subframe mount reinforcing plate / rear valance close panel is mounted https://www.minispar...|Back to search

If that rust is basically over the reinforcement plate that form part of the assy linked then that rust will be in the layers, something to think about there.


Top right:- the crack in the door skin where the window frame is attached to the skin (big spot weld you cannot see without striping the paint off) so not the end of the word and would need that area taking back to bare metal and a small section fabricating to replace that rusted out section. Now again from experience the rust will have tracked down and so the window frame should be fine but will need to taken back to bare metal there for the repair to take. BUT and its a big BUT what is the rest of the door like?? have a very good along the bottom of the door skin especially where it folds around the bottom section of the door. If that is corroded at all then rather than waste time trying to do localised repairs consider re skinning the door. It looks daunting but its not. Plenty of advice on here and i have done a lot of them including all of the common repairs that may need to be done on the frame etc.


Ok middle row left to right. Ignoring the hole in the sill you have ringed the corner of the quarter panel. That will have rusted from the inside and that will also be why the middle far right and bottom center picture shows a hole in the close out panel there.

https://www.minispar...|Back to search


So there is a couple of ways of tackling this, first thing is to take out the lining from the r/h companion bin and further assess what is going on in there. You will also see the top of the close out where it attaches to the rear arch, companion bin and spot welded to the top of the heelboard.


You can buy separately the small curved section of the closeout and this is available from M machine. (just looked on their website and they do sell them , you will need to ring them to confirm both parts come under this number. 11.37.02.04 Plate, Companion Box Closing, RH £7.50 £9.00)


so when you take out the corner of the quarter panel to clear the rust there you can get a better view of that section. Something like this

f2abffe10beddd41e115dc95d77899dcd9e2d740


This picture shows what could be lurking there in a worst case scenario.

95627bbf6a25d152d9e2209ddaed242af2cf058e


So the hole in the outer sill. That will get bigger but you can do a localised repair there, something like this but you may be able to keep it a lot smaller.

c164c9b298260a2868a3bd4665f027ec02ca37de


The hole in the A pillar. That needs the trim strip removing first, then clean out the hole with dremmel or rotary carbide burr. Then depending on how good you are with welding you can fill the hole with weld. NOW FOR THE WARNING. Running up the post will be the rear wiring harness and its a bit of a sod to get to as you will need to peel back the roof lining. If you do not do this you will damage the wiring harness.


Thanks so much. Great info and advice. I personally haven't welded before but my uncles done quite a lot of welding on cars with his MIG. So he said he'll come around and help me do it. Possibly give it a go myself at the same time  :proud: I've watched some videos on youtube and it doesn't look to difficult. should we be lap welding or butt welding?


So had a play around today and have opened up all the areas of rust. See pictures below. 


-Found more rust in the rear valance and the rear join where the quarter panel meets the rear valance.

-The inside of the sills seems pretty good as well as the companion bin. The inner sill is solid and there is only what  looks like light surface rust. 

- On the rust end of the sill I was able to have a look inside the sill and behind the quarter panel from both the side and from under the car. I can see that the bad rust continues to just past the first vent hole on the outter sill. The same for the quarter panel. Although it feels solid from the outside it actually is rusting from the inside out and the bad rust on the quarter panel continues to just about when it is inline with the first vent hole on the sill. Would it be best just to cut all this out to prevent it rusting through again (even though the metal may be solid from the outside)? 

- the jack point bracket is also there and seems solid although it is a bit rusty. would it be best to replace this? is it required?

-The heelboard seems okay and the captive nuts are good in behind now that I've been able to have a look. 

-Someone had put some silica gel packets between the inner & outer sill  :lol:

-The boot floor is localised rust. I grinded it down to metal and its only in a small location. can cut and patch it. Hasn't spread to the arch or the subframe floor mount area. I Forgot to take a pic of it but will get a pic up tommorow so you can have a look


All the above is on the right side of the car. ill have a deeper look on the left side tomorrow but my first impressions is that the left looks pretty solid with no signs of rust. 

Attached Files


Edited by mvahora, 18 January 2022 - 12:02 PM.


#5 mvahora

mvahora

    Mini Mad

  • Members
  • PipPipPipPip
  • 158 posts

Posted 18 January 2022 - 12:22 PM

uploaded a video of it, might show it better. follow this link https://1drv.ms/v/s!...E0S8fLNTr1henUp


#6 sonscar

sonscar

    Up Into Fourth

  • Members
  • PipPipPipPipPipPipPipPipPip
  • 2,720 posts
  • Location: crowle
  • Local Club: none

Posted 18 January 2022 - 01:35 PM

A big hole takes no more welding than a small hole,just more steel.It may improve access and make repair easier and removing as much rust as possible gives a longer lasting fix.Use butt welds when joining to existing panels and plug welds where existing seams are.The rust shown is very localised and should repair relatively easily.Enjoy,Steve..


#7 sonikk4

sonikk4

    Twisted Paint Polisher!!!

  • Admin
  • PipPipPipPipPipPipPipPipPipPipPip
  • 15,885 posts
  • Name: Neil
  • Location: Oxfordshire

Posted 18 January 2022 - 03:27 PM

Ok time for honest opinions here. The outer sill needs to be replaced rather than messing around trying to patch it. They always always rust from the inside out never the outside in. So with confidence what you see there is the veritable tip of the iceberg. Plus i can see further rust hiding in the inside of the outer sill, thats the right hand picture in the group of three.


Now the rear valance, again in the corners this is boxed in by the close out. For the price of a rear valance, (they are cheap) i would replace completely rather than patch.


The majority of what is left you can linish back, or use a twisted wire cup in a grinder especially once the outer sill is off. 


What i'm wondering is has the car been restored in the past??what i can see of the underside of the companion bin closeout etc is seriously lacking in paint??


Now i'm not telling you to go the whole hog and rip the car apart, what i'm going to say from experience here is the lack of paint etc is concerning and ultimately will need to be dealt with at sometime or other. At least with the outer sill off the inner sill can be inspected, cleaned up etc and painted before a replacement outer goes on.


What i can see there in the pictures is straight fwd to do and not the end of the world.


#8 sonikk4

sonikk4

    Twisted Paint Polisher!!!

  • Admin
  • PipPipPipPipPipPipPipPipPipPipPip
  • 15,885 posts
  • Name: Neil
  • Location: Oxfordshire

Posted 18 January 2022 - 03:32 PM

As sonscar has said, butt weld where possible, the outer sill can be plug welded in place if you replace the complete panel, if you decide to just patch then butt weld and plug weld in place. The quarter panel repair needs to be butt welded in place. The drop down behind there if you replace just the lower wrap around section is a mixture of butt weld and plug weld.


The rear valance is plug welded / spot welded in place. As it stands on a mini there are very few seam welds from the factory


#9 mvahora

mvahora

    Mini Mad

  • Members
  • PipPipPipPip
  • 158 posts

Posted 20 January 2022 - 01:02 AM

Ok time for honest opinions here. The outer sill needs to be replaced rather than messing around trying to patch it. They always always rust from the inside out never the outside in. So with confidence what you see there is the veritable tip of the iceberg. Plus i can see further rust hiding in the inside of the outer sill, thats the right hand picture in the group of three.


Now the rear valance, again in the corners this is boxed in by the close out. For the price of a rear valance, (they are cheap) i would replace completely rather than patch.


The majority of what is left you can linish back, or use a twisted wire cup in a grinder especially once the outer sill is off. 


What i'm wondering is has the car been restored in the past??what i can see of the underside of the companion bin closeout etc is seriously lacking in paint??


Now i'm not telling you to go the whole hog and rip the car apart, what i'm going to say from experience here is the lack of paint etc is concerning and ultimately will need to be dealt with at sometime or other. At least with the outer sill off the inner sill ca


What i can see there in the pictures is straight fwd to do and not the end of the world.


A big hole takes no more welding than a small hole,just more steel.It may improve access and make repair easier and removing as much rust as possible gives a longer lasting fix.Use butt welds when joining to existing panels and plug welds where existing seams are.The rust shown is very localised and should repair relatively easily.Enjoy,Steve..


I see your point of replacing the outer sill -  I can then protect the inner sill.


As you mentioned the rust on the outer sill does continue on the inside but its only for about another 15cm. so I could cut out that extra bit and patch it. I'm in two minds now. If I don't take off the entire outer sill; then with time the companion box and inner sill could rust along with the floor... which will then turn into a bigger problem/fix. 


I haven't restored the mini. I've had it almost 14 years now. perhaps someone in the past did? I also noticed the lack of paint... perhaps it came like that from the factory?


I guess the main question here is how hard is it to remove and replace the outer sill? and what parts do i need?


In regards to the valance, its in great condition other then the closed off area on one side which has rusted. 


Are you able to advise which exact parts I need (My mini is a 1977 morris. Mk3 I believe). I'm confused between genuine and non genuine? Does it make a difference which is used? The non genuine ones seem to be a heck of a lot cheaper.


Edited by mvahora, 20 January 2022 - 01:09 AM.


#10 mvahora

mvahora

    Mini Mad

  • Members
  • PipPipPipPip
  • 158 posts

Posted 20 January 2022 - 01:18 AM

Ive also just realised my outer sills only have 2 vents. Did minis ever come out with 2? as far as I'm aware shouldn't it be 4 or 6 vents?


Edited by mvahora, 20 January 2022 - 01:18 AM.


#11 Gilles1000

Gilles1000

    Speeding Along Now

  • TMF+ Member
  • PipPipPipPipPip
  • 438 posts
  • Location: Karlsruhe

Posted 20 January 2022 - 08:27 AM

Your car will be an MK4, it should have rubber-mounted front subframe.

This is the main difference to the MK3.


The outer sills had 4 openings up to about '72 or '74, yours should have 6.


Concerning the panels, I used panels from M-Machine, they were pretty good fitting. I only have the door surround from Heritage, but I did not offer them on the car as I preferred repairing the originals.


Good luck with the repairs.

Gilles


#12 mvahora

mvahora

    Mini Mad

  • Members
  • PipPipPipPip
  • 158 posts

Posted 20 January 2022 - 10:45 AM

Your car will be an MK4, it should have rubber-mounted front subframe.

This is the main difference to the MK3.


The outer sills had 4 openings up to about '72 or '74, yours should have 6.


Concerning the panels, I used panels from M-Machine, they were pretty good fitting. I only have the door surround from Heritage, but I did not offer them on the car as I preferred repairing the originals.


Good luck with the repairs.

Gilles


Oh right, ive always been confused as to what MK my mini was lol. It has some features that are mk3 some that are mk4. Probably as its a 1977 which was when they were changing parts.


Six openings vents? mine only has 2 on the outer sills? is this normal? 


How are the non genuine panels from minispares or sommerford mini?


#13 sonikk4

sonikk4

    Twisted Paint Polisher!!!

  • Admin
  • PipPipPipPipPipPipPipPipPipPipPip
  • 15,885 posts
  • Name: Neil
  • Location: Oxfordshire

Posted 20 January 2022 - 10:50 AM

As Giles has mentioned I would use the M Machine outer sill which is really good.

So pattern and genuine.

Pattern. Magnum are the main producer of pattern panels, cheap and cheerful and not always the best. I have mixed views on their panels.

Pattern 2. Now M Machine produce a large and varied amount of mini panels so technically they fall under the pattern title. However their own pressed items are very good. I always use their outer and inner sills, I have also used several other panels as well. They did need work to make them fit as they did not follow the contours of the existing car. Companion bin and waist rail. However they were still good quality.

Genuine. This is a bit of a misnomer in itself as these are not Rover pressed panels ( they are still out there is small amounts) but BMH (Heritage). BMH basically bought all of the presses and forms from Rover so as close to Genuine as you can get.

A lot more expensive, tend to be better finish and fit BUT and again it’s a BIG BUT some of these take work to fit properly and also the quality can vary. I bought a very expensive Heritage Clubman bonnet and it was shocking in its quality. That is all listed in Project Paddy in my signature.

So it boils down to this, budget and ability.

Now back to your car, with the outer sill off you can attend to any missing paint etc before fitting a new one. You did mention the jacking point, now me I keep them on but I do a lot of extra work to ensure longevity. Extra welding for strength etc. Again M Machine do these and I really recommend them.

The rear valance, I would seriously consider just changing the whole thing rather than just patching the end. As already mentioned they are one of the cheaper panels and that way you can attend to any issues hidden at the other end or under the boot floor lip.

And again as a mentioned your car will have six flute outer sills. Please do not fit oversills. All this done is hide issues and also form the wrong section for strength.

#14 sonikk4

sonikk4

    Twisted Paint Polisher!!!

  • Admin
  • PipPipPipPipPipPipPipPipPipPipPip
  • 15,885 posts
  • Name: Neil
  • Location: Oxfordshire

Posted 20 January 2022 - 10:55 AM

Oh and I should say that M Machine also supply Magnum and Heritage as well as heir own pressed panels. Always call them ( don’t email) and speak to Doreen, a veritable font of info.

Everything you see on Minispares Minisport panel wise will be Pattern = Magnum, Genuine = Heritage. However there is also the odd panel supplied by both companies that come from M Machine.

Confusing I know but list what you want and we can point out what is what. And also what will suit your own particular needs.

Where are you located??


#15 Gilles1000

Gilles1000

    Speeding Along Now

  • TMF+ Member
  • PipPipPipPipPip
  • 438 posts
  • Location: Karlsruhe

Posted 20 January 2022 - 12:42 PM


Your car will be an MK4, it should have rubber-mounted front subframe.

This is the main difference to the MK3.


The outer sills had 4 openings up to about '72 or '74, yours should have 6.


Concerning the panels, I used panels from M-Machine, they were pretty good fitting. I only have the door surround from Heritage, but I did not offer them on the car as I preferred repairing the originals.


Good luck with the repairs.

Gilles


Oh right, ive always been confused as to what MK my mini was lol. It has some features that are mk3 some that are mk4. Probably as its a 1977 which was when they were changing parts.


Six openings vents? mine only has 2 on the outer sills? is this normal? 


How are the non genuine panels from minispares or sommerford mini?


I have two MK4 both built in 1979 in Seneffe, Belgium, which are I think close by 2000 build numbers. Both are pretty original.

The black (oldest one) has diagonal inner door handles (MK4). The red one has the older hinged handles.

the rear lenses are always a strike, with or withour the white rear drive lenses.

On the black I have a small tank (25L) but with diagonal strap. On the red one I have to check.

Both have the punched hole in the roof gutter, which should be MK3 style, but no additional roof gutter.


It's everything mix and match, I think they just took the bits they had at the moment and built them up.


Same for the older cars. I saw a Cooper S, built and registrated in 70. Basically it was an MK3 body but still with the outer door hinges...


And for the panels, just ask :)


Gilles


1 user(s) are reading this topic

0 members, 1 guests, 0 anonymous users