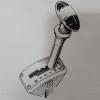
Has anyone successfully repaired the clamp on the steering column stalk as per the following image:

I attempted to join it with Araldite a couple of times with out success.
Has anyone managed to do it?


One Carb Or Two?

Posted 23 December 2023 - 09:22 PM
Has anyone successfully repaired the clamp on the steering column stalk as per the following image:
I attempted to join it with Araldite a couple of times with out success.
Has anyone managed to do it?
Up Into Fourth

Posted 23 December 2023 - 11:14 PM
I am THE CLAMP MAKER

Posted 23 December 2023 - 11:16 PM
I have one that was fixed with a jubilee clip around it, I think it was cut and screwed to the plastic and the jubilee clip screw tightens it onto the column . you may be able to screw a small piece of metal bridging the broken part.
One Carb Or Two?

Posted 23 December 2023 - 11:41 PM
Super Mini Mad

Posted 24 December 2023 - 06:57 AM
I had the same problem and tried various ways to repair it without success. I ended up buying a new unit but the stalk did not match the one on the broken unit, so to keep the look factory original I took the old stalk of the broken unit and put it onto the new unit. Just be careful, if you do the same taking the units apart, as there are a lot of small pieces of brass/copper rod contacts and springs. Easy Easy Catchy Monkey is the way to go doing it over a minimum 3 inch deep box/tray lined with white paper to catch any of the small bits that you drop by accident.
Mini Mad

Posted 24 December 2023 - 08:18 AM
You still have the bolt to tighten (mine has broken at that point!). Can you drill and put in a pin or screw to repair the break (as pictured) and then tighten to fix to the column?
Failing that maybe some silicone or something stronger to bond to the column - chances are you will not have to remove it again - and if you do it is already broken so no worse off!?
 tnn3FGF.jpg 37.75K
2 downloads
tnn3FGF.jpg 37.75K
2 downloads
Edited by Davidmt, 24 December 2023 - 10:41 AM.
One Carb Or Two?
Posted 24 December 2023 - 10:03 AM
Thanks for all the suggestions some food for thought.
I had the same problem and tried various ways to repair it without success. I ended up buying a new unit but the stalk did not match the one on the broken unit, so to keep the look factory original I took the old stalk of the broken unit and put it onto the new unit. Just be careful, if you do the same taking the units apart, as there are a lot of small pieces of brass/copper rod contacts and springs. Easy Easy Catchy Monkey is the way to go doing it over a minimum 3 inch deep box/tray lined with white paper to catch any of the small bits that you drop by accident.
I also bought new replacements decided to accept the slightly different appearance.
However, one of the multipin connectors (the one on the wiper stalk) would not fit in the original female connector the pins were too big, no matter how I much I tried to expand the female connector I couldn't get it to fit.
Thought about using the old wiper stalk on the new indicator part but they do look different so scrubbed that idea.
Couldn't return them because I'd wrapped the new wiring in harness tape to make them look more original!
Passed Test

Posted 24 December 2023 - 05:30 PM
Hi, this is my approach.
Works fine since more than 6 years.
Merry X-mas and happy new year!
Markus
 clamp1.png 129.85K
39 downloads
clamp2.png 123.38K
35 downloads
clamp1.png 129.85K
39 downloads
clamp2.png 123.38K
35 downloads
One Carb Or Two?
Posted 24 December 2023 - 06:04 PM
Mini Mad
Posted 24 December 2023 - 06:07 PM
Hi, this is my approach.
Works fine since more than 6 years.Merry X-mas and happy new year!
Markus
Looks like your has broken in the same place as mine - will be following your lead and just using a P clip or jubilee clip and shaping around with a bolt - thanks.
Edited by Davidmt, 24 December 2023 - 06:08 PM.
Passed Test
Posted 25 December 2023 - 12:06 PM
I have seen a couple of these: all broken at the same place. Could buy them very cheap. 
Up Into Fourth

Posted 26 December 2023 - 07:05 AM
Mini Mad

Posted 06 January 2024 - 12:45 AM
One Carb Or Two?
Posted 06 January 2024 - 08:13 AM
Speeding Along Now

Posted 08 January 2024 - 12:44 PM
My fix was to drill and screw in a couple of small self tapers either side of the crack, leaving sufficient thread to then use a tie wrap around the 2 screws to pull it together, has lasted at least 10 years.!


0 members, 1 guests, 0 anonymous users


