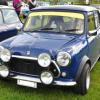
Here are the pictures of what I started with:
1974 Innocenti With A K20Z3
#1

Posted 07 November 2024 - 12:10 AM
Here are the pictures of what I started with:
#2

Posted 07 November 2024 - 12:30 AM
After driving for a couple months, I had saved up enough money to get started. I doing a donor car, a 2006 civic si. K20z3 engine, almost 200hp and revs to 8000rpm, 6 speed with LSD.
First job was to strip the Honda and keep as much as I thought I might need. I kept the drivetrain, seats, as much of the instruments and switches as I could pull out, pedals and master cylinders, and the wiring harnesses.
I refreshed the engine myself, changing every but that wears out and inspecting the main components. It should be set for another few thousand miles now. I brought the trans to a shop since I don't have a press for doing the gears. I then rebuild it and change the final drive from stock 4.764 to 4.0 to try to keep the revs down on the highway.
Attached Files
Edited by -Lost-, 07 November 2024 - 12:36 AM.
#3

Posted 07 November 2024 - 12:49 AM
Next job was to shove all that Honda stuff into the back of the garage and start stripping the Mini. I stripped it down to just the shell with the subframes so that I could still move it around as I work. I also cut off the front end since I'll be needing to put on an extended fiberglass front to fit over the new engine. I'm planning on using the civic's seats, but they don't line up with the crossmember on the floor. I cut out the crossmember, along with the floor around it so that I could build a new one a few inches further back. Doing this let me see into the sills, which did not look great. They were also the extra large ones without vents that everyone seems to think are a bad idea. The tunnel was also in pretty bad shape, so I cut that out up the firewall as well. I then beat a panel into shape to use there and welded it in, then replaced the floor that I cut out on either side.
Once that was done, I moved onto the sills. I removed the old ones, cleaned up the inside, fabbed up some new brackets for the jacking points, and welded it all back together. This was all a huge pain, since the floor has been patched so many times already. I cut through 4 layers of steel while replacing the tunnel. Anyway, that should be it for rust repair. Everything else I see looks like it is fairly solid. I'm planning on getting it media blasted soon though, so I may find out that other parts are made of structural Bondo... Wish me luck with that.
Attached Files
#4

Posted 07 November 2024 - 07:52 AM
Killing an Inno ? ![]()
#5

Posted 10 November 2024 - 06:22 PM
I got a lot done this weekend. First up was removing the front subframe. The bottom bolts were all frozen, but since I needed to fill in the holes anyway, I just cut out that section of floor and welded in some patches. Once that was done I mounted the new hubs to the subframe. The coilovers are on backorder though, so I made some wooden ones as temporary supports. It's bolted onto the body with the large top bolts, but I'll wait until later to drill holes for the bottom bolts. Now that it can roll around on the new subframe, I moved back inside and started on the dashboard area. I first made a piece for the top and attached it. This will get some more pieces attached later this week to finish it up. I also removed the lower rail to get it ready for its replacement part. That will be the next job; I have a 2" round tube and some 1/8" sheet to make brackets for the ends. I'm going to try to bolt it on, rather than weld. I think that will probably work better, but I suppose I'll see once I start on it.
Attached Files
#6

Posted 13 November 2024 - 09:13 PM
I personally am not bothered but I think you might have a few folks on here getting worked up that a (relatively) rare model was chopped/converted (but it could always be reversed!)
The purists who do have an Innocenti should be happy in fact as their car just got rarer!
As I say not bothered personally but if it were me I think it would have been better to sell the relatively more valuable Innocenti and buy something bog standard (cheaper) to convert and use the difference in price to go towards the cost of the conversion
It would help to keep the purists happy as well....
#7

Posted 13 November 2024 - 09:43 PM
About the rarity of the Innocenti: I'm in America, not England. All minis are rare here, and nobody has any clue what an Innocenti even is. My choices of a car to start with were: this car, about 30 minutes away; a garage about 4-5 hours away that has a few rusted out shells; a partially repaired body shell about 1500 miles away. Those were the choices, so I chose this one.
If you are bothered by this, please stay away because this thread will be full of blasphemy.
Anyway, I finished up the top rail of the dash today. I had already welded on the top piece. Next up was the back part, it forms the rear of the box section and drops down to be the mounting flange for the wooden dash panel. After that, I attached the front part, and lastly the bottom which you can't really see in the pictures but it connects the front and rear vertical parts.
Next up is the seat mounts. I have the rear mounts almost completed. Once they are installed I'll be able to see where the fronts need to go and can build a new crossmember to bolt them up to.
Attached Files
#8

Posted 15 November 2024 - 10:20 PM
So I got a bunch of work done on the seat mounts. Amazingly frustrating job trying to get the profiles to match the floor of the car. First up was the rear mounts. I cut a piece of square tube I had lying around in half, I think it's 1.5" and around 1/16" thick walls. I cut the ends to match the curve of the floor and drilled some holes where the bolts go. I then bolted it onto the seat and welded the nuts in place.
Next I moved to the front mounts. I need to rebuild the crossmember a few inches back to match the Honda seats. I got some 12 gauge steel sheet to make them, same thickness I had used to make all my other floor patches. First step here is to make some templates from posterboard. The template then gets transferred to the steel and cut out. Repeat 3 more times. This weekend I'll drill some holes in the front pieces for the bolts and weld in captive nuts like I did for the rear mounts. These parts will then all be welded to the body and a cap welded on top.
Attached Files
#9

Posted 19 November 2024 - 11:37 PM
And the seat mounts/crossmember is finished. Seats installed and they fit better than I thought they would. I have them mounted about as close to the sides as possible because when test fitting the seats were right on top of each other. Now that they are bolted in place though, there is plenty of space between them, maybe 5" or so. That's perfect, because I'm planning on putting the shifter between the seats, as well as the handbrake, and maybe a cup holder or open storage cubby, whatever looks like will fit when I actually start making it. I also started getting the mounts ready for the lower dash rail, that's the next step.
Attached Files
#10

Posted 23 November 2024 - 08:47 PM
Great work, please keep us posted.
#11

Posted 24 November 2024 - 10:15 PM
Now that the seats are in, I'm working on getting the steering and pedals in place. This is tricky, because the parts all are located based on each other's positions. I started by attaching my steering wheel to a wooden dowel I had lying around. With this stick in place, I could hold the wheel where I wanted it positioned and used that to set the height of the bottom dash rail. I wasn't sure how they would line up, but the best fit looks like the steering column mounted above the rail. I then cut it to length, welded on end caps, and welded those to the car body.
Now that the lower rail is attached, I can attach the pedals to it. First up is the accelerator pedal. This pedal doesn't attach to the rail, the others do. However, this pedal can't be adjusted fore/aft while the others can. So, I'll mount the accelerator and then mount the other pedals in line with it. Since the engine I have is drive by wire, the pedal has a sensor that needs to be mounted above it, and the bottom pedal mount attached to the floor. I held it up in place and found the spot where the sensor will go, then made a bracket for it. Next, I trimmed the bottom pedal mount to a better size. It had previously been the full height of the pedal, but the angle is different in the mini and it didn't really fit. However, trimming the top meant I only have one screw hole now. To make up for that, I next built a little shoe to hold the front of it in place. Tomorrow morning, I'll weld these two brackets to the car, as well as welding a screw into the floor to anchor the pedal base. Once this pedal is in place, I can make the clutch/brake pedal bracket. This will most likely be a pair of rails connecting the firewall to the lower dash rail. Finally, I'll build the steering shafts around these.
Attached Files
#12

Posted 26 December 2024 - 06:07 PM
So I got the clutch and brake pedals installed, but it was a much longer process than I anticipated. Since I had no reference points, it was tricky to get it mounted. What I ended up doing was making some temporary brackets that are approximately the right size and shape. I used these to then make mounting tabs on the firewall and the lower dash rail, then made permanent rails to connect those. I used heavier gauge steel and welded vertical pieces to strengthen it, so the permanent brackets are now rock solid.
Attached Files
1 user(s) are reading this topic
0 members, 1 guests, 0 anonymous users


