Hello to all,
My name is Patrick, still living in the Netherlands and since decemer 2005 I own a 1971 Mini 850. Some months ago the shell became rustfree and I started measuring everything out to get the frame in. The frame is measured out perfectly and bolted into the Mini.
In the following posts I will add some pictures and comment.
Hope you will enjoy it.


Dutch HayaMini project
Started by
Poly_Patje
, Dec 07 2006 11:22 PM
56 replies to this topic
#2

Poly_Patje
-
- Noobies
-

- 82 posts
Stage One Kit Fitted
Posted 07 December 2006 - 11:55 PM
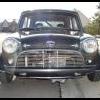
December 2005:
I saved her from going to the junkyard. Everything was original and rusted....
 DSC02094_SCALED.JPG 66.11K
26 downloads
DSC02106_SCALED.JPG 67.7K
20 downloads
DSC02094_SCALED.JPG 66.11K
26 downloads
DSC02106_SCALED.JPG 67.7K
20 downloads
Januar 2006:
After a battle of at least 2 days (all bolts and nuts were very rusted) the complete front subframe came out.
DSC021061_HPIM0593_SCALED.JPG 73.01K
80 downloads
Februar 2006:
Rented a large van, went to Gent (Belgium) to visit Chris at a local old-timer exhibition to pick up the ZCars frame and all extra parts. Chris, if you read this topic, thanks for taking it with you to Belgium.
DSC02238_SCALED.JPG 78.32K
28 downloads
March 2006:
Started cutting everything out that is not needed anymore to get rid of lots of rust.
DSC02234_SCALED.JPG 67.18K
14 downloads
Between April 2006 and July 2006:
I welded some frames to take it to a higher level. Uhm ok, the Mini went up to about 65cm from the ground so I have enough space underneath it.
DSC02377_scaled.JPG 111.14K
22 downloads
August 2006:
Started with cutting out the complete front floor and to get new floor pans in. Also the crossmember, hinge panels (both sides) and innerwings (both sides) had to be grinded out because it was too rusted.
DSC02380_scaled.JPG 143.27K
23 downloads
IMAGE_00013_SCALED.jpg 75.03K
20 downloads
Between September 2006 and begin November 2006:
The new hinge panels, innerwings, complete front floor and crossmember are welded in. Also the valance is cut out and replaced with new fresh metal. Last week I could not sort out my mind and now I am designing a frame (squared tubes) that will replace the crossmember. Begin November 2006 I cut out one of the last rusted pieces of floor and welded new sheetmetal in its place.
DSC02525_SCALED.JPG 71.25K
23 downloads
DSC02534_SCALED.JPG 62.83K
47 downloads
DSC02546_SCALED.JPG 72.15K
62 downloads
Mid November 2006:
I received a messages from my Mini parts supplier that they had something from me and it would cost me all my savings, but it is worth every GBP.
DSC02558_SCALED.JPG 59.14K
37 downloads
December 2006:
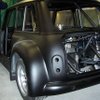
Finally I made up my mind and I will go for 15" wheels. The ZCars frame is put in and I removed the doorskins to reveal the inside of the 35 year old doors. When I took it off a voice in head kept telling me that it was better to get rid of these doors and get the fiberglass doors. But I want to keep these doors and will fix them up. They will come out nice when the doors are finished.
DSC02619_SCALED.JPG 85.63K
103 downloads
DSC02613_SCALED.JPG 64.39K
84 downloads
Next pictures are about test fitting the 15" wheels to see it clears all parts. I need a set of adapter of 30mm thick and must also change the bolt pattern from 4x4" to 4x100. Last weekend I have done this with AutoCad, next weekend I will get a set of 16 studbolts (M12) and then I can mill them.
DSC02624_SCALED.JPG 57.38K
27 downloads
DSC02637_SCALED.JPG 65.36K
114 downloads
I saved her from going to the junkyard. Everything was original and rusted....
DSC02094_SCALED.JPG 66.11K
26 downloads
DSC02106_SCALED.JPG 67.7K
20 downloadsJanuar 2006:
After a battle of at least 2 days (all bolts and nuts were very rusted) the complete front subframe came out.
DSC021061_HPIM0593_SCALED.JPG 73.01K
80 downloadsFebruar 2006:
Rented a large van, went to Gent (Belgium) to visit Chris at a local old-timer exhibition to pick up the ZCars frame and all extra parts. Chris, if you read this topic, thanks for taking it with you to Belgium.
DSC02238_SCALED.JPG 78.32K
28 downloadsMarch 2006:
Started cutting everything out that is not needed anymore to get rid of lots of rust.
DSC02234_SCALED.JPG 67.18K
14 downloadsBetween April 2006 and July 2006:
I welded some frames to take it to a higher level. Uhm ok, the Mini went up to about 65cm from the ground so I have enough space underneath it.
DSC02377_scaled.JPG 111.14K
22 downloadsAugust 2006:
Started with cutting out the complete front floor and to get new floor pans in. Also the crossmember, hinge panels (both sides) and innerwings (both sides) had to be grinded out because it was too rusted.
DSC02380_scaled.JPG 143.27K
23 downloads
IMAGE_00013_SCALED.jpg 75.03K
20 downloadsBetween September 2006 and begin November 2006:
The new hinge panels, innerwings, complete front floor and crossmember are welded in. Also the valance is cut out and replaced with new fresh metal. Last week I could not sort out my mind and now I am designing a frame (squared tubes) that will replace the crossmember. Begin November 2006 I cut out one of the last rusted pieces of floor and welded new sheetmetal in its place.
DSC02525_SCALED.JPG 71.25K
23 downloads
DSC02534_SCALED.JPG 62.83K
47 downloads
DSC02546_SCALED.JPG 72.15K
62 downloadsMid November 2006:
I received a messages from my Mini parts supplier that they had something from me and it would cost me all my savings, but it is worth every GBP.
DSC02558_SCALED.JPG 59.14K
37 downloadsDecember 2006:
Finally I made up my mind and I will go for 15" wheels. The ZCars frame is put in and I removed the doorskins to reveal the inside of the 35 year old doors. When I took it off a voice in head kept telling me that it was better to get rid of these doors and get the fiberglass doors. But I want to keep these doors and will fix them up. They will come out nice when the doors are finished.
DSC02619_SCALED.JPG 85.63K
103 downloads
DSC02613_SCALED.JPG 64.39K
84 downloadsNext pictures are about test fitting the 15" wheels to see it clears all parts. I need a set of adapter of 30mm thick and must also change the bolt pattern from 4x4" to 4x100. Last weekend I have done this with AutoCad, next weekend I will get a set of 16 studbolts (M12) and then I can mill them.
DSC02624_SCALED.JPG 57.38K
27 downloads
DSC02637_SCALED.JPG 65.36K
114 downloads
Edited by Poly_Patje, 09 December 2006 - 02:33 PM.
#3
Ade
-

- Members
-
- 2,357 posts
the bogie man
Posted 08 December 2006 - 12:06 AM
Well done for taking the plunge Patrick!!
Great job on getting rid of the rust!! Looks like there was plenty of it to keep you busy!!
Looks like your certainly going about it in the right way! Plenty of space is always a huge help!
Ade
Great job on getting rid of the rust!! Looks like there was plenty of it to keep you busy!!
Looks like your certainly going about it in the right way! Plenty of space is always a huge help!
Ade
#4
jaapio1984
-

- Noobies
-
- 58 posts
Stage One Kit Fitted
- Local Club: MSCN
Posted 28 December 2006 - 05:14 PM
heey patrick..
Second one in holland.. rennesy from minisevenclub nederland is also working on one..
Maybe u can get intouch with eachother..
Project looks great
Jaapio
Second one in holland.. rennesy from minisevenclub nederland is also working on one..
Maybe u can get intouch with eachother..
Project looks great
Jaapio
#5
Poly_Patje
-
- Noobies
-
- 82 posts
Stage One Kit Fitted
Posted 30 December 2006 - 01:07 PM
Hey Jaapio,
We do have contact by mail and msn. Second one? I think I'm the first one in Holland, cause it already started Januar this year and got the kit in Februar. Rennesy started in October this year (10 months later).
At the moment it looks like I will finish the build before Rennesy does (I hope so). Next month I will work on the wheel adaptors to change the bolt pattern to 4x100. When this is done, the mini can stand on its new wheels again. After this I can continu with the metal arches, carbonfiber parts for the inside including a carbon fiber bulkhead to reduce weight.
Hope to continu soon again so I can post updates. It looks like many users of this forum are not interested in my project, except Ade and you. Ok, I contacted Ade somewhere around May this year with some questions about his alloy floor with his Minus.
Thanks for you interest,
Patrick
#6
Renessy
-

- Members
-
- 306 posts
Speeding Along Now
- Local Club: minisevenclub Holland
Posted 30 December 2006 - 03:24 PM
I do follow your project too!
I'm the third one in Holland to be exact. There are two brothers who are building a Z-cars mini to. They make good progress. Kit is in and body is finished by now I think. I'm the first with a VTEC conversion......
Interest from others on this forum is sometimes slim indeed. Not many repley's on my topic either...... lots of people wacth it though.
But what do you want then? 100.000 'keep up the good work' or 'Looking good/great' ??? Most of them are here to assist in problem solving..... Then these guys are handy!
Keep it friendly, I want to come to a Zcars meet someday!
Still, Pat you're doing good! Looking forward to your updates.
René
Edited by Renessy, 30 December 2006 - 05:22 PM.
#7
Willie
-
- Noobies
-
- 66 posts
Stage One Kit Fitted
- Location: south of detroit
Posted 30 December 2006 - 11:40 PM
Patrick....Nicely done...I'm over in the States doing a busa Zcars build myself....Stage 2, ITS 54mm turbo job..........Can you please tell me what is that a pic of in ( 59.14k ) ?????
Thanks...................Willieeeeeeeeeeeeeeeeeeeeeeeeeeeeeeeeeeeeeeeeeeeeeeeeee
eeeeeeeeeeee..........
Thanks...................Willieeeeeeeeeeeeeeeeeeeeeeeeeeeeeeeeeeeeeeeeeeeeeeeeee
eeeeeeeeeeee..........
#8
ed4ran
-

- TMF+ Member
-
- 2,849 posts
Cadwell Event organiser
- Location: Stoke On Trent
Posted 31 December 2006 - 12:59 AM
Looks like a dry sump setup to me.
#9
jaapio1984
-
- Noobies
-
- 58 posts
Stage One Kit Fitted
- Local Club: MSCN
Posted 31 December 2006 - 03:47 AM
sorry pat, got confused with hayabusa and VTEC... I hope.. when i finshed school, i can save money to get my own..
Good luck both of you..
Regards,
Jaapio
Good luck both of you..
Regards,
Jaapio
#10
Poly_Patje
-
- Noobies
-
- 82 posts
Stage One Kit Fitted
Posted 31 December 2006 - 02:05 PM
Patrick....Nicely done...I'm over in the States doing a busa Zcars build myself....Stage 2, ITS 54mm turbo job..........Can you please tell me what is that a pic of in ( 59.14k ) ?????
Thanks...................Willieeeeeeeeeeeeeeeeeeeeeeeeeeeeeeeeeeeeeeeeeeeeeeeeee
eeeeeeeeeeee..........
Hey Willie, that is the dry sump kit from TTS Performance (located in GB) with a high oil pressure pump and a high flow electric waterpump. It is a good designed kit and I hope to save my egine from any kind of oil surge when cornering. It is used on many dragbikes and saved lots of these engines from oil surge. It is an expensive kit, but it is worth every penny.
Here is the link to the actual TTS Performance Dry Sump system. It cost a total of 2300 euros. The total price went up because of the large special oil tank which is designed for racing.
#11
Willie
-
- Noobies
-
- 66 posts
Stage One Kit Fitted
- Location: south of detroit
Posted 31 December 2006 - 08:57 PM
I'm thinking of running an " Accusump " oil accumulator 2 or 3 quart....This will prime the lump so you don't have dry starts as well as keeping it lubed in the turns..You can get this for under $ 300.00 US ...But don't get me wrong Dry sump is another way of getting r done....A bit pricy though....
Willieeeeeeeeeeeeeeeeeeeeeeeeeeeeeeeeeeeeeeeeeeeeeeeeeeeeeeeeeeeee..............
.........
Willieeeeeeeeeeeeeeeeeeeeeeeeeeeeeeeeeeeeeeeeeeeeeeeeeeeeeeeeeeeee..............
.........
#12
Bungle
-

- Members
-
- 28,971 posts
Original Spamster
- Location: Cornwall
- Local Club: cornish mini club
Posted 31 December 2006 - 11:19 PM
have you been eating your oleabulla and apple strudles tonight ?
#13
Monte Busa
-
- Noobies
-
- 681 posts
Super Mini Mad
- Location: Michigan, USA
Posted 01 January 2007 - 12:55 AM
Hi Willie,
You might want to consider adding a pan baffle to prevent aeration and to keep the oil in the pan where it is supposed to be - even if you use an accusump...try www.downsengineering.com, which is where I got mine from.
I recommend also their increased pressure oil pressure regulator and overdrive oil pump gear - gotta keep the pressure up, and according to Mike Downs (who builds Busas for race cars for a living), other than stock rods bending (which you have addressed with your Carillos), the most common failure is oil starvation on Busas in cars.....so any added insurance is good in my book.
You might want to call Mike up to chat before you buy the accusump too - he talked me out of getting one as the Busa motor even with the oiling mods does not have enough excess capacity to fill an accusump, especially one as big as you're talking about. He does sell an increased capacity oil pump though.......707-938-1011
Cheers,
Aric
I'm thinking of running an " Accusump " oil accumulator 2 or 3 quart....This will prime the lump so you don't have dry starts as well as keeping it lubed in the turns..You can get this for under $ 300.00 US ...But don't get me wrong Dry sump is another way of getting r done....A bit pricy though....
Willieeeeeeeeeeeeeeeeeeeeeeeeeeeeeeeeeeeeeeeeeeeeeeeeeeeeeeeeeeeee..............
.........
Edited by Monte Busa, 01 January 2007 - 01:22 AM.
#14
Poly_Patje
-
- Noobies
-
- 82 posts
Stage One Kit Fitted
Posted 22 March 2007 - 08:05 PM
Ok, made some progress. Welded the bars for over the floorpan.
Instead of putting her on a diet, I added a total weight of 16 kg.
IMG_0963.jpg 72.62K
75 downloads
IMG_0969.jpg 51.48K
51 downloads
IMG_0979.jpg 73.48K
61 downloads
IMG_0971.jpg 75.25K
73 downloads
Hopefully I will make lots of progress in April, but welding this frame in, get the complete ZCars in and putting the front wheelhubs together to get the Mini on 'her' wheels again.
Instead of putting her on a diet, I added a total weight of 16 kg.
IMG_0963.jpg 72.62K
75 downloads
IMG_0969.jpg 51.48K
51 downloads
IMG_0979.jpg 73.48K
61 downloads
IMG_0971.jpg 75.25K
73 downloadsHopefully I will make lots of progress in April, but welding this frame in, get the complete ZCars in and putting the front wheelhubs together to get the Mini on 'her' wheels again.
Edited by Poly_Patje, 22 March 2007 - 08:40 PM.
#15
Poly_Patje
-
- Noobies
-
- 82 posts
Stage One Kit Fitted
Posted 06 May 2007 - 09:21 PM
Ok, the past months I sorted some things out and started welding the frame that goes ontop of the floor instead of the original crossmember.
Here are some pictures.
IMG_1183.jpg 233.6K
85 downloads
IMG_1215.jpg 279.8K
40 downloads
IMG_1228.jpg 239.89K
70 downloads
Now this is done, the frame and rollcage bars can be put back in. After this is done, I can start welding a small frame to bolt onto the rear vallance to make feel more solid. When this is alligned I can finally start with the new steel wheelarches, putting the doorskins back on the doorframes and into the shell. I hope to have all of this finished within a couple weeks but I'm afraid that is 2 months will pass before it is finished.
Ok, a bonus photo...
IMG_1112.jpg 254.45K
136 downloads
Some (positive) input and/or advise would be nice
Here are some pictures.
IMG_1183.jpg 233.6K
85 downloads
IMG_1215.jpg 279.8K
40 downloads
IMG_1228.jpg 239.89K
70 downloadsNow this is done, the frame and rollcage bars can be put back in. After this is done, I can start welding a small frame to bolt onto the rear vallance to make feel more solid. When this is alligned I can finally start with the new steel wheelarches, putting the doorskins back on the doorframes and into the shell. I hope to have all of this finished within a couple weeks but I'm afraid that is 2 months will pass before it is finished.
Ok, a bonus photo...
IMG_1112.jpg 254.45K
136 downloadsSome (positive) input and/or advise would be nice


1 user(s) are reading this topic
0 members, 1 guests, 0 anonymous users


