Jump to content


Photo
- - - - -

1984 Mayfair rebuild


  • Please log in to reply
135 replies to this topic

#16 mad4mins

mad4mins

    One Carb Or Two?

  • Members
  • PipPipPipPipPipPipPip
  • 1,396 posts
  • Location: Andover
  • Local Club: WAMO!

Posted 15 January 2007 - 01:57 PM

is that a caravan connector for the headlights?/ :bah: thats crazy lol.. not seen that before!! :D

#17 gavfoz

gavfoz

    Speeding Along Now

  • Members
  • PipPipPipPipPip
  • 362 posts

Posted 15 January 2007 - 06:30 PM

Yup it certainly is! Thinking outside the box my son! (perhaps?). I don't know if its a comon thing to do but I guess if you had a flip front you wouldn't need to split the wires. Because mine has a removable front, the wires for the headlamps, indicators and the couple of earths that come from them need to have a split in them. A tow-hitch style plug on the bulkhead (away from all the poo) looked like the best option. You can only disconnect 7 wires like this but if you wanted more electric powered stuff mounted on your front (say spot lamps or maybe even the horn) you could use a military hook-up because they use a 12 pin system instead of the civvy 7 pin.

If anyone wants a military 12 pin jobby just let me know and I can point you in the right direction!

Cheers
Gav

Edited by gavfoz, 15 January 2007 - 06:31 PM.


#18 gavfoz

gavfoz

    Speeding Along Now

  • Members
  • PipPipPipPipPip
  • 362 posts

Posted 21 January 2007 - 03:49 PM

Took a rest from the major works required and started restoring a set of Dunlop D1s I bought. So far all have had a bath of paint stripper and a quick scrub up. This one I have run started to polish the rim and spokes up by running around them with harsh and then fine wire-wool. Just finished painting the inserts now.

Posted Image

Gav

#19 gavfoz

gavfoz

    Speeding Along Now

  • Members
  • PipPipPipPipPip
  • 362 posts

Posted 08 February 2007 - 10:00 AM

Since last update I have:
Finished one of the D1s
Posted Image
Decided to use Ford Burgundy for the lower half of the car (seen here on right, colour on left is Clove Brown). These are the colours straight out the can by the way! :wub: 
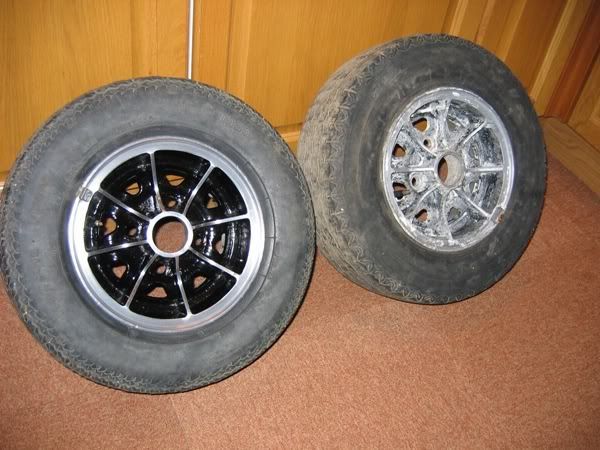
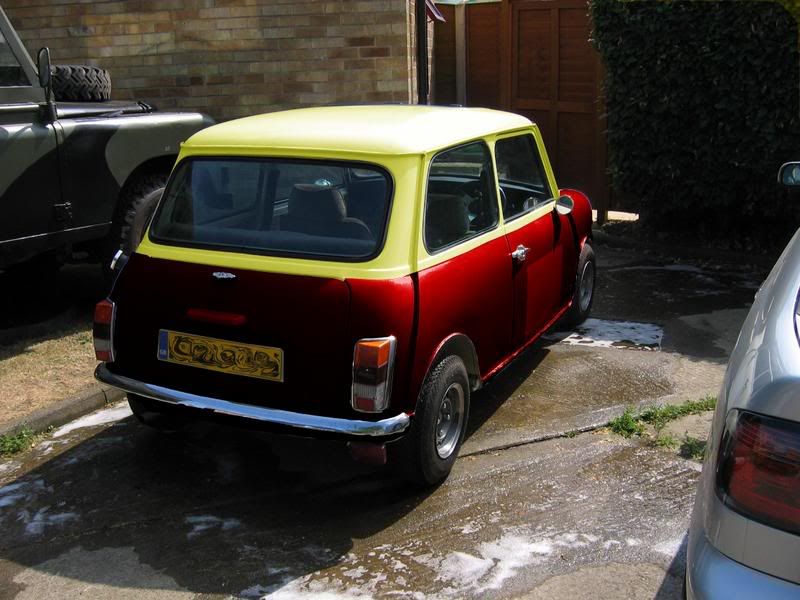
And it looks darker and not pink. It’s going to look like one of those rhubarb and custard sweets alright!
Posted Image
I decided to take a week off work to get a fair bit done.

So far I have fitted the driver’s a-panel, refitted the boot lid and looked to start fitting the flip front but I needed a bigger drill bit so put it on hold, stripped the rear driver’s corner and basically struggled with the cold. At the rear corner I have fitted an adjustable camber bracket (what a pig of a job) and tried to fit my Hi-Los but couldn't get the rubber cone off the :( 
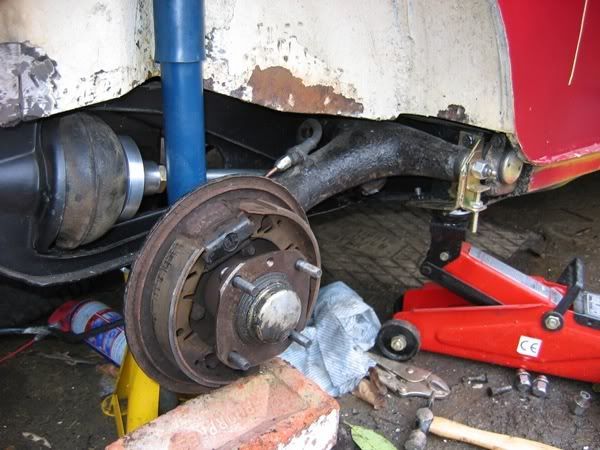
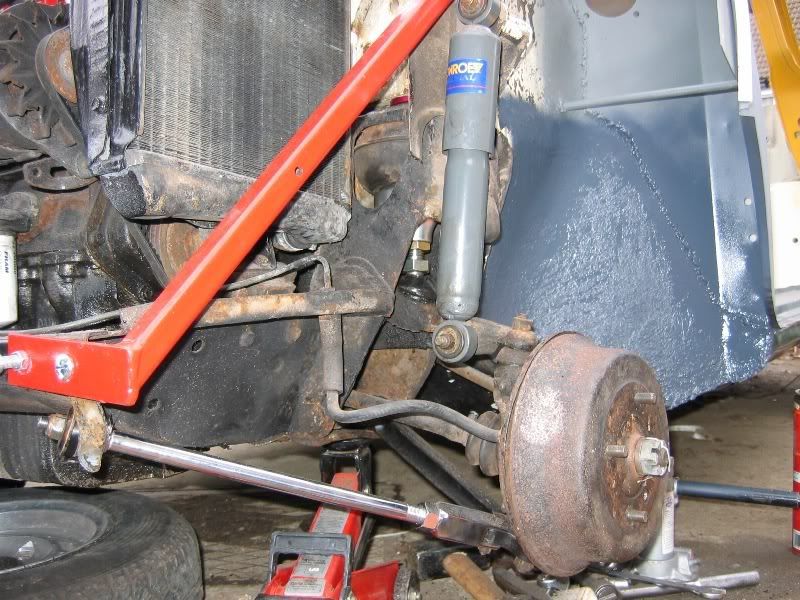
trumpet. I replaced the wheel studs on that side as well. Took allot of my aggression that did :crazy: !

Now it’s snowing, 80mm so far and it’s still rising. I refuse to work in the snow so the Mini will have to wait for better weather!
Posted Image

Gav

#20 gavfoz

gavfoz

    Speeding Along Now

  • Members
  • PipPipPipPipPip
  • 362 posts

Posted 11 February 2007 - 05:30 PM

Gave up on freeing the old cones off and used a secondhand set I had. Next problem I had was the nylon cup in the radius arm needed pulling out so I could fit my new knuckle joints. Long nosed pliers, chisel, warm screwdriver, WD40 and plus gas didn't work. Eventually I just put the gas torch on it and burned/melted it out. It worked a dream.

I tried to patch up the boot floor/wheel arch join near the subframe mount but my welder kept tripping out the house electrics and after being threatened by a female clasping a luke-warm iron I had to give up!

Posted Image

All I need is another week off work and I will be significantly approaching completion!

Fibreglass front to fit, 3 more corners to finish mechanically, 3 more bits of welding and then a splash of paint!

Gav

#21 gavfoz

gavfoz

    Speeding Along Now

  • Members
  • PipPipPipPipPip
  • 362 posts

Posted 18 February 2007 - 10:20 PM

Yesterday:
Posted Image
Hi-Lo, adjustable camber bracket and knuckles fitted in 90min. The other side took all wkend!
Today:
Posted Image
-1.5degree bottom arm, adjustable tie bar, Hi-Lo and new knuckles. Also stone chipped the lower half of the new flitch.

During the week I have been learning to use Photoshop Elements as I need to start using it more when at work.
Posted Image
Hopefully the finished Mini will look something along these lines colour wise.

Gav

#22 mad4mins

mad4mins

    One Carb Or Two?

  • Members
  • PipPipPipPipPipPipPip
  • 1,396 posts
  • Location: Andover
  • Local Club: WAMO!

Posted 19 February 2007 - 11:34 AM

still loving that paint scheme.. .mmm strawberries and cream.. .haha ..lol.. i hope your going to upgrade to disc on the front!! :(..lol keep up the good work

#23 TimS

TimS

    Mini Doctor

  • Members
  • PipPipPipPipPipPipPipPipPip
  • 2,712 posts
  • Local Club: TMF

Posted 19 February 2007 - 01:57 PM

I also used the Caravan 7 point plug and have had no problems after 3 years of running. Its very very usefull when you have a removable front.

#24 gavfoz

gavfoz

    Speeding Along Now

  • Members
  • PipPipPipPipPip
  • 362 posts

Posted 20 February 2007 - 06:06 PM

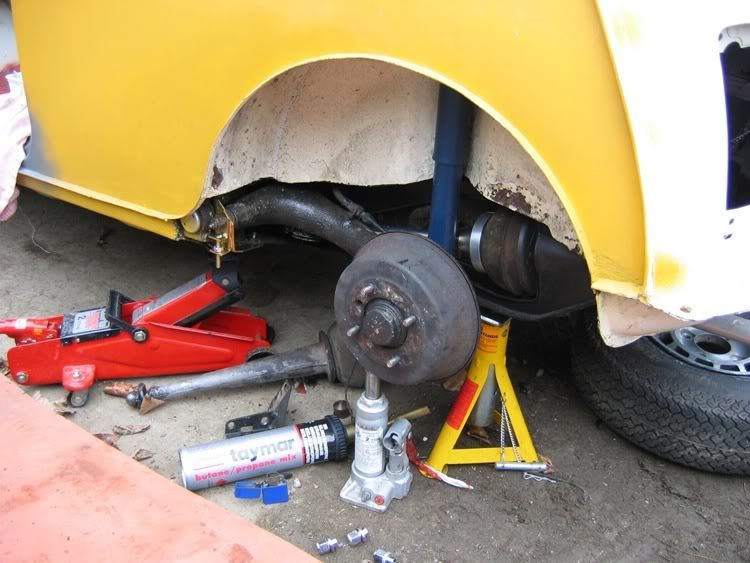
I hope your going to upgrade to disc on the front!! :P..


That will come in phase 2 my man. When the engine work is done the brakes will get a boost. To start with it will be all show and no go. Eventually it will be all show and lots of go!

Gav

#25 gavfoz

gavfoz

    Speeding Along Now

  • Members
  • PipPipPipPipPip
  • 362 posts

Posted 25 March 2007 - 04:18 PM

Another month has past and seemingly little has been done. Just to prove I still have the car here is a current pic:
Posted Image

It now has Hi-los and new knuckles all round. Front has negative camber bottom arms and adjustable tie-bars. The rear looks a little low in that photo.

I have finished renovating my Dunlop D1s:
Posted Image
just need to wire wool two of the rims when the paint has dried.

Have decided to go for Mk1 lights out back but due to the age of the shell I will have to run a reverse and fog light on the rear valance somewhere. Thinking of using some small round clear-lensed lamps for each. Have also decided the flip front will need a bumper and at least the rear needs a set of overiders.

I am away next weekend in my Land Rover, providing transport for the rebels at an Airsoft event, which is always a laugh. Hopefully the week after I am going to strip everything out of the Mini back into the Landy and paint the Mini's interior.

Got so many ideas about the engine I don't know what I shall do. To get serious poke out of the 998 you need to spend a fair amount of pound notes, more or less the same amount as building a 1293 to the same bhp output level. But then the 1293 will always have potential to produce more. Decisions decisions. . .

Gav

#26 gavfoz

gavfoz

    Speeding Along Now

  • Members
  • PipPipPipPipPip
  • 362 posts

Posted 06 April 2007 - 08:43 PM

Quick update:

Posted Image
Old valance cut off, area preped for rear lamp adaptor plates, new valance awaiting clamping in position and tacing

Posted Image
Not too rusty considering. . . What are all those holes in the parcel shelf for???

Posted Image
first adaptor plate in. Can you tell I have not used the welder for the last few weeks ^_^

Posted Image
Today I blended the adaptor plates in with a rake of filler and couldn't help but try the new lights in their new home. More to come this weekend no doubt. . .

Gav

Edited by gavfoz, 06 April 2007 - 08:44 PM.


#27 gavfoz

gavfoz

    Speeding Along Now

  • Members
  • PipPipPipPipPip
  • 362 posts

Posted 07 April 2007 - 05:59 PM

Today I spent the whole day sanding the filler, adding filler, sanding filler, filing filler, adding more filler, sanding filler and then finally primering the filler so I have now got a Mk1 back side!
Posted Image ^_^
Posted Image :D
Also primered the new rear valance. It suddenly doesn't look a million miles away from completion.

May weld the boot floor and rear arches up tommorrow, Oh the excitment! ;)

Gav

Edited by gavfoz, 07 April 2007 - 08:00 PM.


#28 CanadianMiniFan

CanadianMiniFan

    Camshaft & Stage Two Head

  • Members
  • PipPipPipPipPipPipPipPip
  • 1,591 posts

Posted 07 April 2007 - 10:18 PM

that's if you can find the boot floor...lol but really looking good. Lots of filling needed for the back...you must do the boot too, as it looks funny with a mk3-on boot...

#29 gavfoz

gavfoz

    Speeding Along Now

  • Members
  • PipPipPipPipPip
  • 362 posts

Posted 08 April 2007 - 07:37 PM

I was thinking along the lines of either:
Posted Image
or
Posted Image
Don't Mk1 lights make the Mini look chubby. . . With new paint I will have to get some new chrome. Overiders and chrome hinges would look nice I think. . .

Prefer the first mock up to be honest. I got an Abingdon Special Tuning Rosette and Leyland ST stickers to put on as well if the final paint looks to be missing something.

Well today I painted the fuel tank and decided the drivers side rear corner needed a bit more sanding. It looked good but didn't feel right. Much happier now though. Went to start welding the boot up but found more rust than expected. On the drivers side the boot floor has rusted away from the inner wing so they need reuniting. I didn't relise the boot floor, in the spare wheel well was quite so bad. After a good wire brushing you could see the ground below through pin-prick holes. At this stage it is a bit of a blow to find another piece which needs replacing but hey hum, it needs doing. Just ordered a boot floor repair panel from Mini Spares. . . I hope I don't have to take the new rear valance off though :(

So as to not waste a day I decided to paint the interior. I have gone for "Hammered Black". I wanted to paint it a neutral colour and then have it sprayed up to match the outside when funds allowed. I was going to paint it white but decided it was too bright (after paint a bit of the floor as you can see). Now the black is in I think it looks quite good. I have painted the rear shelf, rear seat and door bins, b-pillar and seat crossmember. This took ages
Posted Image
Really must find myself a drivers door. . .

I think I will prepare and primer the rear quarters tommorrow, then the rear windows can go back in. . .

Gav

#30 Tomm

Tomm

    Up Into Fourth

  • Members
  • PipPipPipPipPipPipPipPipPip
  • 2,462 posts
  • Location: Rochester, Kent

Posted 08 April 2007 - 09:39 PM

Looks great, nice to see you havent lost intrest. can i ask how you are applying the paint?

the ford burgandy on the rear section looked VERY well done!


1 user(s) are reading this topic

0 members, 1 guests, 0 anonymous users